background image

Chapter 4: System Safety

4-1

Chapter 4 

System Safety

4-1  Electrical Safety Precautions

!

Basic electrical safety precautions shall be followed to protect yourself from harm 

and the server from damage:

Be aware of the locations of the power on/off switch on the chassis as well 

• 

as the room's emergency power-off switch, disconnection switch or electrical 

outlet. If an electrical accident occurs, you can then quickly remove power from 

the system. 

Do not work alone when working with high voltage components.

• 

Power should always be disconnected from the system when removing or in-

• 

stalling main system components, such as the serverboard, memory modules 

and fl oppy drive. When disconnecting power, you should fi rst power down the 

system with the operating system fi rst and then unplug the power cords of all 

the power supply units in the system. 

When working around exposed electrical circuits, another person who is familiar 

• 

with the power-off controls should be nearby to switch off the power if neces-

sary. 

Use only one hand when working with powered-on electrical equipment. This 

• 

is to avoid making a complete circuit, which will cause electrical shock. Use 

extreme caution when using metal tools, which can easily damage any electrical 

components or circuit boards they come into contact with.  

Do not use mats designed to decrease static electrical discharge as protection 

• 

from electrical shock. Instead, use rubber mats that have been specifi cally 

designed as electrical insulators. 

The power supply power cords must include a grounding plug and must be 

• 

plugged into grounded electrical outlets.

Note: power should always be disconnected before perform-

ing any service on the system.

Summary of Contents for SUPERSERVER 6016GT-TF

Page 1: ...SUPER SUPERSERVER 6016XT TF SUPERSERVER 6016GT TF SUPERSERVER 6016GT TF TM2 SUPERSERVER 6016GT TF TC2 USER S MANUAL Revision 1 0...

Page 2: ...r the resolution of any such disputes Super Micro s total liability for all claims will not exceed the price paid for the hardware product FCC Statement This equipment has been tested and found to com...

Page 3: ...he server system and describes the main features of the Super X8DTG DF serverboard and the SC818GTQ 1400B chassis Chapter 2 Server Installation This chapter describes the steps necessary to install th...

Page 4: ...d Chapter 6 Advanced Chassis Setup Refer to Chapter 6 for detailed information on the SC818GTQ 1400B 1U rackmount server chassis You should follow the procedures given in this chapter when install ing...

Page 5: ...v Preface Notes...

Page 6: ...Overview 2 1 2 2 Unpacking the System 2 1 2 3 Preparing for Setup 2 1 Choosing a Setup Location 2 1 Rack Precautions 2 2 Server Precautions 2 2 Rack Mounting Considerations 2 3 Ambient Operating Temp...

Page 7: ...ions 4 2 4 3 ESD Precautions 4 3 4 4 Operating Precautions 4 4 Chapter 5 Advanced Serverboard Setup 5 1 Handling the Serverboard 5 1 Precautions 5 1 Unpacking 5 2 5 2 Serverboard Installation 5 2 5 3...

Page 8: ...llation 6 7 6 5 Installing the Air Shroud 6 8 Checking the Air Flow 6 8 6 6 Power Supply 6 9 Power Supply Failure 6 9 Chapter 7 BIOS 7 1 Introduction 7 1 Starting BIOS Setup Utility 7 1 How To Change...

Page 9: ...Two passive CPU heatsinks SNK P0037P Riser Cards 6016XT TF One RSC R1UG 2E8 for two PCI Express x8 cards left side One RSC R1UG 2E8R for two PCI Express x8 cards right side One RSC R1U E16R for PCI E...

Page 10: ...or details Serial ATA A SATA controller is integrated into the South Bridge ICHR10 section of the chipset to provide a six port 3 Gbs SATA subsystem which is RAID 0 1 5 and 10 sup ported The SATA driv...

Page 11: ...he power supply See Chapter 6 for details SATA Subsystem The SC818GTQ 1400B chassis includes three 3 5 drive bays which may be used to house hot swappable SATA drives RAID 0 1 5 and 10 are supported R...

Page 12: ...ications Server Model GPU Subsystem 6016XT TF Riser cards included for PCI expansion see note below 6016GT TF 2x Gen 2 0 PCI E x16 slots for double width GPUs GPUs not included 6016GT TF TM2 2x Nvidia...

Page 13: ...3 DIMM 2 2 2 DDR3 DIMM C C A A B B D D E E F F Intel 5520 IOH36D Link1 ICH10R ESI PE 4 1 PE 5 Winbond BMC VGA VGA CONN DDR II PCI SATA 1 SATA 2 SATA 3 SATA 4 SATA LPC SPI SST25 VF016 CLINK CLINK DMI A...

Page 14: ...com Europe Address Super Micro Computer B V Het Sterrenbeeld 28 5215 ML s Hertogenbosch The Netherlands Tel 31 0 73 6400390 Fax 31 0 73 6416525 Email sales supermicro nl General Information support s...

Page 15: ...ver It should be situated in a clean dust free area that is well ventilated Avoid areas where heat electrical noise and electromagnetic fields are generated You will also need it placed near a grounde...

Page 16: ...e rack is stable before extending a component from the rack You should extend only one component at a time extending two or more si multaneously may cause the rack to become unstable Rack mounted equi...

Page 17: ...hat the amount of airflow required for safe operation is not compromised Mechanical Loading Equipment should be mounted into a rack so that a hazardous condition does not arise due to uneven mechanica...

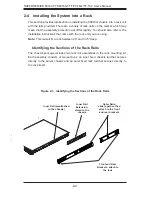
Page 18: ...using Note This rail will fit a rack between 26 and 33 5 deep Identifying the Sections of the Rack Rails The chassis package includes two rack rail assemblies in the rack mounting kit Each assembly c...

Page 19: ...a server rack Attaching the inner rail extensions to to the inner rails stabilizes the chassis within the rack Installing the Inner Rail Extensions Place the inner rail extensions B over the preattac...

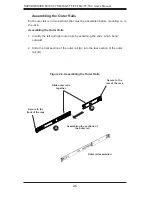
Page 20: ...efore mounting on to the rack Assembling the Outer Rails Identify the left and right outer rails by examining the ends which bend 1 outward Slide the front section of the outer rail A into the rear se...

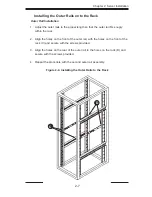
Page 21: ...the proper length so that the outer rail fits snugly 1 within the rack Align the holes on the front of the outer rail with the holes on the front of the 2 rack C and secure with the screws provided Al...

Page 22: ...that the outer rails are installed on the rack Line chassis rails with the front of the rack rails 2 Slide the chassis rails into the rack rails keeping the pressure even on both 3 sides you may have...

Page 23: ...ine how far follow the server will extend out the front of the rack Larger chassis should be positioned to balance the weight between front and back If a bezel is included on your server remove it The...

Page 24: ...ver Figure 2 7 Remove the three screws securing the top cover to the chassis 1 Press both of the release tabs at the same time to release the cover 2 Slide the cover toward the rear of the chassis 3 L...

Page 25: ...onnections Also check the air seals for damage The air seals are located under the blower fan and beneath the frame cross section that separates the drive bay area from the serverboard area of the cha...

Page 26: ...provide input power to the system Plug the 1 power cord from the power supply unit into a high quality power strip that of fers protection from electrical noise and power surges It is recommended that...

Page 27: ...s others on the drive car riers to keep you constantly informed of the overall status of the system as well as the activity and health of specific components There are also two buttons on the chassis...

Page 28: ...th critical information related to different parts of the system This section explains what each LED indicates when illuminated and any corrective action you may need to take Universal Information LED...

Page 29: ...apter 6 for instructions on replacing failed SATA drives Red The red LED to indicate an SATA drive failure If one of the SATA drives fail you should be notified by your system management software Plea...

Page 30: ...3 4 SUPERSERVER 6016XT TF 6016GT TF TF TM2 TF TC2 User s Manual Notes...

Page 31: ...operating system first and then unplug the power cords of all the power supply units in the system When working around exposed electrical circuits another person who is familiar with the power off co...

Page 32: ...ng fan This product may be connected to an IT power system In all cases make sure that the unit is also reliably connected to Earth ground Serverboard Battery CAUTION There is a danger of explosion if...

Page 33: ...PCBs come into contact with your clothing which may retain a charge even if you are wearing a wrist strap Handle a board by its edges only do not touch its components peripheral chips memory modules o...

Page 34: ...taken to assure that the chassis cover is in place when the system is operating to ensure proper cooling Out of warranty damage to the system can occur if this practice is not strictly followed Figur...

Page 35: ...to handle them very carefully see previous chapter To prevent the serverboard from bending keep one hand under the center of the board to support it when handling The following measures are generally...

Page 36: ...f 1 the top cover of the chassis then pull the cover off Make sure that the I O ports on the serverboard align properly with their 2 respective holes in the I O shield at the back of the chassis Caref...

Page 37: ...ve data cable SATA1 3 SGPIO cable T SGPIO 0 Control Panel cable JF1 GPU power cables JPW2 JPW3 6016GT series only Important Make sure the the cables do not come into contact with the fans Connecting P...

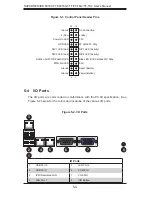
Page 38: ...n conformance with the PC 99 specification See Figure 5 2 below for the colors and locations of the various I O ports Figure 5 1 Control Panel Header Pins Figure 5 2 I O Ports No Connection x Key 3 3V...

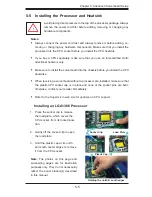
Page 39: ...chassis before you install the CPU heatsinks When receiving a serverboard without a processor pre installed make sure that the plastic CPU socket cap is in place and none of the socket pins are bent o...

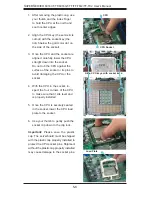
Page 40: ...ce of the socket or its pins to avoid damaging the CPU or the socket With the CPU in the socket in 4 spect the four corners of the CPU to make sure that it sits level and is properly installed Once th...

Page 41: ...damage the CPU Add the two remaining screws 5 then finish the installation by fully tightening all four screws Installing a CPU Heatsink Removing the Heatsink 1 Unscrew and remove the heatsink screws...

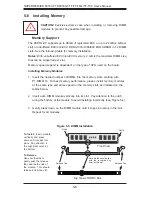
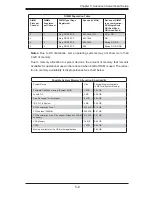
Page 42: ...ed on the memory slots as indicated on the tables below Insert each DIMM module vertically into its slot Pay attention to the notch 2 along the bottom of the module to avoid installing incorrectly see...

Page 43: ...evices the amount of memory that remains available for operational use will be reduced when 4 GB of RAM is used The reduc tion in memory availability is disproportional See chart below Possible System...

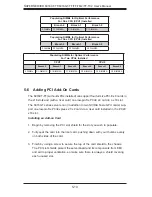
Page 44: ...hing down with your thumbs evenly 2 on both sides of the card Finish by using a screw to secure the top of the card shield to the chassis 3 The PCI slot shields protect the serverboard and its compone...

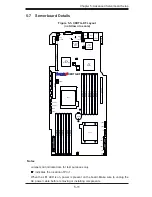
Page 45: ...W2 JPW3 LE4 SW1 JPW1 FAN4 FAN8 FAN7 FAN3 FAN1 4 1 FAN2 FAN6 FAN5 JLPC80 JWD1 JBMC1 JPL1 JPG1 LE1 JF1 LE2 JL1 JNMI1 JSPK1 J_UID_OW SBX 2B SBX 1B PCI E 2 0 x4 SBX 2A IPMB IPMI_LAN USB2 3 T SGPIO 0 T SGP...

Page 46: ...MI 2 0 JF1 Front Panel Connector JL1 Chassis Intrusion JLPC80 JLPC80 Connector JNMI1 NMI Non Maskable Interrupt Header JPI2 C Power SMB I2 C1 JPSK1 Internal Speaker Buzzer Header JPW1 12V 20 pin Power...

Page 47: ...he table on the right for pin definitions Main ATX Power Supply Connector The primary power supply connector JPW1 is a proprietary design Refer to the table on the right for the pin definitions of thi...

Page 48: ...e LED pin 7 works as the UID LED indicator for the front panel UID button located on pins 13 14 of JF1 When Jumper J_UID_OW is set to off default the red LED takes precedence over the blue LED See Pag...

Page 49: ...ditional 3 pin fans Fan speed control is available for 4 pin fans but not supported by 3 pin fans The fan speeds are controlled by Thermal Management via Hardware Monitoring in the Advanced Setting in...

Page 50: ...ed on the serverboard The headers can be used to provide front side USB access cables not included See the table on the right for pin defini tions Universal Serial Bus Pin Definitions USB0 1 Pin Defin...

Page 51: ...itions Pin Definitions Pin 1 Pos Beep In Pin 2 Neg Alarm Speaker Unit Identifier Button SW1 There are two Unit Identifier UID buttons and LED indicators on the serverboard The Front Panel UID button c...

Page 52: ...ing 3 2 1 3 2 1 CMOS Clear JBT1 is used to clear CMOS which will also clear any passwords Instead of pins this jumper consists of contact pads to prevent accidentally clearing the contents of CMOS To...

Page 53: ...to disable the Watch Dog Timer Watch Dog Jumper Settings Jumper Setting Definition Pins 1 2 Reset Pins 2 3 NMI Open Disabled J_UID OW Overwriting Jumper Settings Jumper Definition Open Red Fail LED ov...

Page 54: ...system is on Be sure to unplug the AC power cable before removing or adding any components See the table on the right for more details Onboard PWR LED Indicator LED Color Definition Off System Off pow...

Page 55: ...p 5 21 5 11 SATA Ports SATA Ports There are no jumpers to configure the onboard SATA connectors See the table on the right for pin definitions SATA Port Pin Definitions Pin Definition 1 Ground 2 TXP 3...

Page 56: ...at came packaged with your system Driver Tool Installation Display Screen Note Click the icons showing a hand writing on paper to view the readme files for each item Click the computer icons to the ri...

Page 57: ...cial system information such as CPU temperature system voltages and fan status See the Figure below for a display of the Supero Doctor III interface Note The default User Name and Password for SuperDo...

Page 58: ...be downloaded from our Web Site at ftp ftp supermicro com utility Supero_Doctor_III You can also download the SDIII User s Guide at http www supermicro com PRODUCT Manuals SDIII UserGuide pdf For Lin...

Page 59: ...t damage to any printed circuit boards PCBs it is important to handle them very carefully The following measures are generally sufficient to protect your equipment from ESD damage Precautions Use a gr...

Page 60: ...for details on the LEDs and the control panel buttons Details on JF1 can be found in Chapter 5 Advanced Serverboard Installation 6 3 System Cooling Eight 4 cm counter rotating fans provide the cooling...

Page 61: ...the server for an extended period of time with the top cover open Turn off the power to the system and unplug the AC power cord 2 Remove the failed fan s wiring from the backplane 3 Remove the four pi...

Page 62: ...rive For a complete listing of peripheral drive options visit the Supermicro web site at http www supermicro com products chassis 1U 818 SC818G 1400 cfm Hard Drive Installation The hard drives are mou...

Page 63: ...er 6 Advanced Chassis Setup 6 5 Figure 6 3 Removing a Hard Drive Carrier Warning Except for short periods of time swapping hard drives do not operate the server with the hard drive carriers removed 1...

Page 64: ...ircuit board side facing 3 downward so that the mounting holes align with those in the carrier Secure the hard drive by tightening all six screws 4 Installing a Hard Drive Carrier Into the Chassis Ins...

Page 65: ...and data cables from the motherboard and or backplane 2 If you are adding a new drive Remove the dummy tray from the drive bay 3 The mini bezel can be removed by pulling out the hard drive beneath th...

Page 66: ...3 Lower the front of the air shroud over the fan tray sliding the front notches 4 C over the pins on the fan tray D Checking the Air Flow Checking the Server s Air Flow Make sure there are no wires o...

Page 67: ...module in the system power must be com pletely removed from the server before removing and replacing the power supply for whatever reason Removing Replacing the Power Supply Figure 6 6 Power down the...

Page 68: ...6 10 SUPERSERVER 6016XT TF 6016GT TF TF TM2 TF TC2 User s Manual Notes...

Page 69: ...t be configured Options in blue can be configured by the user The right frame displays the key legend Above the key legend is an area reserved for a text message When an option is selected in the left...

Page 70: ...ntial damages arising from a BIOS update If you have to update the BIOS do not shut down or reset the system while the BIOS is updating This is to avoid possible boot failure 7 2 Main Setup When you f...

Page 71: ...r system CPU Type This item displays the type of CPU used in the motherboard Speed This item displays the speed of the CPU detected by the BIOS Physical Count This item displays the number of processo...

Page 72: ...bootup screen options to be modified between POST mes sages or the OEM logo Select Disabled to display the POST messages Select Enabled to display the OEM logo instead of the normal POST messages The...

Page 73: ...ds or longer The options are Instant_Off and 4_Second_Override Restore on AC Power Loss Use this feature to set the power state after a power outage Select Power Off for the system power to remain off...

Page 74: ...hysical computer The options are Enabled and Disabled Note If there is any change to this setting you will need to power off and restart the system for the change to take effect Please refer to Intel...

Page 75: ...e C3 C6 or C7 requests to C1 based on un core auto demote information The options are Disabled and Enabled C3 Auto Demotion When enabled the CPU will conditionally demote C6 or C7 requests to C3 based...

Page 76: ...ble errors is used to trigger fail over The spare memory is put online and used as active memory in place of the failed memory Demand Scrubbing A memory error correction scheme where the Processor wri...

Page 77: ...ters above or below sea level the system is located The options are Sea Level or Below 1 300 301 600 601 900 901 1200 1201 1500 1501 1800 1801 2100 2101 2400 2401 2700 2701 3000 DIMM Pitch This is the...

Page 78: ...user guide for the desired setting The options are 256 MB and 128MB XSouthBridge Configuration This feature allows the user to configure the settings for the Intel ICH South Bridge chipset USB Functi...

Page 79: ...he item SATA AHCI will be available ICH RAID Code Base This feature is available when the option RAID is selected Select Intel to enable Intel s SATA RAID firmware to configure Intel s SATA RAID setti...

Page 80: ...fer Block Mode boosts the IDE drive performance by increasing the amount of data transferred Only 512 bytes of data can be transferred per interrupt if Block Mode is not used Block Mode allows transfe...

Page 81: ...a transfer rate of 16 6 MBs Select UDMA0 to allow the BIOS to use Ultra DMA mode 0 It has a data transfer rate of 16 6 MBs It has the same transfer rate as PIO mode 4 and Multi Word DMA mode 2 Select...

Page 82: ...the AMI BIOS to configure all devices in the system PCI Latency Timer This feature sets the latency Timer of each PCI device installed on a PCI bus Select 64 to set the PCI latency to 64 PCI clock cyc...

Page 83: ...feature allows the user to set the flow control for Console Redirection The options are None Hardware and Software Redirection After BIOS POST Select Disabled to turn off Console Redirection after Pow...

Page 84: ...alarm including the LED and the buzzer to be triggered when the CPU temperature reaches about 5oC above the threshold temperature as predefined by the CPU manufacturer to give the CPU and system fans...

Page 85: ...tilation for blockage High The processor is running hot This is a caution level since the CPU s Tem perature Tolerance has been reached or has been exceeded and may activate an overheat alarm User int...

Page 86: ...tem The options are Enabled and Disabled Headless Mode This feature is used to enable system to function without a keyboard monitor or mouse attached The options are Enabled and Disabled High Performa...

Page 87: ...rdware This is an informational feature which returns the status code of the BMC micro controller XView BMC System Event Log This feature displays the BMC System Event Log SEL It shows the total numbe...

Page 88: ...System Event Log Clear BMC System Log Select OK and press the Enter key to clear the BMC system log Select Cancel to keep the BMC System log The options are OK and Cancel Caution Any cleared informat...

Page 89: ...el Number Status This feature returns the channel status for the Channel Number selected above Channel Number is OK or Wrong Channel Number XIP Address Configuration Enter the IP address for this mach...

Page 90: ...ber separated by dots should not exceed 255 as shown in the screen below Parameter Selector Use this feature to select the parameter of your Mac Address configuration Mac Address The BIOS will automat...

Page 91: ...Cycle OEM Action Diagnostic Interface Alert Startup Delay This feature inserts a delay during startup for PEF alerts The options are Enabled and Disabled PEF Alert Startup Delay This sets the pre det...

Page 92: ...options are Disabled Reset System Power Down Power Cycle BMC Watch Dog TimeOut Min Sec This option appears if BMC Watch Dog Timer Action above is enabled This is a timed delay in minutes or seconds b...

Page 93: ...er password has not been used Change Supervisor Password Select this feature and press Enter to access the submenu and then type in a new Supervisor Password User Access Level Available when Superviso...

Page 94: ...When Enabled the AMI BOIS displays a warning when any program or virus is sues a Disk Format command or attempts to write to the boot sector of the hard disk drive The options are Enabled and Disabled...

Page 95: ...e SATA XXXXXXXXX XRemovable Drives This feature allows the user to specify the boot sequence from available Removable Drives The settings are 1st boot device 2nd boot device and Disabled 1st Drive USB...

Page 96: ...iscard Changes and Exit from the Exit menu and press Enter Discard Changes Select this option and press Enter to discard all the changes and return to the AMI BIOS Utility Program Load Optimal Default...

Page 97: ...l not allow the system to continue the boot up procedure If a fatal error occurs you should consult with your system manufac turer for possible repairs A 1 BIOS Error Beep Codes BIOS Error Beep Codes...

Page 98: ...A 2 SUPERSERVER 6016XT TF 6016GT TF TF TM2 TF TC2 User s Manual Notes...

Page 99: ...booting up from the CD Press the F6 key when the message Press F6 if you need to install a third 2 party SCSI or RAID driver displays When the Windows XP Windows 2003 Setup screen appears press S to 3...

Page 100: ...inue with the OS installation The Windows OS Setup screen will display 2 From the Windows setup screen press the Enter key The XP 2003 Setup 3 will automatically load all device files and then continu...

Page 101: ...ction in Chapter 5 for details GPUs Graphics Processing Units 6016XT TF 6016GT TF GPU ready no GPUs installed 6016GT TF TM2 two NVIDIA Tesla M1060 GPU cards 6016GT TF TC2 two NVIDIA Tesla C1060 GPU ca...

Page 102: ...rements AC Input Voltage 180 240 VAC Rated Input Current 7 2A 180V to 9 5 240V Rated Input Frequency 50 60 Hz Power Supply Rated Output Power 1400W w PFC Part PWS 1K41F 1R Rated Output Voltages 12V 11...

Page 103: ...nd Canada CE Marking Europe California Best Management Practices Regulations for Perchlorate Materials This Perchlorate warning applies only to products containing CR Manganese Dioxide Lithium coin ce...

Page 104: ...ailure to perform be reasonably expected to result in significant injury or loss of life or catastrophic property damage Accordingly Supermicro dis claims any and all liability and should buyer use or...

Reviews: