


Chapter 5: Advanced Motherboard Setup
5-5
IMPORTANT:
Always connect the power cord last and always remove it
before adding, removing or changing any hardware components. Make
sure that you install the processor into the CPU socket
before
you install
the heatsink. The X5SS8-GM/X5SSE-GM can support one Xeon processors
of up to 3.06 GHz. Pictures below show a 603-pin socket.
!
5-5
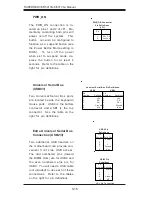
PGA Processor and Heatsink Installation
When handling the processor package, avoid placing direct
pressure on the label area of the fan. Also, do not place the
motherboard on a conductive surface, which can damage the
BIOS battery and prevent the system from booting up.
1. Lift the lever on the CPU socket.
Lift the lever completely or you will
damage the CPU socket when
power is applied.
Socket lever
2. Install the CPU in the socket.
Make sure that pin 1 of the CPU is
seated on pin 1 of the socket (both
corners are marked with a
triangle).
Pin 1
3. Press the lever down until you
hear it *click* into the locked
position. See Figure 5-3 for
pictures of the 604-pin CPU socket
before and after the processor is
installed.
Socket lever in
locked position
Summary of Contents for SuperServer 5013S-8
Page 1: ... SUPER SUPERSERVER 5013S 8 SUPERSERVER 5013S i USER SMANUAL Revision 1 0a ...
Page 5: ...Notes Preface ...
Page 10: ...SUPERSERVER 5013S 8 5013S i User s Manual x Notes ...
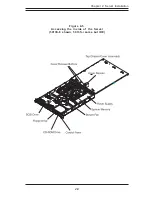
Page 41: ...Chapter 5 Advanced Motherboard Setup 5 7 Figure 5 4 Heatsink and Air Shroud Installation ...
Page 62: ...5 28 SUPERSERVER 5013S 8 5013S i Manual Notes ...
Page 72: ...6 10 SUPERSERVER 5013S 8 5013S i Manual Notes ...
Page 98: ...7 26 SUPERSERVER 5013S 8 5013S i Manual Notes ...
Page 108: ...B 6 SUPERSERVER 5013S 8 5013S i Manual Notes ...