background image

2-6

S

UPER

S

ERVER 5018D-MHR7N4P User's Manual

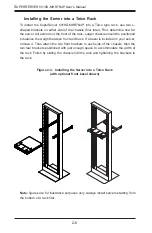
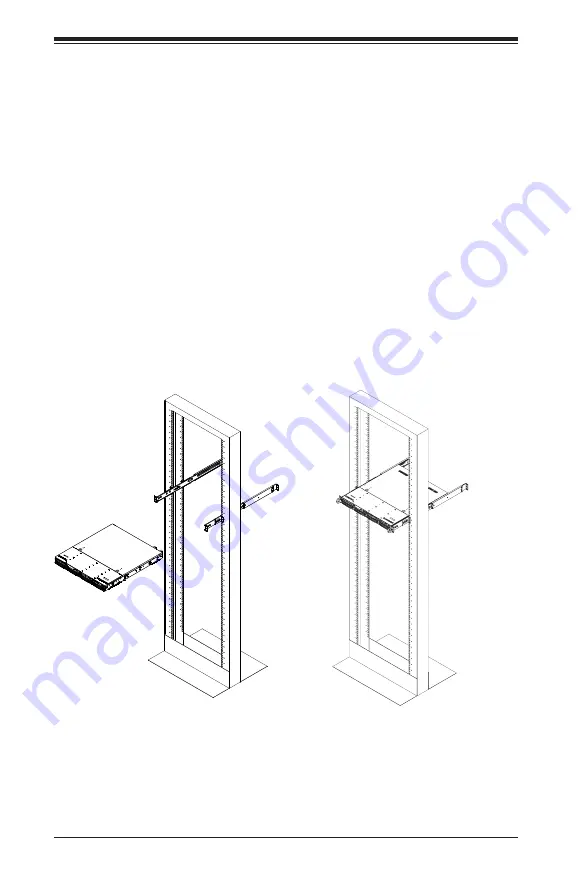
Figure 2-3.  Installing the Server into a Telco Rack 

(with optional front bezel shown)

Installing the Server into a Telco Rack

To install the SuperServer 5018D-MHR7N4P into a Telco type rack, use two L-
shaped brackets on either side of the chassis (four total). First, determine how far 
the server will extend out the front of the rack. Larger chassis should be positioned 
to balance the weight between front and back. If a bezel is included on your server, 
remove it. Then attach the two front brackets to each side of the chassis, then the 
two rear brackets positioned with just enough space to accommodate the width of 
the rack. Finish by sliding the chassis into the rack and tightening the brackets to 
the rack.  

Note:

 figures are for illustrative purposes only. Always install servers starting from 

the bottom of a rack first.

Summary of Contents for SUPERSERVER 5018D-MHR7N4P

Page 1: ...SUPERSERVER 5018D MHR7N4P USER S MANUAL 1 0 ...

Page 2: ...f any such disputes Super Micro s total liability for all claims will not exceed the price paid for the hardware product FCC Statement This equipment has been tested and found to comply with the limits for a Class A digital device pursuant to Part 15 of the FCC Rules These limits are designed to provide reasonable protection against harmful interference when the equipment is operated in a commerci...

Page 3: ...the SC813MFTQC R407CB chassis Chapter 2 Server Installation This chapter describes the steps necessary to install the SuperServer 5018D MHR7N4P into a rack and check out the server configuration prior to powering up the system If your server was ordered without processor and memory components this chapter will refer you to the appropriate sections of the manual for their installation Chapter 3 Sys...

Page 4: ...ard Chapter 6 Advanced Chassis Setup Refer to Chapter 6 for detailed information on the SC813MFTQC R407CB server chassis You should follow the procedures given in this chapter when installing removing or reconfiguring hard drives and when replacing system power supply units and cooling fans Chapter 7 BIOS The BIOS chapter includes an introduction to BIOS and provides detailed informa tion on runni...

Page 5: ...Notes Preface v ...

Page 6: ...Setup 2 1 Choosing a Setup Location 2 1 2 4 Warnings and Precautions 2 2 Rack Precautions 2 2 Server Precautions 2 2 Rack Mounting Considerations 2 3 Ambient Operating Temperature 2 3 Reduced Airflow 2 3 Mechanical Loading 2 3 Circuit Overloading 2 3 Reliable Ground 2 3 2 5 Installing the System into a Rack 2 4 Identifying the Sections of the Rack Rails 2 4 Installing the Rack Rails 2 4 Installing...

Page 7: ...16 Power Cable and AC Adapter 4 18 Chapter 5 Advanced Motherboard Setup 5 1 Handling the Motherboard 5 1 Precautions 5 1 5 2 Connecting Cables 5 2 Connecting Data Cables 5 2 Connecting Power Cables 5 2 Connecting the Control Panel 5 2 5 3 I O Ports 5 3 5 4 Installing Memory 5 4 5 5 Adding PCI Expansion Cards 5 5 5 6 Motherboard Details 5 6 X10SDV 7TP4F Quick Reference 5 7 5 7 Connector Definitions...

Page 8: ...ailure 6 7 Chapter 7 BIOS 7 1 Introduction 7 1 Starting BIOS Setup Utility 7 1 How To Change the Configuration Data 7 1 How to Start the Setup Utility 7 2 7 2 Main Setup 7 2 7 3 Advanced Setup Configurations 7 4 7 4 Event Logs 7 28 7 5 IPMI 7 30 7 6 Security Settings 7 33 7 7 Boot Settings 7 36 7 8 Save Exit 7 38 Appendix A BIOS Error Beep Codes Appendix B System Specifications Appendix C UEFI BIO...

Page 9: ...ave been included with the 5018D MHR7N4P as listed below One 4 cm fan FAN 0065L4 One riser card RSC RR1U E8 One special I O shield MCP 260 00100 0B Note For your system to work properly please follow the links below to download all necessary drivers utilities and the user s manual for your server Supermicro product manuals http www supermicro com support manuals Product drivers and utilities ftp f...

Page 10: ...C RDIMM Registered DIMM or 64 GB of ECC non ECC UDIMM Unregistered DIMM DDR4 2133 1866 1600 memory See Chapter 5 for details SATA A SATA controller is integrated into the chipset to provide four SATA 3 0 6 Gbps ports PCI Expansion Slots The X10SDV 7TP4F has one M 2 PCI E 3 0 x4 slot an M Key for 2242 2280 22110 SSDs Mux with I SATA4 and one mini PCI E 2 0 x1 slot with mSATA support Mux with I SATA...

Page 11: ...ncy feature allows you to replace a failed power supply without shutting down the system Hard Drive Subsystem The SC813MFTQC R407CB was designed to support four hot swappable 3 5 hard drives Drives mount in carriers and may be removed and installed without powering down the system Front Control Panel The control panel on the SC813MFTQC R407CB provides you with system moni toring and control LEDs i...

Page 12: ...USB HUB GL854G USB 3 0 connector x2 compatible with 2 0 USB 2 0 Header x2 iXFI x2 x1 VGA USB3 0 SFP USB 2 0 Header x2 3rd LAN KR DDR4 1600 1866 2133 USB 2 0 TypeA INPHI CS4227 SFP JPCIE2 PCIE 3 0 x8 PCIE 3 0 x8 mini PCIe PCIE 2 0 x1 PCIE 3 0 x3 M 2 CONN SATA GEN 3 PCIE 2 0 SATA3 0 4 SATA3 0 5 SATA3 0 0 SATA3 0 1 SATA3 0 2 SATA3 0 3 PCIE 2 0 x1 x1 COM1 DDR 3 BMC AST2400 PHY RTL8211F VGA CONN IPMI L...

Page 13: ...pe Address Super Micro Computer B V Het Sterrenbeeld 28 5215 ML s Hertogenbosch The Netherlands Tel 31 0 73 6400390 Fax 31 0 73 6416525 Email sales supermicro nl General Information support supermicro nl Technical Support rma supermicro nl Customer Support Web Site www supermicro nl Asia Pacific Address Super Micro Computer Inc 3F No 150 Jian 1st Rd Zhonghe Dist New Taipei City 235 Taiwan R O C Te...

Page 14: ...1 6 SUPERSERVER 5018D MHR7N4P User s Manual Notes ...

Page 15: ...on a suitable location for the rack unit that will hold the system It should be situated in a clean dust free area that is well ventilated Avoid areas where heat electrical noise and electromagnetic fields are generated You will also need it placed near a grounded power outlet Read the Rack and Server Precautions in the next section 2 3 Preparing for Setup The box the system was shipped in should ...

Page 16: ...ake sure the rack is stable before extending a component from the rack You should extend only one component at a time extending two or more si multaneously may cause the rack to become unstable Server Precautions Review the electrical and general safety precautions in Chapter 4 Determine the placement of each component in the rack before you install the rails Install the heaviest server components...

Page 17: ...ssible overloading of circuits might have on overcurrent protection and power supply wiring Appropriate consideration of equipment nameplate ratings should be used when addressing this concern Reliable Ground A reliable ground must be maintained at all times To ensure this the rack itself should be grounded Particular attention should be given to power supply connec tions other than the direct con...

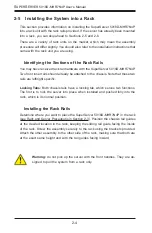
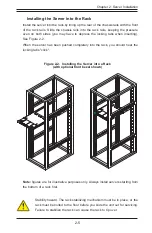
Page 18: ...ched to the chassis Note that these two rails are left right specific Locking Tabs Both chassis rails have a locking tab which serves two functions The first is to lock the server into place when installed and pushed fully into the rack which is its normal position Installing the Rack Rails Determine where you want to place the SuperServer 5018D MHR7N4P in the rack see Rack and Server Precautions ...

Page 19: ...ressure even on both sides you may have to depress the locking tabs when inserting See Figure 2 2 When the server has been pushed completely into the rack you should hear the locking tabs click Stability hazard The rack stabilizing mechanism must be in place or the rack must be bolted to the floor before you slide the unit out for servicing Failure to stabilize the rack can cause the rack to tip o...

Page 20: ...erver will extend out the front of the rack Larger chassis should be positioned to balance the weight between front and back If a bezel is included on your server remove it Then attach the two front brackets to each side of the chassis then the two rear brackets positioned with just enough space to accommodate the width of the rack Finish by sliding the chassis into the rack and tightening the bra...

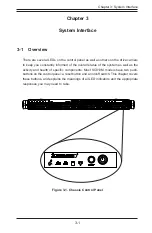
Page 21: ...tantly informed of the overall status of the system as well as the activity and health of specific components Most SC813M models have two push buttons on the control panel a reset button and an on off switch This chapter covers these buttons and explains the meanings of all LED indicators and the appropriate responses you may need to take Figure 3 1 Chassis Control Panel ...

Page 22: ...dicates when illuminated and any corrective action you may need to take Reset The reset button is used to reboot the system 3 2 Control Panel Buttons There are two push buttons located on the front of the chassis These are in order from left to right a reset button and a power on off button Information LED Status Description Solid red An overheat condition has occurred This may be caused by cable ...

Page 23: ...o the system s power supply units This LED should normally be illuminated when the system is operating HDD Indicates hard drive SAS SATA activity when flashing NIC1 Indicates network activity on GLAN1 when flashing NIC2 Indicates network activity on GLAN2 when flashing 2 1 ...

Page 24: ...carrier has a green LED When illuminated this green LED on the front of the drive carrier indicates drive activity A connection to the SAS SATA backplane enables this LED to blink on and off when that particular drive is being accessed Red The red LED indicates a SAS SATA drive failure If one of the SAS SATA drives fail you should be notified by your system management software Re quires software s...

Page 25: ... or configuring components in the Supermicro chassis These warnings may also be found on our web site at http www supermicro com about policies safety_information cfm Warning This warning symbol means danger You are in a situation that could cause bodily injury Before you work on any equipment be aware of the hazards involved with electrical circuitry and be familiar with standard practices for pr...

Page 26: ...ará el número que le ayudará a encontrar el texto traducido en el apartado de traducciones que acompaña a este dispositivo GUARDE ESTAS INSTRUCCIONES IMPORTANTES INFORMATIONS DE SÉCURITÉ Ce symbole d avertissement indique un danger Vous vous trouvez dans une situation pouvant entraîner des blessures ou des dommages corporels Avant de travailler sur un équipement soyez conscient des dangers liés au...

Page 27: ... apparatuur gaat werken dient u zich bewust te zijn van de bij een elektrische installatie betrokken risico s en dient u op de hoogte te zijn van de standaard procedures om ongelukken te voorkomen Gebruik de nummers aan het eind van elke waarschuwing om deze te herleiden naar de desbetreffende locatie BEWAAR DEZE INSTRUCTIES ٌ ز تحذ خطز ٌ ع الزهز هذا ٌ ة جسذ اصابة ف تتسبب أى يك ٌ و حالة ف ً ك ا ال...

Page 28: ...de instalación antes de conectar el sistema a la red de alimentación Attention Avant de brancher le système sur la source d alimentation consulter les directives d installation 設置手順書 システムを電源に接続する前に 設置手順書をお読み下さい 시스템을 전원에 연결하기 전에 설치 안내를 읽어주십시오 Waarschuwing Raadpleeg de installatie instructies voordat u het systeem op de voedingsbron aansluit 警告 将此系统连接电源前 请先阅读安装说明 警告 將系統與電源連接前 請先閱讀安裝說明 מתח למקור המער...

Page 29: ...htung nicht mehr als 250 V 20 A beträgt Advertencia Este equipo utiliza el sistema de protección contra cortocircuitos o sobrecorrientes del edificio Asegúrese de que el dispositivo de protección no sea superior a 250 V 20 A Attention Pour ce qui est de la protection contre les courts circuits surtension ce produit dépend de l installation électrique du local Vérifiez que le courant nominal du dis...

Page 30: ...ndteile anzubringen oder zu entfernen Warning The system must be disconnected from all sources of power and the power cord removed from the power supply module s before accessing the chassis interior to install or remove system components 경고 이 제품은 전원의 단락 과전류 방지에 대해서 전적으로 건물의 관련 설비에 의존합니다 보호장치의 정격이 반드시 250V 볼트 20A 암페어 를 초과하지 않도록 해야 합니다 Waarschuwing Dit product is afhankelijk van de kortsluitbeveili...

Page 31: ...ou enlever des composants de systéme 경고 시스템에 부품들을 장착하거나 제거하기 위해서는 섀시 내부에 접근하기 전에 반드시 전원 공급장치로부터 연결되어있는 모든 전원과 전기코드를 분리해주어야 합니다 Waarschuwing Voordat u toegang neemt tot het binnenwerk van de behuizing voor het installeren of verwijderen van systeem onderdelen dient u alle spanningsbronnen en alle stroomkabels aangesloten op de voeding en van de behuizing te verwijderen חשמלי ניתוק מפני אזהרה אזהרה ...

Page 32: ...al gestattet werden Advertencia Solamente el personal calificado debe instalar reemplazar o utilizar este equipo Attention Il est vivement recommandé de confier l installation le remplacement et la maintenance de ces équipements à des personnels qualifiés et expérimentés 경고 훈련을 받고 공인된 기술자만이 이 장비의 설치 교체 또는 서비스를 수행할 수 있습니다 警告 只有经过培训且具有资格的人员才能进行此设备的安装 更换和维修 警告 只有經過受訓且具資格人員才可安裝 更換與維修此設備 אזהרה הציוד עב...

Page 33: ... in Bereichen mit beschränktem Zutritt vorgesehen Der Zutritt zu derartigen Bereichen ist nur mit einem Spezialwerkzeug Schloss und Schlüssel oder einer sonstigen Sicherheitsvorkehrung möglich Advertencia Esta unidad ha sido diseñada para instalación en áreas de acceso restringido Sólo puede obtenerse acceso a una de estas áreas mediante la utilización de una herramienta especial cerradura con lla...

Page 34: ...en beperkte toegang Toegang tot dergelijke gebieden kunnen alleen verkregen worden door gebruik te maken van speciaal gereedschap slot en sleutel of andere veiligheidsmaatregelen 電池の取り扱い 電池交換が正しく行われなかった場合 破裂の危険性があります 交換する電池はメー カーが推奨する型 または同等のものを使用下さい 使用済電池は製造元の指示に従 って処分して下さい 警告 电池更换不当会有爆炸危险 请只使用同类电池或制造商推荐的功能相当的电池更 换原有电池 请按制造商的说明处理废旧电池 警告 電池更換不當會有爆炸危險 請使用製造商建議之相同或功能相當的電池更換原有 電池 請按照製造商的說明指示處理廢棄舊電池 מ...

Page 35: ...tipo o el equivalente recomendado por el fabricante Desechar las baterías gastadas según las instrucciones del fabricante 경고 배터리가 올바르게 교체되지 않으면 폭발의 위험이 있습니다 기존 배터리와 동일하거나 제조사에서 권장하는 동등한 종류의 배터리로만 교체해야 합니다 제조사의 안내에 따라 사용된 배터리를 처리하여 주십시오 Waarschuwing Er is ontploffingsgevaar indien de batterij verkeerd vervangen wordt Vervang de batterij slechts met hetzelfde of een equivalent type die door de fabri...

Page 36: ...n Cette unité peut avoir plus d une connexion d alimentation Pour supprimer toute tension et tout courant électrique de l unité toutes les connexions d alimentation doivent être débranchées Redundant Power Supplies Warning This unit might have more than one power supply connection All connections must be removed to de energize the unit 冗長電源装置 このユニッ トは複数の電源装置が接続されている場合があります ユニッ トの電源を切るためには すべての接続を取...

Page 37: ...idado cuando lo revise Attention Lorsque le système est en fonctionnement des tensions électriques circulent sur le fond de panier Prendre des précautions lors de la maintenance Warning Hazardous voltage or energy is present on the backplane when the system is operating Use caution when servicing 경고 이 장치에는 한 개 이상의 전원 공급 단자가 연결되어 있을 수 있습니다 이 장치에 전원을 차단하기 위해서는 모든 연결 단자를 제거해야만 합니다 Waarschuwing Deze e...

Page 38: ...equipo debe cumplir con las normas de electricidad locales y nacionales 경고 시스템이 동작 중일 때 후면판 Backplane 에는 위험한 전압이나 에너지가 발생 합니다 서비스 작업 시 주의하십시오 Waarschuwing Een gevaarlijke spanning of energie is aanwezig op de backplane wanneer het systeem in gebruik is Voorzichtigheid is geboden tijdens het onderhoud 警告 设备安装必须符合本地与本国电气法规 警告 設備安裝必須符合本地與本國電氣法規 האחורי בפנל מתח אזהרה במהלך להיזהר יש המערכת תפעול בזמן ...

Page 39: ...et worden voldaan aan de lokale en nationale elektriciteitsvoorschriften 製品の廃棄 この製品を廃棄処分する場合 国の関係する全ての法律 条例に従い処理する必要が あります 警告 本产品的废弃处理应根据所有国家的法律和规章进行 警告 本產品的廢棄處理應根據所有國家的法律和規章進行 Warnung Die Entsorgung dieses Produkts sollte gemäß allen Bestimmungen und Gesetzen des Landes erfolgen Advertencia Al deshacerse por completo de este producto debe seguir todas las leyes y reglamentos nacionales הארצי החשמ...

Page 40: ...靠近風扇 경고 이 제품은 해당 국가의 관련 법규 및 규정에 따라 폐기되어야 합니다 Hot Swap Fan Warning Warning Hazardous moving parts Keep away from moving fan blades The fans might still be turning when you remove the fan assembly from the chassis Keep fingers screwdrivers and other objects away from the openings in the fan assembly s housing Attention La mise au rebut ou le recyclage de ce produit sont généralement soumis à des lo...

Page 41: ...ssis Prenez garde à ce que doigts tournevis et autres objets soient éloignés du logement du bloc ventilateur 경고 움직이는 위험한 부품 회전하는 송풍 날개에 접근하지 마세요 섀시로부터 팬 조립품을 제거할 때 팬은 여전히 회전하고 있을 수 있습니다 팬 조림품 외관의 열려있는 부분들로부터 손가락 및 스크류드라이버 다른 물체들이 가까이 하지 않도록 배치해 주십시오 Waarschuwing Gevaarlijk bewegende onderdelen Houd voldoende afstand tot de bewegende ventilatorbladen Het is mogelijk dat de ventilator nog draait tij...

Page 42: ...chen Sicherheitsstandards einhalten Der Gebrauch von anderen Kabeln und Adapter können Fehlfunktionen oder Feuer verursachen Die Richtlinien untersagen das Nutzen von UL oder CAS zertifizierten Kabeln mit UL CSA gekennzeichnet an Geräten oder Produkten die nicht mit Supermicro gekennzeichnet sind 電源コードとACアダプター 製品を設置する場合 提供または指定および購入された接続ケーブル 電源コードとAC アダプターを 該当する地域の条例や安全基準に適合するコードサイズやプラグと共に 使用下さい 他...

Page 43: ...aptateurs peut provoquer un dysfonctionnement ou un incendie Appareils électroménagers et la Loi sur la Sécurité Matériel interdit l utilisation de câbles certifies UL ou CSA qui ont UL ou CSA indiqué sur le code pour tous les autres appareils électriques sauf les produits désignés par Supermicro seulement ומתאמי חשמליים כבלים AC אזהרה ומתאמים ספקים בכבלים להשתמש יש המוצר את מתקינים כאשר AC או נרכ...

Page 44: ...luiten van het Product uitsluitend gebruik maken van de geleverde Kabels of een andere geschikte aan te schaffen Aansluitmethode deze moet altijd voldoen aan de lokale voorschriften en veiligheidsnormen inclusief de juiste kabeldikte en stekker Het gebruik van niet geschikte Kabels en of Adapters kan een storing of brand veroorzaken Wetgeving voor Elektrische apparatuur en Materiaalveiligheid verb...

Page 45: ...important to handle them very carefully see Chapter 4 Also note that the size and weight of the motherboard can cause it to bend if handled improperly which may result in damage To prevent the motherboard from bending keep one hand under the center of the board to support it when handling The following measures are generally sufficient to protect your equipment from static discharge Precautions Us...

Page 46: ...connection to the ATX power supply Connect the appropriate connec tor from the power supply to JPW1 to supply power to the motherboard See the Connector Definitions section in this chapter for power connector pin definitions In addition the 8 pin JPV1 connector to supply power for HDDs may need to be connected to the power supply Connecting the Control Panel JF1 contains header pins for various fr...

Page 47: ...e 5 2 Rear I O Ports Rear I O Ports 1 IPMI LAN Port 4 LAN Port 2 7 LAN Port 7 SPF 2 USB Port 1 USB 3 0 5 LAN Port 1 8 VGA Port 3 USB Port 0 USB 3 0 6 LAN Port 8 SPF Power Button OH Fan Fail PWR Fail 1 NIC1 Activity LED Reset Button 2 HDD LED FP PWR LED Reset PWR 3 3 V 3 3V Stby Ground Ground 15 16 Power Fail LED NIC2 Activity LED 3 3V Stby 3 3V Stby UID LED 3 3V 1 2 3 4 5 6 7 8 ...

Page 48: ...ed Memory Support The X10SDV 7TP4F has four DIMM sockets that can support up to 128 GB of ECC RDIMM Registered DIMM or 64 GB of ECC non ECC UDIMM Unregistered DIMM DDR4 2133 1866 1600 memory For the latest memory updates please refer to our website Please follow the tables below for correct installation Memory Installation Guidelines When installing memory modules the DIMM slots should be populate...

Page 49: ...ds PCI Expansion Slots One RSC RR1U E8 riser card is used to support an expansion add on card to the system PCI Card Installation Before installing a PCI add on card make sure it is supported by the riser card Begin by releasing the locking tab that corresponds to the slot you wish to populate Insert the expansion card into the riser card by pushing down with your thumbs evenly on both sides of th...

Page 50: ...USB0 1 WAKE UP 2 3 DISABLE LAN3 4 5 6 1 2 ENABLE JPL3 ON PWR RST X FF OH NIC2 JF1 NIC1 LED HDD LED PWR PCI E 2 0 X1 I SATA5 CPU SLOT7 PCI E 3 0 X8 CPU SLOT6 PCI E 3 0 X8 USB 5 6 USB 3 4 USB 2 USB 0 1 3 0 PCI E 3 0 X4 I SATA4 JMD1 M 2 Intel Xeon D 1500 SoC 1 2 ENABLE 2 3 DISABLE JPG1 2 3 DISABLE JPL1 JPL2 1 2 ENABLE JL1 2 3 NMI 1 2 RST JWD1 WATCH DOG JBT1 LAN2 LAN1 CHASSIS CMOS INTRUSION CLEAR 4 7 ...

Page 51: ...A4 Slot JMP1 Mini PCI E 2 0 X1 I SATA5 Slot JNVI2 C1 NVMe I2 C Header X10SDV 7TP4F Quick Reference Jumper Description Default Setting JBR1 BIOS Recovery Pins 1 2 Normal JBT1 CMOS Clear See Section 5 8 JI2 C1 JI2 C2 SMB to PCI Exp Slots Disable Pins 2 3 Disabled JPB1 BMC Enable Disable Debug use only Pins 1 2 Enabled JPG1 VGA Enable Disable Pins 1 2 Enabled JPL1 LAN1 Enable Disable Pins 1 2 Enabled...

Page 52: ...10Gigabit Ethernet SFP Ports LAN7 LAN8 L SAS0 L SAS15 SAS 2 0 SATA 3 0 Ports M2 SRW1 SRW3 M 2 Mounting Screws MP SRW1 SRW2 PCI E 2 0 x1 I SATA5 Slot Mounting Screws Slot6 Slot7 CPU PCI E 3 0 x8 Slot UID Unit ID Button USB 0 1 Back Panel USB 3 0 Ports USB 2 USB Type A Connector USB 3 4 5 6 Front Access USB 2 0 Ports VGA VGA Port LED Description Color State Status LED3 Power LED Green On System Powe...

Page 53: ...ins 15 and 16 of JF1 Refer to the table on the right for pin definitions Power LED Pin Definitions JF1 Pin Definition 15 3 3V 16 PWR LED 4 Pin HDD Power Pin Definitions JPH1 Pin Definition 1 12V 2 3 GND 4 5V 8 pin DC Power Pin Definitions JPV1 Pin Definition 1 4 GND 5 8 12V HDD LED The HDD LED connection is located on pins 13 and 14 of JF1 Attach a cable here to indicate the status of all HDD rela...

Page 54: ... as the front panel UID LED indicator The red LED on pin 8 works provides warnings of overheat fan failure or power failure The red LED takes precedence over the blue LED by default Refer to the table on the right for pin definitions Reset Button The Reset Button connection is lo cated on pins 3 and 4 of JF1 Attach it to a hardware reset switch on the computer case to reset the system Refer to the...

Page 55: ... USB3 4 and USB5 6 and one USB Type A header are also provided on the motherboard to pro vide front panel access USB cables are not included Refer to the tables on the right for pin definitions Back Panel USB 3 0 Pin Definitions Pin Definition Pin Definition 1 5V 5 5V 2 USB_PN1 6 USB_PN0 3 USB_PP1 7 USB_PP0 4 Ground 8 Ground Internal USB Port 2 0 Pin Definitions Pin Definition Pin Definition 1 5V ...

Page 56: ...ation on IPMI please refer to the IPMI User s Guide posted on our website at http www supermicro com UID Switch Pin Definition 1 Ground 2 Ground 3 Button In 4 Button In UID LED Status Color State Status Blue On Unit Identified Fan Header Pin Definitions Pin Definition 1 Ground Black 2 12V Red 3 Tachometer 4 PWM_Control Fan Headers This motherboard has six 4 pin fan headers Although pins 1 3 of the...

Page 57: ...ect the appropriate cable here to use the IPMI I2 C connection on your system External I2 C Header Pin Definitions Pin Definition 1 Data 2 Ground 3 Clock 4 No Connection Overheat LED Header The JOH1 header is used to connect an LED indicator to provide warnings of chassis overheating Refer to the tables on the right for pin definitions TPM Header Port 80 Header A Trusted Platform Module Port 80 he...

Page 58: ...ght for pin definitions Serial Link I O Header Pin Definitions Pin Definition Pin Definition 1 NC 2 NC 3 Ground 4 DATA Out 5 Load 6 Ground 7 Clock 8 NC System Management Bus Header The System Management Bus header for additional slave devices or sensors is located as JSMB1 Refer to the table on the right for pin definitions SMBus Power Pin Definitions Pin Definition 1 Data 2 Ground 3 Clock NVMe I2...

Page 59: ...le To Control JGPIO Pin Header JGPIO1 PIN SoC GPIO USE Select IO Select Level 1 Power 2 Ground 3 17 IO 0x500 17 IO 0x504 17 IO 0x50C 17 4 68 IO 0x540 4 IO 0x544 4 IO 0x548 4 5 01 IO 0x500 1 IO 0x504 1 IO 0x50C 1 6 69 IO 0x540 5 IO 0x544 5 IO 0x548 5 7 06 IO 0x500 6 IO x0504 6 IO 0x50C 6 8 70 IO 0x540 6 IO 0x544 6 IO 0x548 6 9 07 IO 0x500 7 IO 0x504 7 IO 0x50C 7 10 71 IO 0x540 7 IO 0x544 7 IO 0x548...

Page 60: ...ar any passwords Instead of pins this jumper consists of contact pads to prevent accidentally clearing the contents of CMOS To Clear CMOS 1 First power down the system and unplug the power cord s 2 Remove the onboard CMOS battery 3 With the power disconnected short the CMOS pads with a metal object such as a small screwdriver 4 Remove the screwdriver or shorting device 5 Replace the battery reconn...

Page 61: ...ns 2 3 NMI Open LAN pairs set to default mode without reset or NMI USB Wake Up Use the JPUSB1 jumper to enable the function of System Wake Up via USB devices for USB0 1 This jumper allows you to wake up the system by pressing a key on the USB keyboard or by click ing the USB mouse of your system The JPUSB1 jumper is used together with the USB Wake Up function in the BIOS En able both the jumper an...

Page 62: ...to make sure that the platform operates reliably with the health monitor BMC Enabled Jumper Settings Pin Definition Pins 1 2 Enabled Default Pins 2 3 Disabled 10GbE LAN Ports Enable Disable JPTG1 is used to enable or disable 10GbE support See the table on the right for jumper settings 10Gb Enable Disable Jumper Settings Pin Definition Pins 1 2 Enabled Default Pins 2 3 Disabled GbE LAN Ports Enable...

Page 63: ...artbeat LED A BMC Heartbeat LED is located at LEDM1 See the table on the right for more information LAN Port Link Speed LED Color Definition Off No Connection or 10 Mbps Amber 1 Gbps Green 100Mps 10Gbps for 10GbE Port Overheat PWR Fail Fan Fail LED Settings Color Status Definition Off No Connection Yellow Flashing Active Overheat PWR Fail Fan Fail LED An onboard Overheat PWR Fail Fan Fail LED is l...

Page 64: ...D switch on the I O back panel The front panel UID LED is located at pin 7 of the Front Control Panel at JF1 Connect a cable to pin 7 on JF1 for front panel UID LED indication When you press the UID switch both rear UID LED and front panel UID LED Indica tors will be turned on Press the UID switch again to turn off both LED Indicators These UID Indicators provide easy identification of a system un...

Page 65: ... LED Indicator Color State Definition LEDT1 Green On LAN7 Normal LEDT3 Green On LAN8 Normal LEDT1 LEDT3 SAS Ports Sixteen SAS 2 0 SATA 3 0 ports are located at JSAS1 JSAS4 on the motherboard via four Mini SAS HD cables These SAS ports are supported by the LSI2116 SAS controller and provide serial link signal connections M 2 Socket M 2 is formerly known as Next Generation Form Factor NGFF The JMD1 ...

Page 66: ...o website at http www supermicro com products Find the product page for your motherboard here where you may down load individual drivers and utilities After creating a CD DVD with the ISO files insert the disk into the CD DVD drive on your system and the display shown in Figure 5 5 should appear Figure 5 5 Driver Installation Display Screen Note Click the icons showing a hand writing on paper to v...

Page 67: ...ent versions and can be used with Nagios to maximize your system monitoring needs With SuperDoctor 5 Man agement Server SSM Server you can remotely control power on off and reset chassis intrusion for multiple systems with SuperDoctor 5 or IPMI SD5 Manage ment Server monitors HTTP FTP and SMTP services to optimize the efficiency of your operation Note The default User Name and Password for SuperDo...

Page 68: ...the manufacturer CR2032 Dispose of used batteries according to the manufacturer s instructions Figure 5 7 Installing the Onboard Battery OR Please handle used batteries carefully Do not damage the battery in any way a damaged battery may release hazardous materials into the environment Do not discard a used battery in the garbage or a public landfill Please comply with the regulations set up by yo...

Page 69: ...em very carefully The following measures are generally sufficient to protect your equipment from ESD discharge Precautions Use a grounded wrist strap designed to prevent static discharge Touch a grounded metal object before removing any board from its antistatic bag Handle a board by its edges only do not touch its components peripheral chips memory modules or gold contacts When handling chips or ...

Page 70: ...m control buttons and status indicators These wires have been bundled together in a ribbon cable to simplify the connection The LEDs inform you of system status See Chapter 3 for details on the LEDs and the control panel buttons Details on JF1 can be found in Chapter 5 Figure 6 1 Chassis Front View Power Supply Modules I O Ports PCI Slot Hard Drive Bays 4 Control Panel System Reset Slim Optical or...

Page 71: ...ot swap capability you do not need to access the inside of the chassis or power down the system to install or replace SAS SATA drives Proceed to the next step for instructions DVD ROM Drive optional For installing removing a DVD ROM drive you will need to gain access to the inside of the server by removing the top cover of the chassis Proceed to the DVD ROM Drive Installation section in this chapt...

Page 72: ...ted in drive carriers to simplify their installation and removal from the chassis These carriers also help promote proper airflow for the system For this reason even empty carriers without drives installed must remain in the chassis 1 Install a new drive into the carrier with the printed circuit board side facing down so that the mounting holes align with those in the carrier 2 Secure the drive to...

Page 73: ...Chapter 6 Advanced Chassis Setup 6 5 SATA Backplane The SATA drives plug into a backplane that provides power drive ID and bus termination Figure 6 4 Removing a Drive from the Server ...

Page 74: ... straight out until it locks you will hear a click 2 Depress the two buttons on the top of the chassis to release the top cover and at the same time push the cover away from you until it stops You can then lift the top cover from the chassis to gain full access to the inside of the server Removing Installing a Drive 1 Power down the system and unplug the power cord from the rear of the power suppl...

Page 75: ...terruption The Power LED will illuminate and remain on until the failed unit has been replaced Replace ment units can be ordered directly from Supermicro The power supply units have a hot swap capability meaning you can replace the failed unit without powering down the system Replacing the Power Supply 1 First unplug the AC power cord from the failed power supply module 2 To remove the failed powe...

Page 76: ...6 8 SUPERSERVER 5018D MHR7N4P User s Manual 4 Carefully insert the new unit into position in the chassis and push it in until fully seated 5 Reconnect the power cord to the new power supply ...

Page 77: ...options that can be configured Grayed out options cannot be configured Options in blue can be configured by the user The right frame displays the key legend Above the key legend is an area reserved for a text message When an option is selected in the left frame it is highlighted in white Often a text message will accompany it Note the AMI BIOS has default text messages built in Supermicro retains ...

Page 78: ...Do not update the BIOS unless your system has a BIOS related issue Flashing the wrong BIOS can cause irreparable damage to the system In no event shall Supermicro be liable for direct indirect special incidental or consequential dam ages arising from a BIOS update If you have to update the BIOS do not shut down or reset the system while the BIOS is updating This is to avoid possible boot failure 7...

Page 79: ...e keyboard Press the Tab key or the arrow keys to move between fields The date must be entered in Day MM DD YY format The time is entered in HH MM SS format Note The time is in the 24 hour format For example 5 30 P M appears as 17 30 00 The following BIOS items will also be displayed Supermicro X10SDV 7TP4F Version Build Date Memory Information Total Memory This displays the total size of memory a...

Page 80: ... Use this feature to select the screen display between the POST messages and the OEM logo upon bootup Select Disabled to display the POST messages Select Enabled to display the OEM logo instead of the normal POST messages The op tions are Enabled and Disabled AddOn ROM Display Mode Use this feature to set the display mode for the Option ROM Select Keep Current to display the current AddOn ROM sett...

Page 81: ...its initial boot failure The options are Disabled Legacy Boot and EFI Boot Power Configuration Watch Dog Function If enabled the Watch Dog Timer will allow the system to reset or generate NMI based on jumper settings when it is expired for more than 5 minutes The options are Enabled and Disabled Power Button Function This feature controls how the system shuts down when the power button is pressed ...

Page 82: ...mpt to reduce the interference whenever needed The options are Disable and Enable Hyper Threading ALL Select Enable to use Intel Hyper Threading Technology to enhance CPU perfor mance The options are Disable and Enable Cores Enabled Set a numeric value to enable the number of cores Please refer to Intel s website for more information Enter 0 to enable all cores Monitor Mwait Select Enabled to enab...

Page 83: ...or 64 bytes if this feature is set to Disabled The CPU prefetches both cache lines for 128 bytes as comprised if this feature is set to Enable DCU Streamer Prefetcher Available when supported by the CPU Select Enabled to enable the DCU Data Cache Unit Streamer Prefetcher which will stream and prefetch data and send it to the Level 1 data cache to improve data processing and system performance The ...

Page 84: ...same package The options are ALL and ONE P State Coordination This feature allows the user to change the P State Power Performance State coordination type P State is also known as SpeedStep for Intel processors Se lect HW_ALL to change the P State coordination type for hardware components only Select SW_ALL to change the P State coordination type for all software installed in the system Select SW_...

Page 85: ...e register The options are C0 C1 State C2 State C6 Non Retention State and C6 Rentention state CPU C3 Report Select Enabled to allow the BIOS to report the CPU C3 State ACPI C2 to the operating system During the CPU C3 State the CPU clock generator is turned off The options are Enable and Disable CPU C6 Report Select Enabled to allow the BIOS to report the CPU C6 State ACPI C3 to the operating sys...

Page 86: ...ing Power Efficiency vs Performance This will override whatever setting is in the Operating System The options are Per formance Balanced Performance Balanced Power and Power Power Performance Switch This feature allows dynamic switching between Power and Performance power efficiency The options are Disable and Enable Workload Configuration This feature allows for optimization of workload Balanced ...

Page 87: ... RAPL Extended Range The options are Disable and Enable Chipset Configuration Warning Setting the wrong values in the following features may cause the system to malfunction North Bridge This feature allows the user to configure the following North Bridge settings IIO Configuration EV DFX Device Function On Hide Features When this feature is set to Enable the EV_DFX Lock Bits that are located on a ...

Page 88: ...esource for other tasks The options are Disable and Enable No Snoop Select Enable to support no snoop mode for each CB device The options are Disable and Enable Intel VT for Directed I O VT d Intel VT for Directed I O VT d Select Enable to use Intel Virtualization Technology support for Direct I O VT d support by reporting the I O device assignments to the VMM Virtual Machine Monitor through the D...

Page 89: ...rmance and data integrity The options are Auto Disabled and Enabled DRAM RAPL Baseline Use this feature to set the run time power limit baseline for DRAM modules The options are Disable DRAM RAPL Mode 0 and DRAM RAPL Mode 1 Set Throttling Mode Throttling improves reliability and reduces power consumption in the processor via automatic voltage control during processor idle states The options are Di...

Page 90: ...is performed Use the keyboard to enter a value from 0 24 The default setting is 24 Demand Scrub Demand Scrubbing is a process that allows the CPU to correct correctable memory errors found on a memory module When the CPU or I O issues a demand read command and the read data from memory turns out to be a correctable error the error is corrected and sent to the requestor the original source Memory i...

Page 91: ...Enabled EHCI2 Select Enabled to enable EHCI Enhanced Host Controller Interface support on USB 2 0 connector 2 at least one USB 2 0 connector should be enabled for EHCI support The options are Disabled and Enabled XHCI Pre Boot Driver Select Enabled to enable XHCI Extensible Host Controller Interface support on a pre boot drive specified by the user The options are Enabled and Disabled SATA Configu...

Page 92: ...igure SATA As is set to RAID Select Enabled to use the SATA RAID Option ROM UEFI driver for system boot The options are Enabled and Disabled SATA Port 0 Port 5 This item displays the information detected on the installed SATA drive on the particular SATA port Model number of drive and capacity Software Preserve Support Port 0 Port 5 Hot Plug This feature designates this port for hot plugging Set t...

Page 93: ... con nected to a Solid State drive or a Hard Disk Drive The options are Hard Disk Drive and Solid State Drive Server ME Management Engine Configuration This feature displays the following system ME configuration settings General ME Configuration Operational Firmware Version ME Firmware Type Recovery Firmware Version ME Firmware Features ME Firmware Status 1 ME Firmware Status 2 Current State Error...

Page 94: ...rtain transac tions to violate the strict ordering rules of PCI bus for a transaction to be completed prior to other transactions that have already been enqueued The options are Disabled and Enabled Extended Tag Use this item to allow a device to use the 8 bit tag field as a requester The options are Disabled and Enabled ARI Forwarding When this feature is enabled the Downstream Port disables its ...

Page 95: ...select the type of device installed in the specified LAN Ports used for system boot The options are Disabled and PXE Onboard Video Option ROM Use this item to select the Onboard Video Option ROM type The options are Dis abled Legacy and EFI VGA Priority This feature allows the user to select the graphics adapter to be used as the primary boot device The options are Onboard and Offboard Network Sta...

Page 96: ...he selected onboard serial port The options are Disabled and Enabled Device Settings This item displays the status of a serial part specified by the user Change Port 1 Settings This feature specifies the base I O port address and the Interrupt Request address of a serial port specified by the user Select Auto to allow the BIOS to automatically assign the base I O and IRQ address The options for Se...

Page 97: ...o set the data transmission size for Console Redirection The options are 7 Bits and 8 Bits Parity A parity bit can be sent along with regular data bits to detect data transmission errors Select Even if the parity bit is set to 0 and the number of 1 s in data bits is even Select Odd if the parity bit is set to 0 and the number of 1 s in data bits is odd Select None if you do not want to send a pari...

Page 98: ...r the Windows OS The options are VT100 LINUX XTERMR6 SC0 ESCN and VT400 Redirection After BIOS POST Use this feature to enable or disable legacy console redirection after BIOS POST When set to Bootloader legacy console redirection is disabled before booting the OS When set to Always Enable legacy console redirection remains enabled when booting the OS The options are Always Enable and Bootloader S...

Page 99: ...ata bits is odd Select None if you do not want to send a parity bit with your data bits in transmission Select Mark to add a mark as a parity bit to be sent along with the data bits Select Space to add a Space as a parity bit to be sent with your data bits The options are None Even Odd Mark and Space Stop Bits A stop bit indicates the end of a serial data packet Select 1 Stop Bit for standard seri...

Page 100: ...erial Port for Out of Band Management Windows Emergency Management Services EMS The submenu allows the user to configure Console Redirection settings to support Out of Band Serial Port management EMS Emergency Management Services Console Redirection Select Enabled to use a COM port selected by the user for EMS Console Redirec tion The options are Enabled and Disabled If the item above set to Enabl...

Page 101: ...n the receiving buffer is empty The options are None Hardware RTS CTS and Software Xon Xoff Data Bits Use this feature to set the data transmission size for Console Redirection The options are 7 Bits and 8 Bits Parity A parity bit can be sent along with regular data bits to detect data transmission errors Select Even if the parity bit is set to 0 and the number of 1 s in data bits is even Select O...

Page 102: ...ted Computing Configuration Security Device Support If this feature and the TPM jumper on the motherboard are both set to Enabled onbaord security devices will be enabled for TPM Trusted Platform Module sup port to enhance data integrity and network security Please reboot the system for a change on this setting to take effect The options are Disabled and Enabled TPM State This feature changes the ...

Page 103: ...TXT Support Intel TXT Trusted Execution Technology helps protect against software based at tacks and ensures protection confidentiality and integrity of data stored or created on the system Use this feature to enable or disable TXT Support The options are Disabled and Enabled ...

Page 104: ...ing The options are Enable and Dis able If this item is set to Enable the following item will be available for configuration Memory Corrected Error Enabling Available when the item above Runtime Error Logging Support is set to Enable Select Enable for the BIOS to correct a memory error if it is correctable The options are Disable and Enable Memory Corr Error Threshold Use this item to enter the th...

Page 105: ... is full The options are Do Nothing and Erase Immediately SMBIOS Event Long Standard Settings Log System Boot Event This option toggles the System Boot Event logging to enabled or disabled The options are Disabled and Enabled MECI The Multiple Event Count Increment MECI counter counts the number of occurenc es that a duplicate event must happen before the MECI counter is incremented This is a nume...

Page 106: ...f the IPMI firmware installed in your system System Event Log Enabling Disabling Options SEL Components Select Enabled for all system event logging at bootup The options are Enabled and Disabled Erasing Settings Erase SEL Select Yes On next reset to erase all system event logs upon next system reboot Select Yes On every reset to erase all system event logs upon each system reboot Select No to keep...

Page 107: ...r configuration if Update IPMI LAN Configuration is set to Yes This feature allows the user to select the source of the IP address for this com puter If Static is selected you will need to know the IP address of this computer and enter it to the system manually in the field If DHCP is selected the BIOS will search for a DHCP Dynamic Host Configuration Protocol server in the network that is attache...

Page 108: ...MI Function Support Use this feature to enable IPMI support The options are Enabled and Disabled When Disabled the system powers on quickly by removing BIOS support for extended IPMI features The Disable option is for applications that require faster power on time wthout using Supermicro Update Manager SUM or extended IPMI features The BMC network configuration in the BIOS setup is also invalid wh...

Page 109: ...ring the BIOS Setup utility The options are Setup and Always Administrator Password Press Enter to create a new or change an existing Administrator password CSM Support Select Enabled to support the EFI Compatibility Support Module CSM which provides compatibility support for traditional legacy BIOS for system boot The op tions are Enabled and Disabled Secure Boot Menu This section displays the co...

Page 110: ...keys set by the manufacturer The options are Yes and No Save All Secure Boot Variables This feature allows the user to decide if all secure boot variables should be saved Platform Key PK This feature allows the user to configure the settings of the platform keys Set New Key Select Yes to load the new platform keys PK from the manufacturer s defaults Select No to load the platform keys from a file ...

Page 111: ...load the DBX from the manufacturer s defaults Select No to load the DBX from a file The options are Yes and No Append New Key Select Yes to add the DBX from the manufacturer s defaults to the existing DBX Select No to load the DBX from a file The options are Yes and No Authorized TimeStamps Set New Key Select Yes to load the DBT from the manufacturer s defaults Select No to load the DBT from a fil...

Page 112: ...etting is Dual Fixed Boot Order Priorities This option prioritizes the order of bootable devices that the system to boot from Press Enter on each entry from top to bottom to select devices Dual Boot Order 1 Dual Boot Order 2 Dual Boot Order 3 Dual Boot Order 4 Dual Boot Order 5 Dual Boot Order 6 Dual Boot Order 7 Dual Boot Order 8 7 7 Boot Settings Use this feature to configure Boot Settings ...

Page 113: ...emove a pre defined boot device from which the system will boot during startup The settings are any pre defined boot device NETWORK Drive BBS Priorities This feature allows the user to specify which Network devices are boot devices Legacy Boot Order 1 2nd Boot Device UEFI Application Boot Priorities This feature allows the user to specify which UEFI devices are boot devices UEFI Boot Order 1 ...

Page 114: ...ter Save Changes and Reset When you have completed the system configuration changes select this option to leave the BIOS setup utility and reboot the computer so the new system configura tion parameters can take effect Select Save Changes and Exit from the Exit menu and press Enter Save Options Save Changes After completing the system configuration changes select this option to save the changes yo...

Page 115: ...faults from the Exit menu and press En ter This enables the user to save any changes to the BIOS setup for future use Restore User Defaults To set this feature select Restore User Defaults from the Exit menu and press En ter Use this feature to retrieve user defined settings that were saved previously Boot Override Listed on this section are other boot options for the system i e Built in EFI shell...

Page 116: ...7 40 SUPERSERVER 5018D MHR7N4P User s Manual Notes ...

Page 117: ... with your system manufacturer for possible repairs These fatal errors are usually communicated through a series of audible beeps The numbers on the fatal error list correspond to the number of beeps for the cor responding error Note A PC buzzer must be conected to JD1 to hear the BIOS Error Beep Codes BIOS Error Beep Codes Beep Code LED Error Message Description 1 beep Refresh Circuits have been ...

Page 118: ...A 2 SUPERSERVER 5018D MHR7N4P User s Manual Notes ...

Page 119: ...s that can support up to 128 GB of ECC RDIMM Registered DIMM or 64 GB of ECC non ECC UDIMM Unregistered DIMM DDR4 1866 1600 memory Note see Section 5 5 for details Hard Drives Four 3 5 hot swappable SAS or SATA hard drives Motherboard X10SDV 7TP4F Flex ATX form factor Dimensions 9 x 7 25 in 229 x 184 mm Chassis SC813MFTQC R407CB 1U rackmount Dimensions WxHxD 17 2 x 1 7 x 19 8 in 437 x 43 x 503 mm ...

Page 120: ...densing Non operating Relative Humidity 5 to 95 non condensing Regulatory Compliance Electromagnetic Emissions FCC Class A EN 55032 Class A EN 61000 3 2 3 3 CISPR 22 Class A Electromagnetic Immunity EN 55024 CISPR 24 EN 61000 4 2 EN 61000 4 3 EN 61000 4 4 EN 61000 4 5 EN 61000 4 6 EN 61000 4 8 EN 61000 4 11 Safety CSA EN IEC UL 60950 1 Compliant UL or CSA Listed USA and Canada CE Marking Europe Ca...

Page 121: ...B 3 Appendix B System Specifications Notes ...
Page 122: ... perform be reasonably expected to result in significant injury or loss of life or catastrophic property damage Accordingly Supermicro dis claims any and all liability and should buyer use or sell such products for use in such ultra hazardous applications it does so entirely at its own risk Furthermore buyer agrees to fully indemnify defend and hold Supermicro harmless for and against any and all ...

Page 123: ...ter system at bootup C 2 Recovering the UEFI BIOS Image Main BIOS Block A UEFI BIOS flash chip consists of a recovery BIOS block which is comprised of two boot blocks and a main BIOS block the main BIOS image The boot block contains critical BIOS codes including memory detection and recovery codes for the user to flash a new BIOS image if the original main BIOS image is corrupted When the system p...

Page 124: ...pt the BIOS flashing until it has completed Note If you cannot locate the Super ROM file in your driver disk visit our website at www supermicro com to download the BIOS image to a USB flash device and rename it Super ROM 2 Insert the USB device that contains the new BIOS image Super ROM into your USB drive and power on the system 3 While powering on the system keep pressing Ctrl and Home simultan...

Page 125: ... has completed press any key to reboot the system 7 Using a different system extract the BIOS package into a bootable USB flash drive 8 When the DOS prompt appears enter AMI BAT BIOSname Note Do not interrupt this process until BIOS flashing has completed ...

Page 126: ...ower cable from the power supply to clear CMOS then plug the AC power cable in the power supply again to power on the system 10 Press Del continuously to enter the BIOS Setup utility 11 Press F3 to load the default settings 12 After loading the default settings press F4 to save the settings and exit the BIOS Setup utility ...

Reviews: