background image

Chapter 2: Installation

2-27

KB /MS

Fan8
(CPU2 Fan)

IPMI LAN

USB 0/1

COM1

PHY

VGA

LAN1

LAN2

LAN CTRL

BMC CTRL

BIOS

COM2

USB6

USB7

USB4/5

(ME Rec.)

JTAG Of CPLD

ME Mode

JPI2C

P2-DIMM3A

P2-DIMM3B

P2-DIMM2A

P2-DIMM2B

P2-DIMM1A

P2-DIMM1B

P1-DIMM1B

P1-DIMM1A

P1-DIMM2B

P1-DIMM2A

P1-DIMM3B

P1-DIMM3A

LE2

JUIDB

JPL1

J10

UIOP

SXB2: PCI-E 2.0 x 8

SXB1: PCI-E 2.0 x 16

SXB3: PCI-E 2.0 x 8 in x 4 Slot

J1

J2

J3

JPB

JPG1

Fan6

IPMB

JI2C1

JI2C2

JBT1

J13

J14

JP5

J12

Fan5

JL1 

USB2/3

JLPC1

CPU1

CPU2

Intel I5520

North Bridge

Intel ICH10R

South Bridge

T-SGPIO2

T

S

GPIO1

J17

JPRST1

JWD

JF1

JOH1

JP3

LE1

Fan4

Fan3

SP1

Buzzer

JBAT1

Battery

Fan2

Fan1

JPW1

JPW3

JPW2

JD1

I-SA

TA

5

I-SA

TA

4

I-SA

TA

3

I-SA

TA

2

I-SA

TA

1

I-SA

TA

0

X8DTU/-F

Fan7(CPU1 Fan)

FP

 CTRL

CPLD

PWRLED/SPK

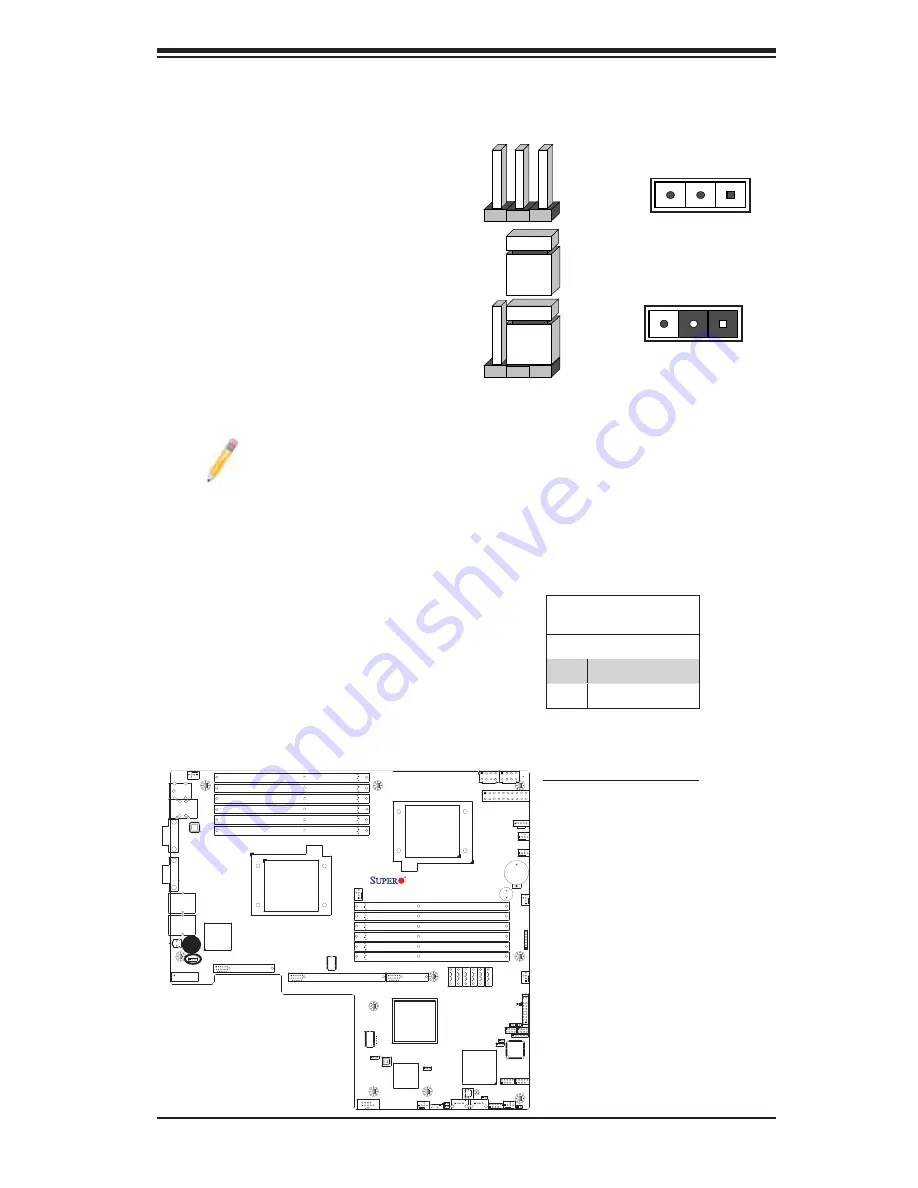
2-7   Jumper Settings

Explanation of Jumpers

To modify the operation of the mother-

board, jumpers can be used to choose 

between optional settings.  Jumpers cre-

ate shorts between two pins to change 

the function of the connector. Pin 1 

is identifi ed with a square solder pad 

on the printed circuit board.  See the 

motherboard layout pages for jumper 

locations.  

Note:

 On two pin jumpers, 

"Closed" means the jumper 

is on and "Open" means the 

jumper is off the pins. 

Connector

Pins

Jumper

Cap

Setting

Pin 1-2 short

3    2    1

3    2    1

GLAN Enable/Disable

JPL1 enable or disable the GL AN 

Por t1/GL AN Por t2 on the mother-

board. See the table on the right for 

jumper settings. The default setting is 

Enabled.

GLAN Enable

Jumper Settings

Pin#     Defi nition     

1-2

Enabled (default)

2-3

Disabled

A

A. LAN Ports 1/2 Enable

Summary of Contents for Supero X8DTU

Page 1: ...Welcome to the Iceberg Relion 1701 Motherboard Manual...

Page 2: ...X8DTU X8DTU F USER S MANUAL Revision 1 0 SUPER...

Page 3: ...ERMICRO SHALL NOT HAVE LIABILITY FOR ANY HARDWARE SOFTWARE OR DATA STORED OR USED WITH THE PRODUCT INCLUDING THE COSTS OF REPAIRING REPLACING INTEGRATING INSTALLING OR RECOVERING SUCH HARDWARE SOFTWAR...

Page 4: ...ual Organization Chapter 1 describes the features specifications and performance of the mother board and provides detailed information about the chipset Chapter 2 provides hardware installation instru...

Page 5: ...Micro Computer B V Het Sterrenbeeld 28 5215 ML s Hertogenbosch The Netherlands Tel 31 0 73 6400390 Fax 31 0 73 6416525 Email sales supermicro nl General Information support supermicro nl Technical Su...

Page 6: ...Preface v Notes...

Page 7: ...ol 1 10 Environmental Temperature Control 1 10 System Resource Alert 1 10 1 4 ACPI Features 1 11 Slow Blinking LED for Suspend State Indicator 1 11 1 5 Power Supply 1 11 1 6 Super I O 1 12 1 7 Overvie...

Page 8: ...ting Cables 2 22 ATX Power Connector 2 22 Processor Power Connector 2 22 UIO Riser_Card Power Connector 2 23 Chassis Intrusion 2 23 Fan Headers 2 24 Speaker Power LED Header 2 24 T SGPIO Headers 2 25...

Page 9: ...Returning Merchandise for Service 4 Chapter 4 BIOS 4 1 Introduction 4 1 Starting BIOS Setup Utility 4 1 How To Change the Configuration Data 4 1 Starting the Setup Utility 4 2 4 2 Main Setup 4 2 4 3 A...

Page 10: ...rds in quality and performance Check that the following items have all been included with your motherboard If anything listed here is damaged or missing contact your retailer The following items are i...

Page 11: ...age Note The drawings and pictures shown in this manual were based on the latest PCB Revision available at the time of publishing of the manual The motherboard you ve received may or may not look exac...

Page 12: ...5 J12 Fan5 JL1 USB2 3 JLPC1 CPU1 CPU2 Intel I5520 North Bridge Intel ICH10R South Bridge T SGPIO2 T SGPIO1 J17 JPRST1 JWD JF1 JOH1 JP3 LE1 Fan4 Fan3 SP1 Buzzer JBAT1 Battery Fan2 Fan1 JPW1 JPW3 JPW2 J...

Page 13: ...are for test purposes only 1 See Chapter 2 for detailed information on jumpers and connectors 2 indicates the location of Pin 1 3 When LE1 LED is on the onboard power connection is on Make sure to 4 u...

Page 14: ...ns 4 7 Speaker JF1 Front Panel Control Connector JL1 Chassis Intrusion Header JOH1 Overheat LED Header JPI2 C Power Supply SMBbus I2 C Header JPW1 20 pin ATX Main Power Connector JPW2 JPW3 8 pin Secon...

Page 15: ...E 2 0 x8 in x4 slot J3 SXB3 BIOS 32 Mb AMI SPI Flash ROM PCI 2 3 ACPI 1 0 2 0 3 0 Plug and Play PnP DMI 2 3 USB Keyboard support Hardware BIOS Monitoring and SMBIOS 2 3 PC Health Monitoring Onboard vo...

Page 16: ...dicated LAN on the X8DTU F One VGA Port supported by the Winbond WPCM450 BMC Controller Two COM ports 1 header 1 port PS 2 mouse and PS 2 keyboard ports Up to eight USB 2 0 Universal Serial Bus 2 Rear...

Page 17: ...DDR3 DIMM DDR3 DIMM DDR3 DIMM DDR3 DIMM B C E F 3 4 BMC VGA ESI SATA 1 SATA SPI SST 25VF016 CLINK CLINK PCIE Ports 1 6 PCI E x8 Gen2 x16 Gen2 x8 Intel ICH10R 1 2 Intel 82576 RJ45 PCI ESI Intel 5520 Po...

Page 18: ...A full width QPI link pair provides 84 signals Each processor supports two QuickPath links one going to the other processor and the other to the 5520 North Bridge The 5520 chipset supports up to 36 P...

Page 19: ...tage thresholds to define the sensitivity of the voltage monitor Fan Status Monitor with Firmware Control The PC health monitor can check the RPM status of the cooling fans The onboard CPU and chassis...

Page 20: ...003 and Windows 2008Op erating Systems Slow Blinking LED for Suspend State Indicator When the CPU goes into a suspend state the chassis power LED will start blinking to indicate that the CPU is in sus...

Page 21: ...unctions that comply with ACPI Advanced Configuration and Power Interface which includes support of legacy and ACPI power manage ment through an SMI or SCI function pin It also features auto power man...

Page 22: ...not touch its components peripheral chips memory modules or gold contacts When handling chips or modules avoid touching their pins Put the motherboard and peripherals back into their antistatic bags...

Page 23: ...on the chassis 8 Tools Needed Phillips Screwdriver 1 Pan head 9 screws 2 Installation Instructions Install the IO shield into the 1 chassis Locate the mounting holes 2 on the motherboard Refer to the...

Page 24: ...ans When purchasing a 5500 Series processor or when receiving a motherboard 3 with a 5500 Series processor pre installed make sure that the CPU plastic cap is in place and none of the CPU pins are ben...

Page 25: ...the surface of the socket or its pins to avoid dam aging the CPU or the socket With the CPU inside the socket 4 inspect the four corners of the CPU to make sure that the CPU is properly installed Once...

Page 26: ...p plied Screw 1 Screw 2 Install Screw 1 Place the heatsink on top of the 2 CPU so that the four mounting holes are aligned with those on the retention mechanism 3 Install two diagonal screws ie the 1...

Page 27: ...d 3 remove the heatsink screws from the motherboard in the se quence as show in the picture on the right Hold the heatsink as shown 4 in the picture on the right and gently wriggle the heatsink to loo...

Page 28: ...notch 2 along the bottom of the module to prevent inserting the DIMM module incor rectly Gently press down on the DIMM module until it snaps into place in the slot 3 Repeat for all modules Memory Popu...

Page 29: ...sed Note 2 Due to OS limitations some operating systems may not show more than 4 GB of memory Note 3 Due to memory allocation to system devices the amount of memory that remains available for operatio...

Page 30: ...R3 Notch X8DTU F To Install Insert module vertically and press down until it snaps into place Pay attention to the alignment notch at the bottom Installing and Removing DIMMs To Remove Use your thumbs...

Page 31: ...locations of the various I O ports 1 Back Panel Connectors IO Ports Back Panel I O Port Locations and Definitions 1 2 3 4 5 6 7 8 9 10 X8DTU F Back Panel Connectors Keyboard Purple 1 PS 2 Mouse Green...

Page 32: ...the table at right for pin defini tions PS 2 Keyboard Mouse Pin Definitions PS2 Keyboard PS2 Mouse Pin Definition Pin Definition 1 KB Data 1 Mouse Data 2 No Connection 2 No Connection 3 Ground 3 Groun...

Page 33: ...panel USB connec tions used to provide front panel USB access See the tables on the right for pin definitions Back Panel USB USB 0 1 Pin Definitions 1 5V 2 PO 3 PO 4 Ground 5 N A Front Panel USB Pin...

Page 34: ...TD2 24 Ground 16 TD3 27 Ground 17 TD3 28 Ground NC No Connection 1 LAN 1 2 LAN 2 3 IPMI LAN X8DTU F Gigabit LAN Ethernet Ports Two Gigabit Ethernet ports LAN1 2 are located next to the VGA port on the...

Page 35: ...located next to the BMC Controller to provide front accessible serial connection See the table on the right for pin definitions Serial Ports COM1 Pin Definitions Pin Definition Pin Definition 1 DCD 6...

Page 36: ...nnector provides video and CRT display Refer to the board layout below for the location VGA CRT Pin Definitions Pin Definition Pin Definition 1 Red 10 Ground 2 Green 11 MS0 3 Blue 12 MS1 SDA DDC Data...

Page 37: ...is located at LE2 When you press the UID switch both Rear UID LED and Front Panel UID LED Indicators will be turned on Press the UID switch again to turn off both LED Indicators These UID Indicators p...

Page 38: ...LED NIC2 Activity LED Key X8DTU F 3 Front Control Panel JF1 contains header pins for various buttons and indicators that are normally lo cated on a control panel at the front of the chassis These con...

Page 39: ...tivity LED Key Power LED The Power LED connection is located on pins 15 and 16 of JF1 Refer to the table on the right for pin definitions NMI Button The non maskable interrupt button header is located...

Page 40: ...of JF1 and the LED connection for GLAN Port 2 is on Pins 9 and 10 Attach the NIC LED cables to display network activity Refer to the table on the right for pin definitions HDD LED The HDD LED connect...

Page 41: ...ctions The Red LED on pin 7 provides warnings of an overheat fan failure or power failure The Blue LED on pin 8 works as the front panel UID LED indicator The Red LED takes precedence over the Blue LE...

Page 42: ...n definitions Power Button Pin Definitions JF1 Pin Definition 1 Signal 2 3V Standby Reset Button The Reset Button connection is located on pins 3 and 4 of JF1 Attach it to a hardware reset switch on t...

Page 43: ...South Bridge T SGPIO2 T SGPIO1 J17 JPRST1 JWD JF1 JOH1 JP3 LE1 Fan4 Fan3 SP1 Buzzer JBAT1 Battery Fan2 Fan1 JPW1 JPW3 JPW2 JD1 I SATA5 I SATA4 I SATA3 I SATA2 I SATA1 I SATA0 X8DTU F Fan7 CPU1 Fan FP...

Page 44: ...from the chassis to inform you of a chassis intrusion when the chassis is opened Chassis Intrusion Pin Definitions JL1 Pin Definition 1 Intrusion Input 2 Ground A B A UIO PWR Connector B Chassis Intr...

Page 45: ...7 CPU1 Fan FP CTRL CPLD PWRLED SPK Fan Headers The X8DTU X8DTU F has six chassis system fan headers Fan1 to Fan6 and two CPU fans Fan7 Fan8 on the motherboard All these 4 pin fans headers are backward...

Page 46: ...PWRLED SPK A B A T SGPIO1 B A T SGPIO2 C Overheat Fan Fail LED JOH1 Overheat LED Fan Fail JOH1 The JOH1 header is used to connect an LED indicator to provide warnings of chassis overheating or fan fa...

Page 47: ...IO2 T SGPIO1 J17 JPRST1 JWD JF1 JOH1 JP3 LE1 Fan4 Fan3 SP1 Buzzer JBAT1 Battery Fan2 Fan1 JPW1 JPW3 JPW2 JD1 I SATA5 I SATA4 I SATA3 I SATA2 I SATA1 I SATA0 X8DTU F Fan7 CPU1 Fan FP CTRL CPLD PWRLED S...

Page 48: ...I SATA3 I SATA2 I SATA1 I SATA0 X8DTU F Fan7 CPU1 Fan FP CTRL CPLD PWRLED SPK 2 7 Jumper Settings Explanation of Jumpers To modify the operation of the mother board jumpers can be used to choose betw...

Page 49: ...r JBT1 is used to clear CMOS Instead of pins this jumper consists of contact pads to prevent the accidental clearing of CMOS To clear CMOS use a metal object such as a small screwdriver to touch both...

Page 50: ...Fan7 CPU1 Fan FP CTRL CPLD PWRLED SPK A A JI2 C1 B JI2 C2 C BMC PHY Reset B I2 C Bus to PCI Exp Slots Jumpers JI2 C1 and JI2 C2 allow you to connect the System Management Bus I2 C to PCI Express slots...

Page 51: ...JI2C1 JI2C2 JBT1 J13 J14 JP5 J12 Fan5 JL1 USB2 3 JLPC1 CPU1 CPU2 Intel I5520 North Bridge Intel ICH10R South Bridge T SGPIO2 T SGPIO1 J17 JPRST1 JWD JF1 JOH1 JP3 LE1 Fan4 Fan3 SP1 Buzzer JBAT1 Battery...

Page 52: ...SATA4 I SATA3 I SATA2 I SATA1 I SATA0 X8DTU F Fan7 CPU1 Fan FP CTRL CPLD PWRLED SPK A A ME Mode Select B ME Recovery ME Mode Select Jumper JP 3 allows the user to select the Manufacture Mode Short th...

Page 53: ...t has two LEDs The yellow LED indicates activity while the Link LED may be green amber or off to indicate the speed of the connection See the tables at right for more information 2 8 Onboard Indicator...

Page 54: ...TA3 I SATA2 I SATA1 I SATA0 X8DTU F Fan7 CPU1 Fan FP CTRL CPLD PWRLED SPK A B A Onboard Power LED B Rear UID LED Onboard Power LED An Onboard Power LED is located at LE1 on the motherboard When this L...

Page 55: ...JBAT1 Battery Fan2 Fan1 JPW1 JPW3 JPW2 JD1 I SATA5 I SATA4 I SATA3 I SATA2 I SATA1 I SATA0 X8DTU F Fan7 CPU1 Fan FP CTRL CPLD PWRLED SPK Serial ATA Pin Definitions Pin Definition 1 Ground 2 TX_P 3 TX_...

Page 56: ...board and 1 chassis Disconnect all ribbon wire cables from the motherboard including those for 2 the keyboard and mouse Remove all add on cards 3 Install CPU 1 first making sure it is fully seated and...

Page 57: ...ndor for repairs Memory Errors When a No_Memory_Beep_Code is issued by the system check the following Make sure that the DIMM modules are properly and fully installed 1 Check if different speeds of DI...

Page 58: ...information when 3 contacting Supermicro for technical support Motherboard model and PCB revision number BIOS release date version this can be seen on the initial display when your system first boots...

Page 59: ...annot be removed Send your motherboard back to Supermicro for repair Question What s on the CD that came with my motherboard Answer The supplied compact disc has quite a few drivers and programs that...

Page 60: ...annot be configured Options in blue can be configured by the user The right frame displays the key legend Above the key legend is an area reserved for a text message When an option is selected in the...

Page 61: ...ising from a BIOS update If you have to update the BIOS do not shut down or reset the system while the BIOS is updating This is to avoid possible boot failure 4 2 Main Setup When you first enter the A...

Page 62: ...otherboard Speed This item displays the speed of the CPU detected by the BIOS Physical Count This item displays the number of processors installed in your system as detected by the BIOS Logical Count...

Page 63: ...etween POST mes sages or the OEM logo Select Disabled to display the POST messages Select Enabled to display the OEM logo instead of the normal POST messages The op tions are Enabled and Disabled AddO...

Page 64: ...19 Capture Interrupt 19 is the software interrupt that handles the boot disk function When this item is set to Enabled the ROM BIOS of the host adaptors will capture Interrupt 19 at boot and allow th...

Page 65: ...ty Available when supported by the OS and the CPU Set to Enabled to enable the Execute Disable Bit which will allow the processor to designate areas in the system memory where an application code can...

Page 66: ...the CPU will conditionally demote C6 or C7 requests to C3 based on un core auto demote information The options are Disabled and Enabled DCA Technology Select Enabled to use Intel s DCA Direct Cache Ac...

Page 67: ...tains two identical copies of all data in memory for redundancy Lockstep The motherboard uses two areas of memory to run the same set of operations in parallel Sparing A preset threshold of correctabl...

Page 68: ...is is the temperature rise to the DIMM thermal zone Each step is in 0 5o C increment The default is 020 Press or on your keyboard to change this value Air Flow This is the air flow speed to the DIMM m...

Page 69: ...significantly reduces CPU overhead by leveraging CPU architectural improvements freeing resources for more other tasks The options are Disabled and Enabled Slot SXB2 SXB3 Width This feature allows th...

Page 70: ...e Disabled and Enabled IDE Floppy Configuration When this submenu is selected the AMI BIOS automatically detects the presence of the IDE or Floppy devices and displays the following items SATA 1 Confi...

Page 71: ...to configure all devices in the system PCI Latency Timer This feature sets the latency Timer of each PCI device installed on a PCI bus Select 64 to set the PCI latency to 64 PCI clock cycles The optio...

Page 72: ...y Select COM to configure the onboard COM 2 port as a normal serial port Select SOL to configure the onboard COM 2 port as a virtual COM port for SOL use The options are SOL and COM Serial Port1 Addre...

Page 73: ...ANSI VT100 and VT UTF8 VT UTF8 Combo Key Support A terminal keyboard definition that provides a way to send commands from a remote console Available options are Enabled and Disabled Sredir Memory Disp...

Page 74: ...factory and is the baseline on which the motherboard takes action during different CPU temperature conditions i e by increasing CPU Fan speed triggering the Overheat Alarm etc Since CPUs can have dif...

Page 75: ...yed in degrees in Celsius and Fahrenheit as it is detected by the BIOS Fan 1 Fan 8 Reading This feature displays the fan speed readings from fan interfaces Fan 1 through Fan 8 Fan Speed Control Modes...

Page 76: ...support ACPI The op tions are Yes and No ACPI APIC Support Select Enabled to include the ACPI APIC Table Pointer in the RSDT Root System Description Table pointer list The options are Enabled and Dis...

Page 77: ...Number and pressing Enter to display the information as shown in the screen Total Number of Entries SEL Entry Number SEL Record ID SEL Record Type Event Timestamp Generator ID Event Message Format Use...

Page 78: ...able containing MAC Address IP Address pairs that are manually entered probably by a network administrator Only clients with a MAC address listed in the MAC IP Address Table will be assigned an IP add...

Page 79: ...re determined time to delay PEF alerts after system power ups and resets Refer to Table 24 6 of the IPMI 1 5 Specification for more information at www intel com The options are No Delay 30 sec 60 sec...

Page 80: ...ration View Event Log Use this option to view the System Event Log Mark All Events as Read This option marks all events as read The options are OK and Cancel Clear Event Log This option clears the Eve...

Page 81: ...etup Utility View Only allows access to the Setup Utility but the fields cannot be changed Limited allows only limited fields to be changed such as Date and Time No Access prevents User access to the...

Page 82: ...Drives This feature allows the user to specify the boot sequence from all available hard disk drives The settings are Disabled and a list of all hard disk drives that have been detected i e 1st Drive...

Page 83: ...uration and reboot the computer Select Discard Changes and Exit from the Exit menu and press Enter Discard Changes Select this option and press Enter to discard all the changes and return to the AMI B...

Page 84: ...ose which will not allow the system to continue the boot up procedure If a fatal error occurs you should consult with your system manufac turer for possible repairs BIOS Error Beep Codes Beep Code Err...

Page 85: ...A 2 X8DTU X8DTU F User s Manual Notes...

Page 86: ...or RAID driver displays When the Windows OS Setup screen appears press S to specify additional 3 device s Insert the driver diskette Intel AA RAID Windows XP 2003 2008 Vista Driver 4 for ICH10R into...

Page 87: ...he OS installation The Windows OS Setup screen will display 2 From the Windows OS Setup screen press the Enter key The Windows 3 OS Setup will automatically load all device files and then continue wit...

Page 88: ...h item you must re boot the system before proceeding with the next item on the list The bottom icon with a CD on it allows you to view the entire contents of the CD Appendix C Software Installation In...

Page 89: ...II displays crucial system information such as CPU temperature system voltages and fan status See the Figure below for a display of the Supero Doctor III interface Note 1 The default user name and pas...

Page 90: ...te Control Note SD III Software Revision 1 0 can be downloaded from our Web site at ftp ftp supermicro com utility Supero_Doctor_III You can also download SDIII User s Guide at http www supermicro com...

Page 91: ...C 4 X8DTU X8DTU F User s Manual Notes...

Page 92: ...expected to result in significant injury or loss of life or catastrophic property damage Accordingly Supermicro disclaims any and all liability and should buyer use or sell such products for use in su...

Reviews: