Super Circuits DMR27U User Manual Download Page 14

10

www.supercircuits.com

SECTION 3: SYSTEM SETUP

NOTE

To receive smooth video during playback, set the frame rate of each channel for more than 3 fps. Switch to full screen 
during playback when audio recording is enabled.

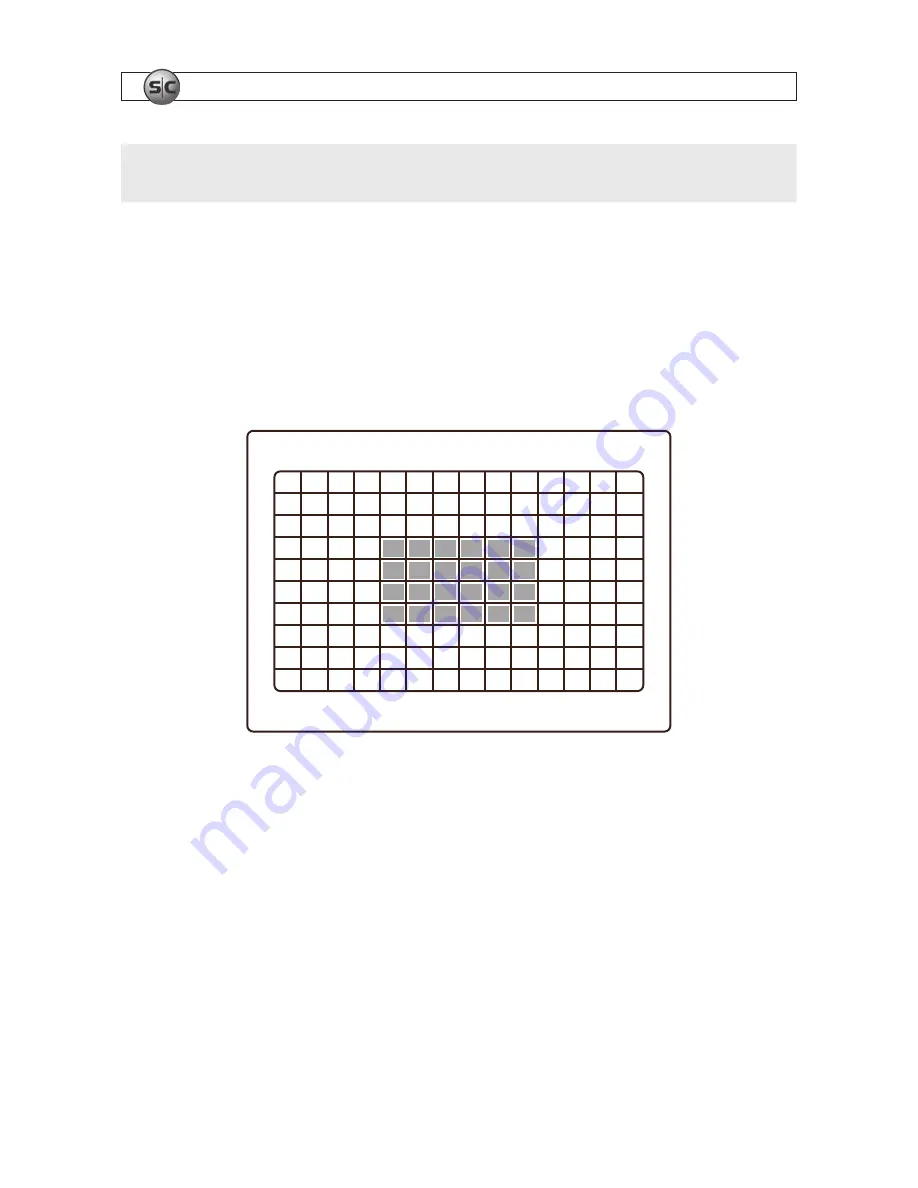
3.3.1  PARTIAL ZONE settings

After selecting PARTIAL ZONE in the MOTION ZONE menu, select the portion of the camera video within which motion sensing 
will occur . Each block in the MOTION ZONE display shown below represents a specific segment of the camera video image . Use the 
navigation buttons on the front panel to move to each block, and press 

Enter

 button to enable or disable motion sensing in that 

portion of the video . Areas selected for motion sensing are indicated by a color change of the block . By default, only the area in the 
middle of the camera video is monitored for motion . 

Motion Zone selection screen with default selections

3.3.2  RECORD SCHEDULE

Select SCHEDULE in the RECORD menu to setup the record schedule for the camera channel . In the SCHEDULE menu, use the 
navigation buttons on the front panel to move to each option on the screen . 

[

ALL

]: Press 

Enter

 to apply to the entire time zone and all channels . 

[

SUN to SAT

]: Press 

Enter

 to apply to the entire time zone for the specified channel . 

[

ENTER

]: When a time slot is selected, press 

ENTER

 repeatedly to cycle through the options 

C

 (continuous), 

M

 (motion), 

S

 (sensor), 

or disable recording mode .

Summary of Contents for DMR27U

Page 1: ...264 4 Channel DVR User Manual Product DMR27U Please read this manual before using your recorder and always follow the instructions for safety and proper use Save this manual for future reference DMR27U_RM ...

Page 2: ... person s voice without their consent or a court order is strictly prohibited by law Supercircuits makes no representations concerning the legality of certain product applications such as the making transmission or recording of video and or audio signals of others without their knowledge and or consent We encourage you to check and comply with all applicable local state and federal laws and regula...

Page 3: ... 13 3 6 STORAGE mode 15 3 7 SAVE SETUP 16 SECTION 4 LIVE and SEARCH Modes 17 4 1 LIVE window 17 4 2 SEARCH window 18 4 3 Play mode 22 SECTION 5 Archiving and Backup 24 5 1 Archiving still images 24 5 2 BACKUP still images or video clip to a USB memory stick 26 5 3 Playing Backup video 27 SECTION 6 Software Maintenance 30 6 1 Firmware upgrade 30 6 2 Backup the setup configuration 31 6 3 Load setup ...

Page 4: ...ack view 41 SECTION 8 Network IE BrowserViewer 44 8 1 Connect to the DVR download and installWebViewer 44 8 2 LIVE mode 45 8 3 Search and PLAYBACK mode 46 SECTION 9 Specifications 49 APPENDIX A HDD Compatibility List 50 APPENDIX B Install FFDSHOW Codec 52 ...

Page 5: ...eous recording payback and remote viewing networking NaFS file system developed for preventing data loss from power failures Real Time Operating System and simplified hardware with a watchdog timer to ensure reliability Individual channel recording and playback with different frame rates High quality live and playback resolution Multi site management supported by CMS application Network via LAN DH...

Page 6: ... cord Remote control AAA batteries 2 Software CD 1 2 1 Software CD The software CD included with your DVR contains Quick Installation Guide FFDSHOW codec see Appendix B Client Software MClient see Section 7 User manual this document HDD calculator for determining recording capacity of your hard disk drive Link to download Adobe Acrobat Reader for viewing documentation ...

Page 7: ...eo modes tt Rewind the footage at 1x 2x and 4x speed in PLAYBACK mode t Jump Step backward In PLAYBACK mode the playback position moves 60 seconds backward u Jump Step forward In PLAYBACK mode the playback position moves 60 seconds forward uu Fast forward the footage at 1x 2x and 4x speeds in PLAYBACK mode REC Start and stop recording manually UP Scroll up in the system menu or select camera 1 in ...

Page 8: ...nectors for video input Connect camera output to Video in VIDEO OUT 1 connector for video output VGA Connector for VGA monitor AUDIO Audio 1 4 AUDIO IN ADUIO OUT SENSOR IN Connection for sensor device ALARM OUT 1 alarm device output Provides simple On Off switching by using relay 0 5A 125V 1A 30V RS 485 Connect to PTZ camera PTZ D PTZ D LAN RJ 45 connector for LAN connection DC 12V Apply 12V DC us...

Page 9: ...stalled in your DVR voids warranty refer to the HDD Compatibility List in Appendix A for recommended models 2 4 Remote control Table 4 Remote control controls Button Description ID DVR ID setup REC Record manually NUMBER Press number button to select channel tt Fast Rewind uu Fast Forward u II Play Pause u PTZ Jump Step forward t Jump Step backward SEL Enter DIRECTION Direction or number 1 to 4 SE...

Page 10: ...ou for password The default password is 1111 CAUTION SupercircuitshighlyrecommendsthattheDVRpasswordbechangedduringinitialsetup Use the menu navigation buttons up right u down and left t representing 1 2 3 and 4 respectively or the number keys to enter the password then press ENTER for password validation 1 3 2 4 Menu navigation buttons After the password is entered the SETUP icons will appear Use...

Page 11: ...M SETUP 3 2 LIVE mode setup options In the LIVE mode menu you can adjust how video images from the cameras appear on the monitor Navigate through the menu items by pressing the and buttons Use the t and u buttons to modify a setting Setup LIVE screen ...

Page 12: ...hannel shown in sequential display mode BRIGHTNESS Change the brightness level for the specified channel CONTRAST Change the contrast level for the specified channel HUE Change the hue level for the specified channel SATURATION Change the saturation level for the specified channel VGA SCREEN MODE Select VGA screen mode as either FULL or Normal Table 6 Event BEEP alarm motion function Event Beep On...

Page 13: ...ON BY SENSOR BY SCHEDULE DISABLE MOTION ZONE Select FULL ZONE or PARTIAL ZONE motion sensing If PARTIAL ZONE is chosen the screen changes to enable disable motion sensing in each of 140 14 x 10 image segments MOTION SENSITIVITY Set the motion sensitivity for the specified channel Adjust the motion sensitivity from 1 to 9 SENSOR TYPE Set the sensor type for the channel to either none N O normal ope...

Page 14: ...ble motion sensing in that portion of the video Areas selected for motion sensing are indicated by a color change of the block By default only the area in the middle of the camera video is monitored for motion Motion Zone selection screen with default selections 3 3 2 RECORD SCHEDULE Select SCHEDULE in the RECORD menu to setup the record schedule for the camera channel In the SCHEDULE menu use the...

Page 15: ...era User Manual SECTION 3 SYSTEM SETUP COPY FROM COPY TO Copy the Record schedule of one channel to another channel ESC Return to the RECORD setup menu SCHEDULE recording setup screen 3 4 SYSTEM SETUP mode SYSTEM setup screen ...

Page 16: ...ate and time display format SET DATE TIME Set the present date and time If DLS daylight savings is ON user can not enter this menu or change the date and time PTZ CONTROL Set the camera speed number type and ID KEY TONE Enable disable the key tone LANGUAGE Select system language REMOTE CONTROL ID Select the ID of the remote control Default is 0 1 Select ID from 0 to 9 2 On a remote control press t...

Page 17: ...TZ CONTROL screen 3 5 NETWORK setup Setup network parameters on the NETWORK setup screen NETWORK setup screen Table 9 Menu items in the NETWORK setup screen Item Description PORT Video Port number default 8000 BACKUP port number is PORT number 1 WEB PORT IE Browser port number default 80 ...

Page 18: ...PORT number in the NETWORK setup screen is the port assigned to the DVR in the IP sharing device router Additionally the DVR requires two additional ports on the IP sharing device one to transmit video and the other to transmit BACKUP files The video port number is defined in the PORT entry and the BACKUP port number is always the PORT number 1 For instance in the NETWORK screen shown above the PO...

Page 19: ...o the DVR from an IP sharer using the DMZ function 3 5 3 SEND E MAIL notification options E mail notification options include IP Notification DVR will send an e mail notification to recipient automatically if IP changes EVENT ALARM DVR will send an e mail notification to recipient automatically if an event detected MAIL ADDRESS Recipient e mail address MAIL SERVER name Recipient e mail server addr...

Page 20: ... 1 SAVE SETUP TO A USB User can save the DVR configuration to a USB memory stick See paragraph 6 2 LOAD SETUP FROM A USB Upload restore the DVR configuration using the USB memory stick See paragraph 6 3 VIDEO DELETE Enable disable recording limit DELETE VIDEO AFTER Set the time limit for a recording to reside on the hard disk drive from 1 to 60 days 3 7 SAVE SETUP Select SAVE SETUP and click YES t...

Page 21: ...en icons in LIVE window Icon Description C Continuous recording in progress R Manual recording in progress M Motion recording is triggered S Sensor recording is triggered Indicates the HDD is overwriting Indicates alarm output is activated Event indicator When there is an alarm sensor alarm or motion alarm in the video channel this icon is red ...

Page 22: ...s with remote control ID 4 2 SEARCH window In LIVE mode press SEARCH and enter the password to open the SEARCH screen Use the arrow buttons or remote control to enter the password SEARCH window 4 2 1 EVENT Search The Event Search window is used to find stored video Three categories of search filters can be applied DATE CHANNEL and TYPE Use the p and q buttons move through the options and press ENT...

Page 23: ...o change the channel selection from ALL to any one of the available channels Press ENTER to select the CHANNEL and move to the TYPE selector 5 Use the t and u buttons to change the TYPE of recording to A All Event Recording M Motion Recording S Sensor Recording M Manual Recording or C Continuous Recording Press ENTER to show the search results LIST search criteria 6 To find the target surveillance...

Page 24: ...llance video event SEARCH date timeline screens NOTE IntheSEARCHtimelinewindow theREDBarindicateswhenvideodatawasrecorded theGREENBarindicateswhen audiodatawasrecorded 3 Press ENTER to select the date and open the timeline SEARCH window 4 Use directional buttons to select a start time Press ENTER to move to the 60 minutes time table 5 Use the t and u buttons to select the duration Press ENTER 6 Us...

Page 25: ...GO TO SEARCh window 4 2 4 GO FIRST time You can access the first data recorded on the HDD using this option 4 2 5 GO LAST time You can access to the last data recorded on the HDD using this option 4 2 6 LOG The LOG option provides a list of user actions LOG option list ...

Page 26: ...r q button to scroll through the list and find the target event 4 Press ENTER to see the selected capture or video in paused mode Press BACKUP to copy the capture or video to USB memory stick If video is being copied select the video type format of the clip AVI or DVR After a successful backup a SAVE SUCCESS message appears NOTE WhensavingavideoclipinDVRformat Player exeiscopiedtothememorystick Us...

Page 27: ... 2 times normal and 4x 4 times normal Press to play video forward at 1x 2x 4x and 8x speeds Playback speed is indicated at the lower right corner of the screen as 1x 2x 4x and 8x for normal twice 4 times and 8 times normal speed II Press to play pause recorded video Jump Step forward Playback position moves 60 seconds forward Jump Step backward Playback position moves 60 seconds backward Use to se...

Page 28: ...s BACKUP The DVR will archive the image on the screen 3 Wait for the message SAVING or CHECK FAIL to close before removing the USB memory stick SAVING indicates that the DVR is writing the archived file to the USB memory stick CHECK FAIL indicates that the attempted backup to the USB memory stick failed 4 Unplug the USB memory stick from the DVR 5 1 2 ARCHIVE and BACKUP in PLAYBACK mode Video clip...

Page 29: ...r u buttons to highlight STILL or VIDEO 8 Press ENTER 9 If backing up a video clip a Use the t or u buttons to highlight the channel you want to archive NOTE Onlyonecameracanbebackedupatatime Usethedirectionalbuttonstoselectasinglechannel TheDVRwillstoprecordingduringbackup DVRcanbackupupto1800sec 30min atatime b Press the button to highlight OK Press ENTER ...

Page 30: ...e When the VIDEO TYPE prompt appears use the t or u buttons to highlight AVI or DVR file format f Press ENTER to backup the video clip to the USB memory stick 10 After the SAVE SUCCESS message appears press ESC to exit 11 Unplug the USB memory stick from the DVR 5 2 BACKUP still images or video clip to a USB memory stick To BACKUP a still image or video clip the data must first be archived To perf...

Page 31: ...p to the USB memory stick A VIDEO OK message will flash 5 After the SAVE SUCCESS message appears press ESC to return to the Archive list 6 Unplug the USB memory stick from the DVR 5 3 Playing Backup video Video backed up to a USB memory stick can be played on a personal computer The backed up video may be in AVI or DVR NaFS format 5 3 1 Playing Backup video in AVI format Most MS Windows based PCs ...

Page 32: ...th Windows Explorer 3 Find the directory named with a date code representing the day of the video clip The directory is named using the format year month number day yyyymmdd Example 20100201 was recorded on February 2 2010 Video files in that directory saved in DVR NaFS format have filename extension dvr 4 Double click player exe to open the application Open media file Play 5 Click the open media ...

Page 33: ...IVING AND BACKUP Playback speed Date Time of data Filename Screen size controls Open media file Playback controls Volume control VIIEWER exe Player window NOTE Tochangeplaybackspeed clickthe iconinthePlaybackcontrols Toselectfullscreenplayback click F ...

Page 34: ...rmware file from your distributor 2 Obtain a USB memory stick with a capacity of 1 GB or larger 3 Format the memory stick to FAT32 4 Create a folder on the USB memory stick named upgrade 5 Copy the new firmware file to the upgrade folder on the USB memory stick 6 On the DVR press the SETUP button and enter the password 7 Open the STORAGE window STORAGE screen 8 Plug the USB memory stick into the U...

Page 35: ... to allow the USB firmware upgrade process to complete STORAGE setup USB UPGRADE 6 2 Backup the setup configuration To backup the DVR setup information do the following 1 Obtain a USB memory stick with a capacity of 1 GB or larger 2 Format the memory stick to FAT32 3 Insert the USB memory stick into the USB port on the front of the DVR 4 On the STORAGE window select SAVE SETUP TO A USB STICK and p...

Page 36: ...Load setup configuration To restore backed up setup configuration data do the following 1 Insert a USB memory stick containing backed up setup configuration data into the USB port on the front of the DVR 2 On the STORAGE window select LOAD SETUP FROM A USB STICK and press ENTER 3 Wait until the process completes A LOAD SUCCESS message will appear STORAGE setup LOAD SETUP ...

Page 37: ...wing search playback backup and recording Before installing MClient verify that your PC meets the minimum requirements for the specifications shown in the table below MClient may not perform correctly if the PC does not meet the minimum requirements Table 14 PC requirements for remote monitoring PC specification Minimum requirement Recommended CPU Intel Pentium III 500 MHz Intel Pentium 4 2GHz Mem...

Page 38: ...of your PC Normally the window below will appear DVR Software CD initial window 3 Click INSTALL CLIENT SOFTWARE NOTE IfMClientisalreadyloadedonyourPC clickingINSTALLCLIENTSOFTWAREwillremovetheexistingversion Afterthe removaliscomplete clickINSTALLCLIENTSOFTWAREagaintoloadtheversionprovidedontheCD 4 Follow the on screen directions to install MClient An MClient icon will appear on the PC desktop 5 D...

Page 39: ...f the client software DATE TIME Display the current date and time VOLUME Use the volume control bar to set the audio level Audio can be on or muted by clicking the AUDIO icon ALARM Alarm indicator Lights for 5 seconds if the alarm output is activated on the DVR HDD USAGE DVR HDD storage Indicator ZOOM FOCUS Control ZOOM FOCUS features on a remote PTZ camera PAN TILT Control PAN TILT features on a ...

Page 40: ...On the MClient screen click SETUP to open the Setup window MClient Setup General window 2 In the Security Option frame select the preferred security conditions and set a password When you access any of the functions shown you must enter the password 3 In the Save Path frame browse for and select folders where image captures and Backup files are saved 4 In the Miscellaneous frame check Automatic re...

Page 41: ...ved by clicking the buttons at the top of the window MClient Setup Site 2 Click Addition to register another site See the window below After parameters are set click OK to include the entry in the Site list Double click the Name entry to change the camera name Site Modify window 3 Complete the entries in the Site Addition pop up window and click OK to create a DVR to connect to a Site Name Enter a...

Page 42: ... Enter the PORT number shown in the DVR SETUP NETWORK option list d Password Enter the password assigned setup for your DVR The default password is 1111 After creating the Site the entry will appear in the Site list 7 3 3 Event option In the Setup menu click Event to specify how events such as Startup Shutdown Camera loss etc are treated by MClient These events can be entered into a LOG saved in a...

Page 43: ...all channels or individual channels to record When the Event method is selected you can set the event for motion and or alarm with duration You can also set each or all channels to record Setup Record window RECORD DISK OPTIONS In the Setup Record Disk window select which local disk to use and the disk space to allocate for storage of recordings Also choose to overwrite data or stop recording when...

Page 44: ...t language is English 7 4 MClient Live view To view real time images from your DVR to the following 1 Double click the MClient icon on your PC desktop to launch the program 2 Click CONNECT See the screen capture below 3 In the Connect pop up window click the down arrow in the Site Name field or the down arrow in the IP Address field and select the name or address of the site you want to connect to...

Page 45: ... a few seconds real time images from the DVR will appear MClient Live view 7 5 MClient search and playback view When MClient is searching for or playing a recorded video the controls identified on the following screen are significant LIVE Search Date Time Timeline bars MClient search controls ...

Page 46: ...aved in either JPEG or BMP format MARK IN Set the video backup start time MARK OUT Set the video backup end time BACKUP Backup the selected recorded video in AVI format 7 5 1 MClient backup recorded video in AVI format Use the MClient search viewer to backup recorded video in AVI format 1 On the MClient search viewer window set the blue marker on the timeline at the time when you want the backup f...

Page 47: ...43 H 264 4 Channel DVR User Manual SECTION 7 MCLIENT NETWORK CLIENT VIEWER AVI backup specification 6 After selecting a channel for backup click the OK button The backup will begin ...

Page 48: ... the following 1 Open a Microsoft Internet Explorer window tab 2 In the internet address field of the browser enter the IP address and web port of your DVR in the format IP address port If the web port number is 80 default the port entry is not required If you are accessing your DVR across the Internet using the DynDNS service convenient for DVRs with dynamic IP addresses go to the appropriate Dyn...

Page 49: ...ddress of your DVR the video PORT number from the Setup SYSTEM menu and the password Then click Connect in the Dialog pop up window A LIVE mode screen will open Web Client server DVR login 8 2 LIVE mode LIVE mode viewing provides real time images from the cameras connected to the DVR A description of the screen controls is provided below ...

Page 50: ...LT Use these buttons to control the PAN and TILT features of remote camera ZOOM and FOCUS Use these buttons to control the ZOOM and FOCUS features of remote camera CONNECTION STATUS Shows the client connection information Full Screen Switch to full screen PAUSE Pause the display screen CAPTURE Capture the image from the live display AUDIO Site audio can be ON or OFF by clicking the Audio button 8 ...

Page 51: ...ECT Connect Disconnect to the DVR LIVE Switch to LIVE mode BACKUP and CAPTURE Capture or backup the image from playback PLAYBACK BUTTONS Control playback image SEARCH CALENDAR Select data for playback Video Map Shows a timeline of where recorded video exists for the date selected Marker Sliding bar to set the start of video playback Full Screen not shown Switch to full screen 8 3 1 Playback video ...

Page 52: ...e recorded video are selectable 2 Click Backup A capture backup webpage dialog window will open 3 Select each field in From and To and enter the start and end times of the video you want to backup 4 In the File field enter the directory where you want to store the backed up video file 5 Open the Channel pull down list and select the camera channel of the video you want to back up 6 Click OK The pr...

Page 53: ... quality grade NORMAL HIGH SUPER Recording Mode Continuous Schedule Motion Sensor Manual Motion Detection Motion detection setup by Grid Display Speed Real Time Display Playback Search Mode Event Archive Log Time Line Storage Internal HDD Serial ATA Up to 1TB Backup USB 2 0 memory stick JPEG AVI and DVR file formats Network Video clips and still images Serial port Camera Control 1 RS 485 Network D...

Page 54: ...tachi HDS728080PLAT20 80 GB 2 MB HDS721680PLAT80 80 GB 8 MB HDT722516DLAT80 160 GB 8 MB HDS722516DLAT80 160 GB 8 MB HDT722525DLAT80 250 GB 8 MB HDT725025VLAT80 250 GB 8 MB HDS722525VLAT80 250 GB 8 MB HDT725032VLAT80 320 GB 8 MB HDP725050GLAT80 500 GB 8 MB HDS725050KLAT80 500 GB 8 MB HDP72505DGLA360 500 GB 16 MB HDS721010KLA330 1 TB 32 MB Maxtor 6Y080L0 80 GB 2 MB 6B160P0 160 GB 2 MB 6Y200P0 250 GB...

Page 55: ...0831ACE 300 GB 8 M ST3300820ACE 300 GB 8 M ST3300831ACE 300 GB 16 M ST3400832ACE 400 GB 8 M ST3400820ACE 400 GB 8 M ST3400620A 400 GB 16 M ST3500630AV Surveillance 500 GB 16 M ST3500630A 500 GB 16 M HDS725050KLAT80 500 GB 8 M ST3750840ACE 750 GB 8 M ST3750640A 750 GB 16 M ST31000340SV 1 TB 32 M Western Digital WD1600BB 22GUA0 160 GB 2 MB WD2000BB 00GUA0 200 GB 8 MB WD2500BB 00KEA0 250 GB 8 MB WD25...

Page 56: ...ftware CD into an optical drive in your PC Play or AutoPlay the disk if the following window does not automatically open 2 Click INSTALL FFDSHOW CODEC 3 In the next window that opens select the language you prefer from the drop down list and then click OK 4 When the Welcome to the ffdshow Setup Wizard window appears click NEXT 5 When the License Agreement window appears read the complete agreement...

Page 57: ... 264 4 Channel DVR User Manual APPENDIX B INSTALL FDDSHOW CODEC 6 In the Choose Components window accept the default settings and click NEXT NOTE Diskspacerequiredforinstallationwithdefaultsettingsis12 6MB ...

Page 58: ...In the Video decoder window uncheck the codecs you do not want to load Click NEXT 8 In the Audio decoder window uncheck the codecs you do not want to load Click NEXT 9 In the Video filters window uncheck Processing and select Subtitles as shown below Click NEXT ...

Page 59: ...DVR User Manual APPENDIX B INSTALL FDDSHOW CODEC 10 In the Audio filters window accept the default settings and click NEXT 11 In the Choose Install Location window accept the default Destination Folder and then click NEXT ...

Page 60: ...IX B INSTALL FDDSHOW CODEC 12 In the Choose Start Menu Folder window define the folder you prefer for ffdshow and then click NEXT 13 Wait until the installation is complete and then click NEXT Click FINISH in the setup wizard window ...

Reviews: