background image

Using Timer 

33


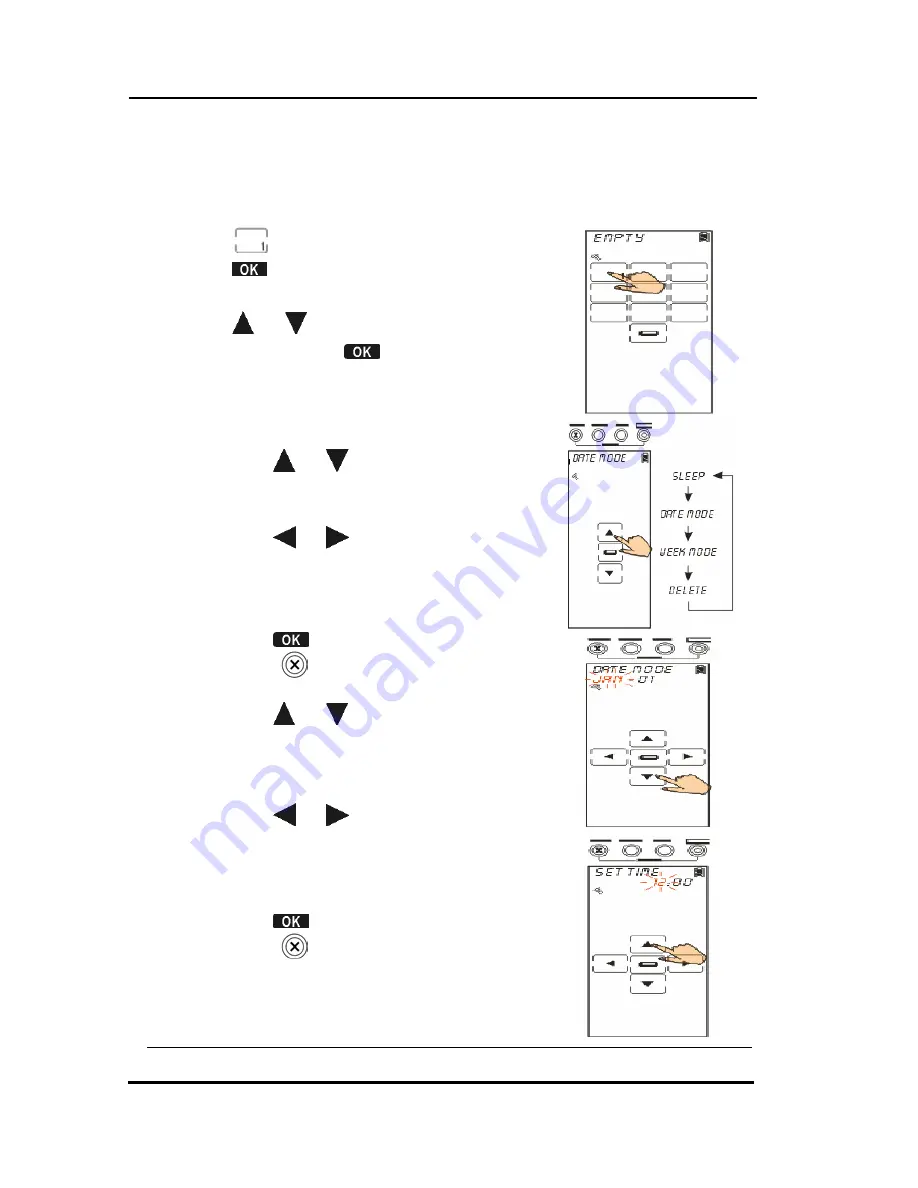
Creating a timer at the DATE mode 

This section will instruct you how to set up a timer at the 
Date mode. 

1.   Tap 

 key for an example.


2.


Tap 

 to confirm and enter timer 

options.


3.


Tap   or   to search the DATE 
mode, and tap 

 to confirm and 

enter the timer setting screen.


4.


Edit the timer 

When setting date: 


Tap   or   to search desired 

date (Jan~Dec for month, 

01~31 for day). 


Tap   or   to select month 

setting or day setting.  The 

character will blink when cursor 
moves to there. 


Tap 

 to confirm settings.   Or, 

click 

 to exit. 

      When setting time: 


Tap   or   to search desired 

time (1am~12am and 
1pm~12pm for hour, 0~59 for 

minute). 


Tap   or   to select hour 
setting or minute setting.  The 

character will blink when cursor 

moves to there. 


Tap 

 to confirm settings.   Or, 

click 

 to exit. 

5.


Edit macro commands 

It’s the same way as you set macro 

commands at the SLEEP mode. 


Summary of Contents for SRC-3820

Page 1: ...SRC 3820 Touch Screen Remote Control User Manual 050805...

Page 2: ......

Page 3: ...e contents The information in this document is subject to change without notice Copyright Copyright 2005 This document contains proprietary information protected by copyright All rights are reserved N...

Page 4: ...Turning the LCD On 6 Precautions of Using the Touch Screen 6 Using Hard Buttons 7 Entering the Setup Menu 8 Navigating the Setup Menu 8 Chapter 3 Setting Up the SRC 3820 10 Device Menu 10 Creating a...

Page 5: ...ing a time at the WEEK mode 34 Deleting a timer 35 Using the Transmission Feature 36 Miscellaneous Menu 37 Setting the Date and Time 38 Setting the Power Time 39 Setting the Backlight 39 Setting the B...

Page 6: ......

Page 7: ...VCRs DVDs TVs Tuners Amps satellite dishes and other equipments with infrared system The SRC 3820 is easy to set up You can quickly configure each device in your household or office by using the innov...

Page 8: ...turer s codes Favorite channels grouping Soft Keys and layout on screen can be changed Built in motion detector LED Backlight Unpacking the SRC 3820 After you have unpacked the SRC 3810 check its cont...

Page 9: ...imulate traditional controls on key layout and provide a better user interface Touch Screen replace the function of rubber buttons Backlight turn on LED backlight Hard Key these buttons include to tur...

Page 10: ...ded Batteries must be inserted before you operate the SRC 3820 For more understanding the following steps will guide you how to install batteries 1 Turn the remote over push the tab in the direction o...

Page 11: ...ely replace batteries when the battery low icon appears The SRC 3820 will not lose programmed data when batteries are replaced but will reset the time Be sure to install fresh batteries Alkaline batte...

Page 12: ...en gently Do not use force Do not use a pen or any sharp object to tap the screen you might damage the surface Keep the touch screen dry Do not immerse it in liquid The SRC 3820 is not waterproof If a...

Page 13: ...EWS to enter control mode Using and to browse through stored channels Press the QUICK CH e g NEWS again to exit control mode Macro Button Display macro keys on each device Device Button Enter device c...

Page 14: ...located at the QUICK CH mode you are not allowed to enter the setup menu Navigating the Setup Menu While in the setup mode tap and to select desired option and tap to confirm or press to exit Figure...

Page 15: ...Menu 9 The following illustration shows you a setup menu tree of SRC 3820 Each main menu has one to several options For detailed description please refer to page 10 of Setting up the SRC 3820 Figure...

Page 16: ...evice Menu Enter the setup mode select Device option and tap to enter the Device menu In the Device menu please tap and to browse through following options New set up a new device Relabel rename a dev...

Page 17: ...ters Tap or to search desired letters from A Z 0 9 and space key Tap or to previous or next character The character will blink when cursor moves to there Press to confirm settings 4 You are prompted t...

Page 18: ...confirm 3 Among default devices select one of them that you desire to re label TV for example 4 Edit the device label Tap or to search desired letters from A Z 0 9 and the space key Tap or to previous...

Page 19: ...tion and codes 1 Select Delete option 2 Tap to confirm 3 Among default devices select one of them that you desire to delete TV for example 4 Press to confirm the decision 5 You are prompted to reconfi...

Page 20: ...le to manually load a code or use auto search function to figure out a compatible code However few of newest and unpopular models may not be preset in the code list so you can not use Pre code functio...

Page 21: ...preprogrammed codes list In case there is nothing found in the code list please try the Learning function 3 Enter the four digit code number which you found from the code list and press to confirm set...

Page 22: ...the device has been turned off you are required to press any button or tap any key to stop searching right away 4 To make sure the code number is compatible with the target device please press the PO...

Page 23: ...Tap to confirm 3 Point the infrared eye of target remote control at the learning eye of SRC 3820 see Page 3 and keep apart between 2 4 inches 5 10cm 4 Select a device to learn codes from the target r...

Page 24: ...SRC 3820 If the code is successfully learned the screen will display an OK message If not it will display an ERROR message 6 If needed you also can tap desired soft key and make it flash to learn cod...

Page 25: ...key codes 1 Select del key option 2 Tap to confirm 3 Select target device TV for example 4 Tap the key or press the button that you desire to delete its code Once the screen displays an OK message it...

Page 26: ...f a device 1 Select del bank option 2 Tap to confirm 3 Press the target device that you desire to delete its codes TV for example 4 Press to confirm the decision 5 You are prompted to reconfirm the ac...

Page 27: ...nfirm 3 Press the target device that you desire to edit TV for example 4 Tap the key that you desire to change its icon All available choices make a cycle will appear one by one as you tap Select one...

Page 28: ...single button You cannot assign any of Device key the Page Date key the Backlight key or three QUICK CH keys to be a macro key Enter the setup mode select Macro option and tap to enter the Macro menu...

Page 29: ...the key stores new macro commands it will replace original data 4 Assign a key to be the macro key Start to input commands and they all will be stored in the macro key one after another until you inpu...

Page 30: ...following commands 2 Press the TV device button 3 Press power button 4 Press to select a time delay 00 99 sec 5 Tap TV Video key 6 Press the DVD device button 7 Press power button 8 Press to select a...

Page 31: ...l instruct you how to delete a macro key 1 Select delete option 2 Tap to confirm 3 Press the target device which has stored the macro key you desire to delete VCR for example 4 Tap the key or press th...

Page 32: ...display preset commands of a macro key 1 Select View option 2 Tap to confirm 3 Press the target device which stores the macro key you desire to review its content VCR for example 4 Tap the said macro...

Page 33: ...Relabel rename a classification label The SRC 3820 has three QUICK CH groups as NEWS MOVIES and KIDS for each device Each device can store at most 50 channels For example if 40 channels have been sto...

Page 34: ...and exit Deleting a QUICK CH This section will instruct you how to delete a QUICK CH group 1 Select delete option 2 Tap to confirm 3 Press the target device that you desire to set up TV for example 4...

Page 35: ...me at most 8 letters Tap or to search desired letters from A Z 0 9 and the space key Tap or to previous or next character The character will blink when cursor moves to there Tap to confirm settings an...

Page 36: ...up Each space key can be set as a timer with macro keys Before setting timer there are 4 options in the following for your selection Sleep set up a timer at sleep mode setting will be erased automatic...

Page 37: ...ment commands at the specific time 1 Tap key for an example 2 Tap to confirm and enter timer options 3 Tap or to search the SLEEP mode and tap to confirm and enter the timer setting screen 4 Edit the...

Page 38: ...er s Manual 32 5 Edit macro commands The following steps about setting macro commands are same as creating a macro besides you don t need to assign a macro key Please refer to page 23 of Creating a ne...

Page 39: ...to search desired date Jan Dec for month 01 31 for day Tap or to select month setting or day setting The character will blink when cursor moves to there Tap to confirm settings Or click to exit When s...

Page 40: ...d tap to confirm and enter the timer setting screen 4 Edit the timer When setting the weekday Tap or to search desired weekdays and tap to confirm each day When weekdays setting finished press to conf...

Page 41: ...mer 35 Deleting a timer The section will instruct you how to delete a timer 1 Tap key for an example 2 Tap to confirm and enter timer options 3 Tap or to search the Delete function and tap to confirm...

Page 42: ...setup mode and select TRANS option and tap to confirm 3 A confirmation screen will pop up You are prompted to reconfirm the action Let 4 numbers disappear by finger tapping 4 During transmitting the...

Page 43: ...ER menu Tap and to browse through following options Clock set the date and time Power set a time period to remain power on backlit set a time period to remain the backlight on beep set beep sound on a...

Page 44: ...h Jan Dec Day 01 31 Year 02 50 2002 2050 Tap or to select month day or year setting Each character will blink when the cursor moves to there When setting time Tap or to search desired time Hour 1 12am...

Page 45: ...r to set desired time 1 90 minutes 4 Press to confirm settings or to exit Setting the Backlight 1 Select backlit option 2 Tap to confirm 3 The default time period is 10 seconds Tap or to set desired t...

Page 46: ...witch buzzer on and off When buzzer is switched on the symbol of will appear on screen 3 Press to exit Checking the Version Number 1 Select version option 2 Tap to confirm 3 Tap or to show version num...

Page 47: ...tion will instruct you how to reset the SRC 3820 back to factory default All individual defined keys will be erased while resetting the SRC 3820 1 Select Reset option 2 Click to confirm 3 A confirmati...

Page 48: ...D Screen W x H 1 6 x 3 6 inches 4 0 x 9 0 cm Soft key 42 keys Hard Button 20 buttons Backlight LED type Learning Frequency 20 kHz 455 kHz Pulse Memory 512 KB flash memory Battery AAA x 4 alkaline batt...

Page 49: ...ed codes database Upgrade Memory It will erase old preset data and memory will be replaced by new factory default Upgrade Pre programmed code Preset codes database only Upgrade MCU MCU program only If...

Page 50: ...Move closer to the target device The maximum operating distance is approximately 30 feet 3 Ensure that the SRC 3820 is aiming at the target device and there is no obstruction between remote and the ta...

Page 51: ...ote at least over 2 seconds 3 Make sure the original remote would aim at learning eye of SRC 3820 straightly 4 Keep 2 4 inches 5 10 cm apart between SRC 3820 and the original remote 5 Do not learn nea...

Reviews: