background image

24

 • Questions? Call or Text +1-801-658-0015

SUNSTONE CDDP-A USERS GUIDE

To select pre-saved schedules, click on the drop down menus 

and select the desired saved schedule.  Operators can choose 

4 different schedules that are selectable through the two PLC 

input pins on the 8DIN connector on the back panel.  These will 

be passed in using a bit mapping.  Keep in mind that the inputs 

are reverse logic, so a low will actually be a ‘1’ and a high will be 

a ‘0’.

Pin3 high(0) and Pin4 high(0) will select schedule 0

Pin3 high(0) and Pin4 low(1) will select schedule 1

Pin3 low(1) and Pin4 high(0) will select schedule 2 

Pin3 low(1) and Pin4 low(1) will select schedule 3

Alarms Tab

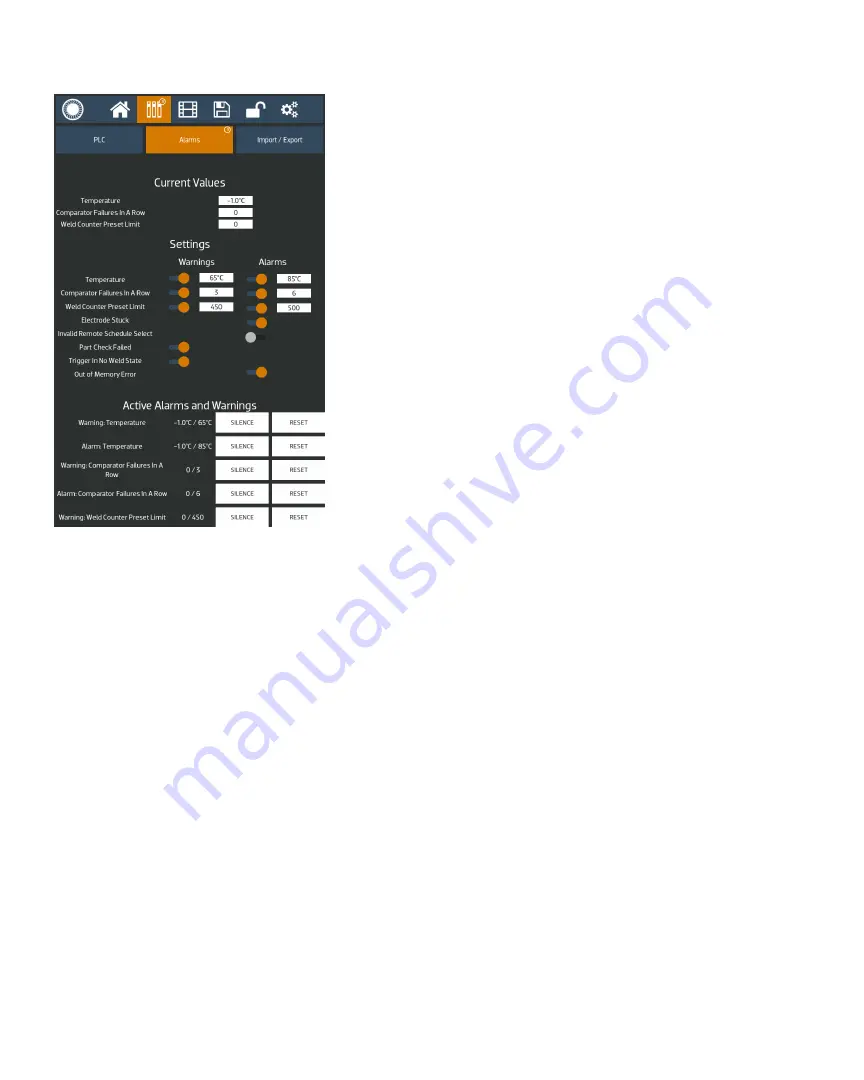
The Alarms tab will display certain power supply statuses, 

active warnings, active alarms, and other alarm-related settings.  

As shown in Figure 24.1, the top portion of the screen displays 

the current temperature, comparator failures in a row, and weld 

count. The weld count can be reset.

The Settings portion of the screen can be used to turn different 

alarms on and off, and also allows to set limits for certain alarms 

and warnings. Parameters that show are gray circle are turned 

off, while orange circles indicate the parameter is turned on.  

The following alarms will be turned on by default: Electrode 

Stuck, Part Check Failed, Trigger In No Weld State, and Wrong 

Trigger Detected.

The bottom portion of the screen will show a list of active 

alarms and warnings. If there are more active alarms and warn-

ings than can be displayed at one time, operators can scroll 

up and down in this section to see all the different alarms and 

warnings. Note that if a warning, and its corresponding alarm 

are both enabled and active, then only the alarm will be dis-

played, but the warning will be active up until the alarm is also 

active.

Active alarms and warnings can be cleared and reset using the 

PLC inputs (Pin3 or Pin4), or by toggling the switch next to the 

alarm in the settings portion of this same screen.

Figure 24.1. Alarms allow you to set  certain power 

supply statuses, active warnings, active alarms, 

and other alarm-related settings. 

Summary of Contents for CDDP-A

Page 1: ...CDDP A User Manual Advanced Capacitive Discharge Dual Pulse Welder For Models 200Ws 400Ws 600Ws 1200Ws Version 20210101 Part 1176...

Page 2: ...SUNSTONE ENGINEERING LLC PRODUCT OR ANY THIRD PARTY PRODUCTS THAT ARE USED IN OR WITH THE SUNSTONE ENGINEERING LLC PRODUCT EVEN IF SUNSTONE ENGINEERING LLC HAS BEEN ADVISED OF THE POSSIBILITY OF SUCH...

Page 3: ...form Display 13 Pulse Settings 14 Comparator 16 How to Turn On the Comparator 16 Control 18 Weld Head Controls 18 Timing Diagrams 19 Chapter 5 PLC Automation Features 22 PLC Tab 22 Basic PLC I O 22 Re...

Page 4: ...68 Raw Data Example 68 Read File Record 20 0x14 69 Response to Read File Record 69 Read First 4 Time Values 69 Response to First 4 Time Values 70 Read First 4 Time Values and First 4 voltage Values 7...

Page 5: ...e welders have many advantages over other welder types Since CD welders use capacitors to store and release weld energy your weld energy will be highly repeatable and will not be affected by line volt...

Page 6: ...ms and warnings Timestamp data feedback Full welder cloning Emergency Stop Roll Spot Welding High Precision Energy Adjustment Lock Out Mode PLC Ready Import Export weld data Software updates Multiple...

Page 7: ...process Figure 3 2 shows an example of a micro scale surface profile On the micro scale material surfaces are rough and only contact in a limited number of locations In the first few milliseconds of w...

Page 8: ...ation requires more weld energy WELD ENERGY Sunstone capacitive discharge dual pulse welders allow adjust ment of the stored energy via the touch screen user interface shown in FIGURE 4 The energy is...

Page 9: ...ng operation Ensure enough clearance on both sides and back of power supply for cables to run Good ventilation is important to keep the power supply from overheating Be sure to have proper air flow in...

Page 10: ...happen via the touch screen The power button will turn the welder on and off When turned on the button will latch and stay depressed To turn the welder off press the button again to unlatch it and tu...

Page 11: ...a PLC through an Ethernet connection Additional information can be found in Chapter 11 The Accessory Port can be used to connect to and communicate with external accessories The PLC Port includes logi...

Page 12: ...EFT side near the FRONT This USB port can be used for three purpos es First operators can plug in a USB flash drive to update the firmware and software of the welder see Chapter 10 for software update...

Page 13: ...Pneumatic weld head controlled by the CDDP A welder Fully manual operation Auto with Timing option Fully Automatic option Manual weld head actuated Two foot pedal operation one to control weld head o...

Page 14: ...gs Tab When you click on the Pulse Settings tab three additional energy settings tab will appear below Total Energy Pulse 1 Energy and Pulse 2 Energy Pre weld Delay and Delay Between Pulses settings w...

Page 15: ...ons Click on Applications to view a list of available application videos PDF Click on PDF to view a list of applicable manuals and other documents Training Click on Training to view a list of availabl...

Page 16: ...ic details about elements of the Lock Screen SETTINGS SCREEN Use the Settings Screen to modify the welder s basic settings such as language date and time speaker vol ume screen brightness and more See...

Page 17: ...l energy is measured in watt seconds Ws The blue Info Box in the upper right corner of the waveform display shows the saved name of the Active Sched ule if the settings were previously saved to the we...

Page 18: ...punch because of the higher peak voltages The example scenario mentioned above Total Stored Energy of 100Ws Pulse 1 5Ws Pulse 2 20Ws will have more initial punch than a weld with Total Stored Energy...

Page 19: ...y available when both pulses are enabled Welder Charge State The welder charge state is a small indicator on the bottom of this screen The indicator will display one of three colors Green indicates th...

Page 20: ...ld was within the limits A red circle indicates that the previous weld was outside of the limits HOW TO TURN ON THE COMPARATOR Select the tab of the value you want to monitor Peak Voltage Peak Current...

Page 21: ...d or the Weld On Off button is off Red indicates that the E Stop is engaged Show Comparator History Graph The check box for the Show Comparator History Graph is on the bottom right of the screen Check...

Page 22: ...hold time is met the weld head will ascend back up to its starting position See the Sunstone weld head users guide for more information Scenario 3 Primary trigger initiates weld sequence Auto With Tr...

Page 23: ...Home Screen Cool The duration of this delay is dependent on the time programmed for Delay Between Pulses The operator can select between 1 and 100 milliseconds which will be ignored if either pulse i...

Page 24: ...dent on the time programmed on welder for time between pulses The operator can select between 1 and 100 milliseconds This time will be ignored if either pulse is disabled Use the Pulse Settings tab on...

Page 25: ...nt on the energy programmed on welder for pulse 1 This is con trolled on the Pulse Settings tab on the Home Screen Cool The duration of this delay is dependent on the time programmed on welder for tim...

Page 26: ...coded Pins 1 2 5 6 while others have a drop down list of options that operators can choose from Pins 3 4 7 8 The pins are labeled 1 8 and each has a color coded box Green boxes indicate the pin is use...

Page 27: ...EMOTE SCHEDULE SELECT The Remote Schedule Select allows operators to program up to four pre saved schedules and recall them and switch between them via the built in PLC capabilities See Figure 23 2 To...

Page 28: ...et The Settings portion of the screen can be used to turn different alarms on and off and also allows to set limits for certain alarms and warnings Parameters that show are gray circle are turned off...

Page 29: ...ll save all the welder settings including the saved schedules to a USB stick This function is beneficial for operators who need to have multiple identically configured power supplies Clone Import will...

Page 30: ...rrange the media files long press on the file and then drag it to the desired location When viewing a video file the screen will display certain controls and options See Figure 27 3 The video can be a...

Page 31: ...Export tab will be able to export history export clone information for another welder or import clone information Figure 27 1 Click on the Media icon in the Navigation Bar to open the Media Screen th...

Page 32: ...ill be displayed along the very center of the screen and can be scrolled through by swiping left or right Operators can choose to list the saved schedules by date or by alphabetical order by selecting...

Page 33: ...g for confirmation before deleting the weld schedule If an operator attempts to save a new schedule with the same name as a previously saved schedule a mes sage will popup to notify the operator that...

Page 34: ...that operators can load pre viously saved weld schedules This option is best when opera tors need to weld with different schedules but are not allowed to make any changes to the schedules The current...

Page 35: ...IN Here text Next enter a PIN and then select Okay Press the cancel button to go back to the lock screen If the Lockout mode is enabled and an operator tries to make changes a popup message will appea...

Page 36: ...o the factory defaults Clear All Memory This button clears all memory including saved schedules Update Welder This button will update the unit via inserting a USB flash drive Update Welder over Wi Fi...

Page 37: ...Update Welder At this stage you ll wait approximately 20 seconds for the welder to do a quick systems check When the check is complete the welder will prompt you to update Press Install The welder wi...

Page 38: ...e Other Network to manually type in your network SSID Enter your password to log into your network and press Okay If the welder is already using the most up to date software a popup will appear statin...

Page 39: ...Figure 35 1 4 Enter the welder s static IP address which you can retrieve from your Network Administrator Typical Routers default to IP address of 192 168 0 2 through 192 168 0 254 Be careful not to...

Page 40: ...ht will be off 12 Once the above settings have been entered press the Submit Modbus Settings button to submit and save all settings At this point the CDDPA is ready to connect and communicate through...

Page 41: ...a decimal but they are a hex number If you see 0x before a value it signifies that the number is hex but the 0x cannot be typed into the program Ex a 0x0011 hex number will be written in the program a...

Page 42: ...nse in the main window is 0x00 False and the Pulse 1 Power Comparator is disabled SENDING INFORMATION TO THE CDDP A Press the Send Frame icon Keep the default settings of 1 Times with 100 ms of Delay...

Page 43: ...NDOW REQUESTS AND RESPONSES Each time you send a request the first two columns of data in the Frame section will increment A as highlighted in Figure 39 2 The third through seventh columns in the Fram...

Page 44: ...12 8V Reading the same input register returns the result of 0x2BAC which converts to 11180 mV or 11 18V which is between 9 6V and 12 8V HOW TO READ WRITE TO A HOLDING REGISTER This section explains ho...

Page 45: ...response was valid as highlighted in Figure 41 2 Next read those registers back by clicking on the Send Frame icon and click on 03 Read Multiple Registers in the Send New Frame window The Request Dat...

Page 46: ...FF into the first input and then type in the function code 67 into the second input followed by 00 in the third input as an ending The identifier and ending will be the same for function codes 0x41 t...

Page 47: ...lick the OK button to save the settings READING COILS Coils are names for memory addresses or pre defined variable names In short a coil is a boolean bit variable Follow these instructions on how to a...

Page 48: ...lding Registers in the Func tion drop down menu box Enter 0 in the Address box Enter 36 in the Quantity box Check the Read Write Disabled box Click the Apply button Click the Read Write Once button Cl...

Page 49: ...own menu box Enter 0 in the Address box Enter 1 in the Quantity box Check the Read Write Disabled box Click the Apply button Click on OK to save all settings The main window will appear In the main wi...

Page 50: ...se in structions Set Mode A to TCP Enter the CDDP A s IP address B Make sure the Port C is 502 which is the default port value Click on the Connect button D The Not Connected indicator E should change...

Page 51: ...states The least significant bit is coil 0 so Pulse 1 Power Compara tor Enable is Off 0b0 The next row has the next eight coil states and starts with register 40008 which is coil 8 Comparator Action...

Page 52: ...A as shown in Figure 48 2 At Register 40000 which is the same as Holding Register 0x0000 the value is 0 which correlates to the Remote Schedule Select Mode being Disabled as noted in the Holding Regi...

Page 53: ...sure Mode is set to TCP Set Values to Write to 1 Change the function code to 5 with Register Size set to 1 bit coils Change the Values to Write to 1 0000 Change the Data Type to 1 bit Boolean Click t...

Page 54: ...make sure Mode is set to TCP Set the function code to 6 Adjust the register size to 16 bit registers Adjust the Values to Write to 1 000 Adjust the Data Type to 16bit UINT Click on the Send button In...

Page 55: ...ottom of the window as shown in Figure 50 1 A new window will appear See Figure 50 2 In this new window make sure Mode is set to TCP Set the function code to 103 Adjust the register size to 16 bit reg...

Page 56: ...DP A USERS GUIDE 32bit UINT 8 boolean 8 boolean 8 boolean 8 boolean 8 boolean 8 boolean Click the Send button and note the results You can compare with the general packet in Modbus documentation Note...

Page 57: ...connection Accessory Used to connect external accessories Coming Soon PLC Mates to SD 80LP E Stop Mates to SD 60LP WH Control Mates to SD 40LP Primary Trigger Mates to SD 50LP Secondary Trigger Mates...

Page 58: ...weld is ready 6 Alarm Pull this pin up to 12V by connecting it with Pin 2 12V Signal will go low 0V when alarm has occurred 7 PLC Output 1 Pull this pin up to 12V by connecting it with Pin 2 12V Signa...

Page 59: ...head needs to actuate 3 Weld Head Actuation 1 12VDC 0 5A Max is sent when weld head needs to actuate 4 GND Shield Primary Trigger Pin Out Refer to Figure 55 3 1 Variable Foot Pedal Connect this to Pin...

Page 60: ...801 658 0015 SUNSTONE CDDP A USERS GUIDE Secondary Trigger Pin Out Refer to Figure 56 1 1 Not Connected 2 12V 3 Secondary Trigger Connect this to Pin 2 12VDC when trig ger is desired 2 1 3 Figure 56...

Page 61: ...top all welding and display this alarm Unsafe states may include the following Internal communications error voltage error on terminals voltage error on capacitors internal temperature over heating or...

Page 62: ...uch the Okay button to return to normal operation Firmware Updating While the CDDP A is updating its firmware this warning will be displayed with a bar representing how much of the operation has been...

Page 63: ...ngs the electrode path cables and the work piece and the try again If the problem persists contact Sunstone s customer service team for immediate assistance Welder Cooled If the welder becomes overhea...

Page 64: ...t Registers 5 0x05 Write Single Coil 6 0x06 Write Single Register 15 0x0F Write Multiple Coils 16 0x10 Write Multiple Registers 20 0x14 Read File Record 22 0x16 Mask Write Register 23 0x17 Read Write...

Page 65: ...d Write Discrete Input 1 Bit 25 Read Holding Register 16 Bit 33 Read Write Input Register 16 bit 82 Read File Record 4 Read COILS Index dec Index hex Coil 0 0x0000 Pulse 1 Power Comparator Enable 1 0x...

Page 66: ...n 4 State Active Low 2 PLC Pin 5 State Active Low 3 PLC Pin 6 State Active Low 4 PLC Pin 7 State Active Low 5 PLC Pin 8 State Active Low 6 Error Heartbeat 7 Error Overtemp 8 Error Terminal Voltage 9 E...

Page 67: ...0x2710 A 6 Pulse 1 Current Comparator Limit Lower 1 0x0000 0x2710 A 7 Pulse 2 Current Comparator Limit Upper 1 0x0000 0x2710 A 8 Pulse 2 Current Comparator Limit Lower 1 0x0000 0x2710 A 9 Pulse 1 Vol...

Page 68: ...arm Comparator Value 1 0x0001 0x0019 27 Alarm Weld Counter Value 1 0x0001 0x4E20 28 Warning Temperature Value 1 0x0000 0x0064 C 29 Warning Comparator Value 1 0x0001 0x0019 30 Warning Weld Counter Valu...

Page 69: ...erature 0x0006 Alarm Comparator Failures in a Row 0x0007 Alarm Electrode Stuck 0x0008 Alarm Weld Counter Preset Limit 0x0009 Alarm Remote Schedule Selection Invalid 0x000A Alarm Part Check Failed 0x00...

Page 70: ...1 A 10 Previous Weld Peak Power P1 1 daW 11 Previous Weld Peak Power P2 1 daW 12 Previous Weld Comparator Result 1 13 Previous Weld Comparator Result Power P1 1 14 Previous Weld Comparator Result Pow...

Page 71: ...1 49 Whitelist IP 3 2 1 50 Whitelist IP 3 3 1 51 Whitelist IP 4 0 1 52 Whitelist IP 4 1 1 53 Whitelist IP 4 2 1 54 Whitelist IP 4 3 1 55 Whitelist IP 5 0 1 56 Whitelist IP 5 1 1 57 Whitelist IP 5 2 1...

Page 72: ...d 0x0001 Weld Bad 0x0002 Weld Bad E Stop 0x0003 Part Check Failed FILE RECORDS File Number File Record Length 0x0001 Previous Weld Record Time 1 Count 0 05 ms 0x01F4 0x0002 Previous Weld Record Voltag...

Page 73: ...Request x 1 FILE RECORDS RESPONSE TO READ FILE RECORD Data Type Data Size Data Output Server Address 1 Byte 0xFF Function Code 1 Byte 0x14 Response Length 1 Byte 0x04 0xF5 Sub Request x Request Lengt...

Page 74: ...ile Record 1 Data 2 2 Byte 0x000F 0 75ms File Record 1 Data 3 2 Byte 0x0011 0 85ms FILE RECORDS READ FIRST 4 TIME VALUES AND FIRST 4 VOLTAGE VALUES Data Type Data Size Data Input Server Address 1 Byte...

Page 75: ...uest 1 File Record 1 Data 0 2 Byte 0x0009 0 45ms 9 x 0 05 Sub Request 1 File Record 1 Data 1 2 Byte 0x000C 0 6ms Sub Request 1 File Record 1 Data 2 2 Byte 0x000F 0 75ms Sub Request 1 File Record 1 Dat...

Page 76: ...e 1 Energy mWs 3 2 Type uint32 bool bool uint32 Byte 8 9 10 11 12 13 14 15 Name Pulse 1 Energy mWs 1 0 Pulse 2 Energy mWs Time Between Pulses Pre Weld Delay ms 1 Type uint32 uint32 uint8 uint16 Byte 1...

Page 77: ...se 1 Current Lower Limit A 3 2 Type uint32 bool uint32 uint32 Byte 16 17 18 19 20 21 22 23 Name Comparator Pulse 1 Current Lower Limit A 1 0 Compara tor Pulse 1 Voltage Enabled Comparator Pulse 1 Volt...

Page 78: ...RM SETTINGS 12 X 16 BIT REGISTERS Byte 0 1 2 3 4 5 6 7 Name Tempera ture Alarm Enabled Compara tor Alarm Enabled Electrode Stuck Alarm Enabled Weld Counter Alarm Enabled Invalid Selection Alarm Enable...

Page 79: ...put Pin Assignment COMPARATOR FAILURE AND WELD COUNT 4 X 16 BIT REGISTERS Byte 0 1 2 3 4 5 7 8 Name Weld Count Comparator Fail Count Type uint32 uint32 CUSTOM FUNCTIONS RSS MODE 1 X BIT COIL Byte 0 Na...

Page 80: ...ood Enough for Weld PLC Set to Lock PLC Input Reset Weld Count Type uint32 Weld Task State Charge Task State bool bool Lock State bool CUSTOM FUNCTIONS GENERAL INFO WELD TASK STATES Weld Task State he...

Page 81: ...Passed Compara tor Re sult Compara tor Pulse 1 Power Result Compara tor Pulse 2 Power Result Compara tor Pulse 1 Current Result Compara tor Pulse 2 Current Result Compara tor Pulse 1 Voltage Result T...

Page 82: ...CDDP A USERS GUIDE Byte 24 25 26 27 28 29 30 31 Name Pulse 2 Peak Voltage mV 2 0 Pulse 1 Peak Power 10s of W Pulse 2 Peak Power 10s of W 3 Type uint32 uint32 uint32 Byte 32 33 34 Name Pulse 2 Peak Pow...

Page 83: ...FORM REPORT GENERAL 11 X 16 BIT REGISTERS Byte 0 1 2 3 4 5 6 7 Name Total Samples P1 State Index P2 State Index Starting Voltage mV Type uint16 uint8 uint8 uint32 Byte 8 9 10 11 12 13 14 15 Name Time...

Page 84: ...bool bool bool RSS STATES 1 X 8 BIT COIL Byte 0 Name Current RSS Value Type uint8 NETWORK INFO 20 X 16 BIT REGISTERS Byte 0 1 2 3 4 5 6 7 Name IP 3 IP 2 IP 1 IP 0 Subnet Mask 3 Subnet Mask 2 Subnet M...

Page 85: ...e server This may be because the function code is only applicable to newer devices and was not implemented in the unit selected It could also indicate that the server is in the wrong state to process...

Page 86: ...he client can next issue a Poll Program Complete message to determine if processing is completed 0x06 SERVER DEVICE BUSY Specialized use in conjunction with programming com mands The server is engaged...

Page 87: ...00 0 100 WELD PULSE CHARACTERISTICS MIN AND MAX OUTPUT 0 2 ws 200 ws 0 2 ws 400 ws 0 2 ws 600 ws 0 2 ws 1 200 ws MIN AND MAX PULSE WIDTH 0 27 ms 19 5 ms 0 29 ms 30 ms 0 31 ms 40 5 ms 1 13 ms 60 ms RIS...

Page 88: ...84 Questions Call or Text 1 801 658 0015 SUNSTONE CDDP A USERS GUIDE...

Page 89: ...Questions Call or Text 1 801 658 0015 85 The Micro Welder Experts...

Page 90: ...86 Questions Call or Text 1 801 658 0015 SUNSTONE CDDP A USERS GUIDE...

Page 91: ...Micro Welder Experts Other World Class Micro Welders from Sunstone The World s Most Advanced Micro TIG Welder When you need a tiny little weld in exactly the right spot The Micro Welder Experts Call o...

Page 92: ...DP A USERS GUIDE 1693 American Way Ste 5 Payson UT 84651 USA Tel 1 801 658 0015 wwww sunstonewelders com 2020 Sunstone Engineering LLC Safety information subject to change Sunstone and Orion are trade...

Reviews: