


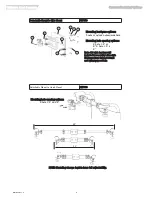

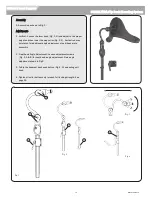


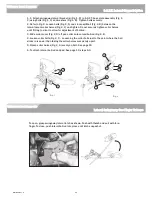


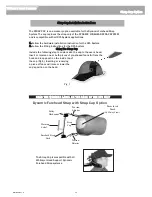


1. Attach swingaway lateral bracket(s) (Fig. 1, D) to PLUSH lateral support interface plate
(Fig. 1, C) using bolts (Fig. 1, A) and washers (Fig. 1, B).
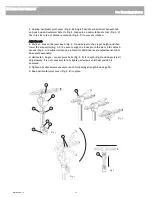
2. Refer to Fig. 3. Tighten bolts (Fig. 3, A) securely. The PLUSH lateral support interface
plate supplies 4 lateral mount locations.
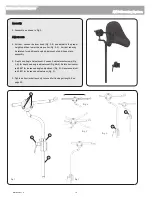
3. Refer to Fig. 2. Remove bolts (Fig. 2, A) and discard bottom collar half of pad (Fig. 2,
B).
4. Evenly clamp the horizontal ball (Fig. 2, C) between the pad collar half (Fig. 2, D) and
PLUSH lateral support interface (Fig. 2, E).
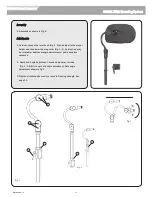
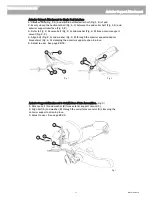
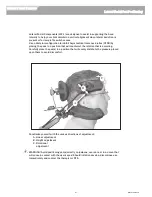
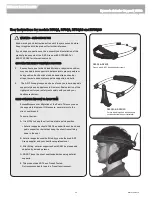
5. Refer to Fig. 4. Loosen bolts (Fig. 4, A) and clamp splitball (Fig. 4, B) between the
lateral mount collar halves (Fig. 4, C) and tighten. Do not securely tighten collar halves
until fit-ting to client to allow for adjustment of ballrod.
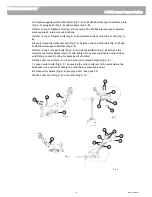
6. Slide collar cover (Fig. 4, D) off pad collar onto curved ballrod (Fig. 4, E).
7. Loosen collar bolts (Fig. 4, F). Loosening the collar bolts just to the point where the
ball slides in is easier than taking the collar halves completely apart.
8. Clamp collar halves (Fig. 4, G) evenly on ball. See page 15.
9. Slide collar cover (Fig. 4, D) onto collar (Fig. 4, G).
Fig. 3
A
Fig. 1
A
B
C
D
Fig. 2
A
D
C
B
E
Fig. 4
F
G
D
A
B
C
E
Whitmyer Head Supports
PLUSH Lateral Support Option
19
MKT6100 Rev. C


