background image

13

Rev.A

5.4 

Lighting maintenance:
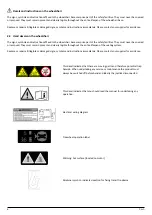
  DANGER! 

Maintaining lights and indicators is a safety critical task. If your lights and indicator system shows a defect, please contact your 

Sunrise Medical Approved Dealer.

All lights and indicators are state of the art LED low energy,  no maintenance units. There are no light bulbs used. The high intrinsic 

reliability of these units means that they are extremely unlikely to fail under normal usage. If a failure should occur, (may be as a 

result of an impact), the damaged light assembly must be replaced in its entirety.  The individual LED’s cannot be replaced.

  CAUTION!

• 

We recommend the use of Sunrise Medical authorized spare parts only.

• 

Be advised that all lighting circuits are electronically protected. In the event of a short circuit current will be limited to a safe level. 

Once the fault is removed the system resets automatically.

5.5 

Cleaning and disinfection

The wheelchair should be wiped over once per week with  a slightly damp, not wet, cloth and any fluff or dust that has accumulated 

around the motors should be blown or dusted away.

  CAUTION!

Make sure that you dry all parts of your wheelchair if it becomes wet or damp after cleaning or if it is used in a wet or damp 

atmosphere.

  DANGER!

It is important that should the wheelchair be used by more than one person it is cleaned thoroughly to ensure there is no cross 

infection.

Hygiene measures when being re-used:

Prior to the wheelchair being re-used, it must be carefully prepared. All surfaces which come into contact with the user must be 

treated with a disinfection spray.

To do this, you must use a suitable disinfectant for rapid alcohol-based disinfection of medical products and medical devices.

Please take into account the manufacturer’s instructions for the disinfectant you are using.

  CAUTION!

• 

Do not use solvents, bleaches, abrasives, synthetic detergents, wax polishes or aerosols.

• 

Disinfectants may be used in dilution as specified by their manufacturer.

• 

Ensure surfaces are rinsed with clean water and dried thoroughly.

  WARNING!

• 

Always read the label on any commercial or domestic cleaning substances.

• 

Always follow the instructions carefully.

Summary of Contents for Quickie Q700-UP F

Page 1: ...Service Instructions Quickie Q700M Q700 UP M F 000690851 01...

Page 2: ...maintenance 13 5 5 Cleaning and disinfection 13 6 0 Service Instructions 14 6 1 Assembly replacement and adjustment instructions 14 6 2 Assembling and replacement instructions Q700M 15 Removal of cast...

Page 3: ...ification number Part number Name of the part concerned This information is provided on the identification plate See Identification of the product If you have any queries about the use maintenance or...

Page 4: ...he environment Reference symbol The symbol refers to a separate user manual This reference will indicate the specific user manual and the section to which is being referred SN Barcode Example 20817010...

Page 5: ...the environment Where ever possible safety information is provided in the relevant chapter Temperature Avoid physical contact with the wheelchair base s motors at all times Motors are continuously in...

Page 6: ...e safety facilities They must never be covered or removed They must remain present and clearly legible throughout the entire lifespan of the seating system Replace or repair all illegible or damaged s...

Page 7: ...er 13 16 17 19 6 Hex Key 1 5 2 5 3 4 5 6 1 Screwdriver crosshead 1 Gear puller 1 Steel bar 31mm approximately 1 Pliers Use only high quality tools for the adjustment s described Make sure that the hex...

Page 8: ...your local Sunrise medical service centre can be found on the inside front cover of this booklet National and International Website addresses are on the back cover 5 1 Maintenance WARNING Loose fasten...

Page 9: ...as been set to drive Chapter 5 8 of the Owner s Manual Checking seating Ensure that all the cushions are in place Make sure that the backrest is correctly fitted and adjusted Visually inspect the whee...

Page 10: ...s and indicators if fitted to make sure that they work correctly With the seating in an elevated position drive the wheelchair to make sure that the creep mode works which will slow the wheelchair Dri...

Page 11: ...drive wheels are inflated to equal pressures as a pair and likewise the rear The inflator pump provides the safest method of inflating your wheelchair tyres and the pressure can be checked with a sta...

Page 12: ...fect on the wheelchair s performance Moving the wheelchair will require more energy making more demands on the batteries Furthermore wear on under inflated tyres is increased When inspecting the tyres...

Page 13: ...ot wet cloth and any fluff or dust that has accumulated around the motors should be blown or dusted away CAUTION Make sure that you dry all parts of your wheelchair if it becomes wet or damp after cle...

Page 14: ...adjustment instructions The paragraphs 6 2 Q700M and Q700 UP M F cover illustrated assembly and replacement instructions Every separate visual instruction is prefaced with Preparation remarks Instruct...

Page 15: ...ructions Note Suitable work area required Follow the illustrated instruction for removing the castor wheel from the castor fork Rebuild the wheelchair in reverse order once completed Tools used 17 Fig...

Page 16: ...from the front or rear castor arm Rebuild the wheelchair in reverse order once completed Tools used 19 Fig 6 2 3 1 Using the screwdriver remove the plastic coloured cap A from the castor arm Fig 6 2 4...

Page 17: ...e work area required Follow the illustrated instruction for removing the drive wheel from the wheelchair base Rebuild the wheelchair in reverse order once completed Tools used 16 Fig 6 2 6 1 Remove th...

Page 18: ...mpleted In order to complete this you must first remove the castor fork Tools used 31 Before removing bearing remove C clip underneath using a screwdriver and then pliers to re insert into groove Fig...

Page 19: ...air base Rebuild the wheelchair in reverse order once completed In order to complete this you must first remove the drive wheel Tools used 6 19 Fig 6 2 11 1 Unscrew and remove bolt A Tightening torque...

Page 20: ...w the illustrated instructions for removing the motor mount from the motor Rebuild the wheelchair in reverse order once completed In order to complete this you must first remove the motor from the whe...

Page 21: ...ctions Note Suitable work area required Follow the illustrated instruction for removing the battery cover Rebuild the wheelchair in reverse order once completed In order to complete this you must firs...

Page 22: ...chair remove the battery cover and electrically disconnect the power Tools used 5 Fig 6 2 15 1 Unscrew and remove 4 A bolts from the top of the shroud NOTE Early models may have plastic washers fitted...

Page 23: ...23 Q700M Rev A 3 Remove front shroud C To remove rear shroud Fig 6 2 18 4 Unscrew and remove 2 D bolts from the rear shroud Fig 6 2 19 5 Remove rear shroud E 4 D 5 E Fig 6 2 19 Fig 6 2 20...

Page 24: ...en removing and replacing batteries Heavy part Fig 6 2 21 1 Once the batteries have been removed unscrew and remove the bolt A from the midlink which is accessed through the wheelchair base Tightening...

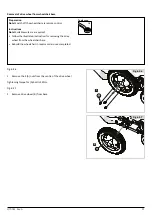
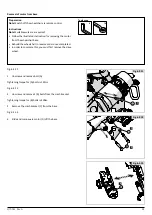
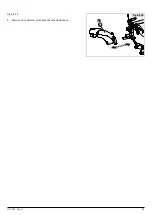
Page 25: ...25 Q700M Rev A 4 E Fig 6 2 24 4 Remove front castor arm E from the wheelchair base Fig 6 2 24...

Page 26: ...o complete this you must first tilt the chair back electircally disconnect the batteries and remove the batteries Tools used 5 6 19 Fig 6 2 25 1 Unscrew and remove bolt A from the suspension spring Ti...

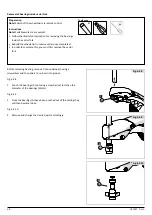
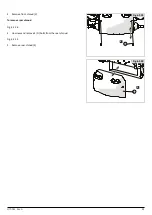
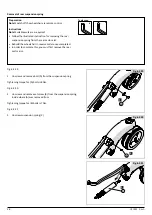
Page 27: ...27 Q700M Rev A 4 D Fig 6 2 28 4 Remove rear castor arm D from the wheelchair base Fig 6 2 28...

Page 28: ...ebuild the wheelchair in reverse order once completed In order to complete this you must first remove the rear castor arm Tools used 4 5 Fig 6 2 29 1 Unscrew and remove bolt A from the suspension spri...

Page 29: ...strated instruction for removing the rear suspension insert from the rear castor arm Rebuild the wheelchair in reverse order once completed In order to complete this you must first remove the drive wh...

Page 30: ...ust first tilt the chair back remove battery cover and remove shrouds Tools used 4 1 5 NOTE This applies to the 4 pole motors and the 2 pole performance motors Fig 6 2 34 1 Unscrew and remove A from t...

Page 31: ...everse order once completed In order to complete this you must first tilt the chair back remove battery cover and remove shrouds Tools used 2 5 NOTE This applies to the 2 pole standard motors Fig 6 2...

Page 32: ...connect the power Please remove brake lever first in order to remove the brake Tools used 3 NOTE This applies to the 4 pole motors and the 2 pole performance motors Fig 6 2 40 1 Unscrew and remove 3 A...

Page 33: ...les in brake using the 3mm Hex Key 3 Remove brake from the motor assembly NOTE If finding your old brake doesn t have the connector but is hardwired then take the following steps 1 Cut cable to remove...

Page 34: ...on for removing the motor brush from the motor Rebuild the wheelchair in reverse order once completed In order to complete this you must first tilt the chair back remove battery cover and remove shrou...

Page 35: ...order once completed In order to complete this you must first remove the drive wheel Tools used 19 Fig 6 2 46 1 Unscrew and remove nut A and washer Tightening torque for A bolts is 60Nm Fig 6 2 47 2 U...

Page 36: ...Service Instructions Sedeo UP M Seating manual...

Page 37: ...t before removing Fig 6 2 49 1 Unscrew and remove 2 x bolts A from the castor lock kit Tightening torque for A bolts is 22Nm Fig 6 2 50 2 Simultaneously remove the nut B using the 13mm spanner located...

Page 38: ...Service Instructions Sedeo UP F Seating manual...

Page 39: ...order to complete this you must first remove the drive wheel tilt the seat back and remove the batteries Tools used 5 13 NOTE Please electrically disconnect the batteries and anti tip actuator before...

Page 40: ...completed In order to complete this you must first remove the active anti tip wheel assembly from the wheelchair base Tools used 5 NOTE Please electrically disconnect the batteries and anti tip actua...

Page 41: ...41 Rev A 7 0 Trouble shooting If the Q700M or Q700 UP M F is not working or not working as it should contact your supplier...

Page 42: ...arise if a repair or replacement of a wheelchair or a part is required for the following reasons a Normal wear and tear which include batteries armrest pads upholstery tyres brakes shoes etc b Any ove...

Page 43: ...43 Rev A...

Page 44: ...e Micka l Faraday 37170 Chambray L s Tours Tel 33 0 247554400 Fax 30 0 247554403 www sunrisemedical fr Sunrise Medical S r l Via Riva 20 Montale 29122 Piacenza Italia Tel 39 0523 573111 Fax 39 0523 57...

Reviews: