background image

13

Extensive vibration of the product during operation is an 

indication of damage. Immediately stop the motor and 

promptly inspect and repair the tool.

After Use

•  Switch the product off, 

remove the battery, and let it cool 

completely.

• 

Check, clean, and store the product as described below.

Care + Maintenance

The Golden Rules for Care

m

WARNING!

 Always switch the product off, remove the 

battery, and let the product cool completely before inspecting, 

cleaning, or performing any other maintenance task.

•  Keep the product clean. Remove any debris after each use 

and before storage.

•  Regular and proper cleaning will help ensure safe use and 

prolong the life of the product.

•  Inspect the product before each use for worn and damaged 

parts. If you find broken and/or worn parts, do not use the 

tool.

m

WARNING!

 Only perform the repairs and maintenance 

work described in this manual. Any other work must be 

performed by a qualified technician.

General Cleaning

•  Clean the product with a dry cloth. Use a brush for areas 

that are hard to reach.

•  Be sure to clean the air vents after every use with a cloth 

and brush.

•  Remove stubborn dirt with high pressure air (max. 3 bar).

NOTE: Do not use chemical, alkaline, abrasive, or other 

aggressive detergents or disinfectants to clean this product as 

such substances might damage the tool's surfaces.

•  Check for worn or damaged parts. Replace worn parts as 

necessary or contact the Snow Joe

®

 + Sun Joe

®

 customer 

service center at 1-866-SNOWJOE (1-866-766-9563) for 

repair before using the product again.

Cleaning the Und Working Tool

m

WARNING!

 Wear safety gloves when working on or 

near the working tool. Use appropriate tools (e.g a wooden 

stick) when necessary; never use your bare hands!

•  Keep the underbody and blades clean and free of debris. 

Use a brush or another implement to remove soil from the 

working tool.

• 

All nuts and bolts must be checked periodically for 

tightness before operation. After prolonged use, especially 

in sandy soil conditions, the working tool will become worn 

and lose some of its original shape. Tilling efficiency will be 

reduced and the working tool should be replaced. 

•  Have worn or damaged working parts replaced with new 

ones of the same type by a qualified technician.

•  To prolong the life span of the working tool and the product, 

lubricate the blades after each use.

m

WARNING! 

Unexpected blade movement may cause 

personal injury. Before servicing, repairing, or inspecting the 

unit, turn the motor OFF and remove the battery. Wait for 

the blades to completely stop rotating before conducting 

inspection, cleaning, or maintenance.
Before and after each use, check the product and accessories 

(or attachments) for wear and damage. When necessary, only 

use identical replacement parts that are approved by the 

manufacturer.

m

WARNING! 

Contact with hot components (e.g. motor 

housing, gear box, etc.) on the machine may cause burns. 

Allow the machine to cool off before handling.

IMPORTANT! 

• 

Wear protective gloves when cleaning or maintaining the 

machine.

•  Do not use cleaning fluids or solvents or spray the 

machine down with water (especially water under 

pressure) when cleaning the machine. 

NOTE: After each use, follow these steps to properly clean the 

unit:

1.  Remove soil, dirt, and foliage stuck in the blades, drive 

shaft, tool surface, and vents with a brush or dry cloth.

2.  Spray or rub biodegradable oil onto the blades.
3.  Clean soiled grips with a damp cloth.

Always inspect the machine for damaged and worn parts after 

each use. Check that safety features (i.e. labels, guards, etc.) 

are in place. Check that nuts, bolts, and screws are tight.

Changing the Blades

NOTE:

 The machine is fitted with four tilling blades that can 

easily be changed in pairs. Both of the steel blade pairs can 

be fitted on the left or right, as required. Always change both 

blade pairs at the same time to avoid imbalance and damage 

to the machine.
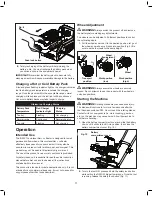
To replace the blades, follow the steps below:

1. 

While standing on a flat and stable surface, switch off the 

unit and remove the battery.

2.  Remove the 2 bolts and 2 nuts, then remove the steel 

blades (Fig. 13).

Summary of Contents for iON12TL

Page 1: ...er 9 Do not force the tool It will perform better with less likelihood of personal or mechanical injury if it is used at the rate for which it was designed 10 Do not overreach Keep proper footing and balance at all times If the tiller cultivator strikes a foreign object follow these steps Stop the cordless tiller cultivator Inspect for damage Repair any damage before restarting and operating the t...

Page 2: ...and feet Keep hands and feet away from all rotating parts Only operate the tiller cultivator when there is good visibility or light and dry conditions Always watch your footing and keep a firm hold on the grips Walk don t run Do not operate the tiller cultivator on slippery surfaces Check your footing during use Exercise caution when changing direction and operating the tool on slopes Always keep ...

Page 3: ...receptacle to reduce the risk of damage to the electrical plug and cord Never carry the charger by its cord or yank it by the cord to disconnect it from the receptacle Keep the cord away from heat oil and sharp edges Make sure the cord will not be stepped on tripped over or subjected to damage or stress when the charger is in use Do not use the charger with a damaged cord or plug Replace a damaged...

Page 4: ...ty reasons IMPORTANT Do not press the ON OFF switch any more if the protective cut off has been activated This may damage the battery pack 11 Use only original battery packs The use of other batteries poses a fire risk and may result in injuries or an explosion Information about the charger and the charging process 1 Please check the data marked on the rating plate of the battery charger Be sure t...

Page 5: ...sure to direct sunlight will result in overheating and cell damage Never charge or work with batteries that have been overheated replace them immediately if possible 7 Store the charger and your cordless tool only in dry locations with an ambient temperature of 50 104 F 10 40 C Store your lithium ion battery pack in a cool dry place at a temperature of 50 68 F 10 20 C Protect the battery pack char...

Page 6: ...any other maintenance Wear eye protection breathing protection and ear protection i e safety goggles dust masks and ear defenders Inspect the work area prior to use and remove all objects that could be thrown by the appliance If a hidden object is discovered while working stop the engine and remove the object Work across slopes never work up and down such surfaces Symbols Symbols Descriptions Desc...

Page 7: ...Wheels 13 Guard 14 Air outlet 15 Lower handle 16 Push lock button 17 Battery indicator 18 Push button for battery indicator 19 EcoSharp lithium ion battery iBAT40 20 EcoSharp battery charger iCHRG40 1 2 3 4 5 6 7 8 11 10 12 13 14 16 17 18 19 20 15 9 Technical Data Battery Voltage 40 V D C Battery Capacity 4 0 Ah Charging Time 2 5 3 hours for full charge Battery Run Time 20 30 mins Cultivating Widt...

Page 8: ...MPORTANT The equipment and packaging material are not toys Do not let children play with plastic bags foils or small parts These items can be swallowed and pose a suffocation risk Assembly mWARNING Do not insert the battery until assembly is complete Failure to comply could result in accidental starting and serious personal injury mWARNING To prevent serious personal injury make sure the battery i...

Page 9: ...oring LED is lit Battery is flat Stop work IMMEDIATELY and charge the battery Otherwise the battery s service life will be greatly shortened NOTE If the charge level button does not appear to be working place the battery pack on the charger and charge as needed NOTE Immediately after using the battery pack the charge level button may display a lower charge than it will if checked a few minutes lat...

Page 10: ... turns green the battery is fully charged Fig 7 NOTE If the top light remains green while the bottom light alternately flashes red and green this indicates a temperature abnormality i e that the battery pack is either too hot or too cold If there is only a red blinking light this indicates that something is wrong with the battery Contact Snow Joe Sun Joe customer service center at 1 866 SNOW JOE 1...

Page 11: ...ther than those described Wheel Adjustment mWARNING Always switch the product off and remove the battery before making any adjustments The wheels can be adjusted to 3 different positions to control the cultivating depth 1 Pull the wheel and move it to the desired position let go of the wheel and make sure it locks into position Fig 9 Be sure to set both wheels to the same height mWARNING Always en...

Page 12: ...ing tool preventing proper blade rotation it could also cause you to slip and fall Always maintain a firm grip on the product For better guidance apply light pressure to the handles mWARNING Do not place hands feet or any other part of the body or clothing near the rotating blades or any other moving part The blades begin to rotate forward once the trigger switch is depressed The blades continue t...

Page 13: ...ed use especially in sandy soil conditions the working tool will become worn and lose some of its original shape Tilling efficiency will be reduced and the working tool should be replaced Have worn or damaged working parts replaced with new ones of the same type by a qualified technician To prolong the life span of the working tool and the product lubricate the blades after each use mWARNING Unexp...

Page 14: ...e charger and the battery pack Do not use oil or solvents to clean or lubricate your battery pack as the plastic casing can become brittle and crack causing a serious risk of injury 2 Store the battery pack and charger at room temperature away from moisture Do not store in damp locations where corrosion of terminals may occur As with other battery pack types permanent capacity loss can result if t...

Page 15: ...he company reordering parts or arranging service from an authorized dealer you will need to provide the model and serial numbers which can be found on the decal located on the housing of the unit Copy these numbers into the space provided below iCHRG40 Federal Communications Commission FCC mWARNING Any changes or modifications to this unit not expressly approved by the party responsible for compli...

Page 16: ...arging Time 2 5 3 hours for full charge Battery Run Time Max 40 min EcoSharp PRO 40 V 5 0 Ah Lithium Ion Battery Charging Time 3 3 5 hours for full charge Battery Run Time Max 50 min EcoSharp 40 V Lithium Ion Battery Charger iBAT40 iBAT40XR iCHRG40 Model Accessoires Item 1 2 3 EcoSharp PRO 40 V 5 0 Ah Lithium Ion Battery Charging Time 4 5 hours for full charge Battery Run Time Max 60 min iBAT40XRP...

Page 17: ...NOTES 17 ...

Page 18: ...NOTES 18 ...

Page 19: ...Snow Joe Sun Joe will not be responsible for the cost of any unauthorized warranty repairs This warranty does not cover any cost or expense incurred by the purchaser in providing substitute equipment or service during reasonable periods of malfunction or non use of this product while waiting for a replacement part or unit under this warranty Wearing parts like belts augers chains and tines are not...

Page 20: ... California to cause cancer birth defects or other reproductive harm Some examples of these chemicals are lead from lead based paints crystalline silica from bricks and cement and other masonry products and arsenic and chromium from chemically treated lumber Your risk from these exposures varies depending on how often you do this type of work To reduce your exposure to these chemicals work in a we...

Reviews: