background image


- 1 - 

SUNIX Co., Ltd. 

TEL : +886-2-8913-1987 

Email : [email protected] 


INDEX 


Chapter 1    Introduction.............................................................................2 

Overview ...........................................................................................3 

Package Checklist ........................................................................... 4 

Product Features.............................................................................. 5 

Product Specifications ..................................................................... 5 


Chapter 2    Hardware Installation..............................................................7 

Hardware Installation........................................................................ 8 

Pin Assignment……..…………………………................................ 15 

Mechanical Drawings..…………………………………………………16 


Chapter 3   


Powered USB Hub Operation ..............................................17 

Driver Installation……..................................................................... 18 

Verify Powered USB Hub in System…...…..…............................... 18 

Powered USB Hub Operation……………….…............................... 19 


Chapter 4    Troubleshooting……………..................................................20 

Troubleshooting……....................................................................... 21 


Chapter 5     


Appendix…………………………............................................24 

Core Technologies………............................................................... 25 

Contract Information…….…............................................................ 27 


Summary of Contents for Powered USB HUB

Page 1: ...User s Manual Powered USB HUB First Edition October 2008 Version 1 0...

Page 2: ...rding the contents of this manual Information in this manual has been carefully checked for reliability however no guarantee is given as to the correctness of this content In the interest of continued...

Page 3: ...ifications 5 Chapter 2 Hardware Installation 7 Hardware Installation 8 Pin Assignment 15 Mechanical Drawings 16 Chapter 3 Powered USB Hub Operation 17 Driver Installation 18 Verify Powered USB Hub in...

Page 4: ...and affordable way to add up to four 2 0 compliant Powered USB ports to your PC With this plug and play upgrade it is easy to connect POS peripherals which require more than the normal power provided...

Page 5: ...ical host side cable locking problem associated with the standard USB connector by providing a host cable locking mechanism SUNIX Powered USB High Speed Hub provides a convenient and affordable way to...

Page 6: ...item is damaged or missing 1 Powered USB Hub 2 User s Manual This document 3 Clamped USB2 0 High Speed Cable 1pcs 4 Power Adapter with 6 pin Mini Din Connector Type out inside 24VDC 2A 1pcs 12VDC 4A 1...

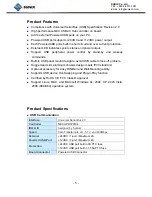
Page 7: ...to avoid USB cable comes off problem Rugged and slim aluminum chassis design meets IP30 standard Optional accessory for easy DIN Rail and Wall Mounting ability Supports USB device Hot Swapping and Plu...

Page 8: ...X86 X64 Microsoft Embedded CE5 0 XP Embedded Microsoft Server 2003 2008 X86 X64 Linux Linux 2 4 x 2 6 x MAC MAC Version 10 2 or later Regulatory Approvals Hardware EN55022 Class B EN55024 EN61000 3 2...

Page 9: ...Email info sunix com tw 2 Hardware Installation This chapter includes information about hardware installation and mechanical drawings for Powered USB High Speed Hub The following topics are covered Ha...

Page 10: ...ta communication between computer and Hub Green 12 or 24VDC power outputs to Powered USB device PWR Do NOT Light There s no any power output to Powered USB device Earth Ground Connection Grounding and...

Page 11: ...evice 24VDC powered USB channel built in 3A PTC fuse 2 12V power adapter provides 2A total 48W to all 12VDC powered USB devices using Each 12VDC powered USB channel built in 1 55A PTC fuse 3 The PTC m...

Page 12: ...m basic port re routes in a PC to connections at podiums and kiosks panel mount cable is a great way to keep your connections extremely reliable safety and professional Please follow up below steps to...

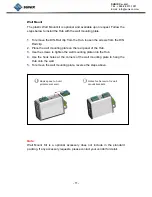
Page 13: ...he wall mounting plate on the rear panel of the Hub 3 Use the screws to tighten the wall mounting plate onto the Hub 4 Use the hook holes at the corners of the wall mounting plate to hang the Hub onto...

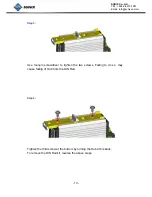
Page 14: ...e see the steps as shown in below diagrams The DIN Rail kit consists of two brackets as shown in the figure Affix the two brackets together by inserting the off white bracket s mounted head in yellow...

Page 15: ...com tw Use four pin screwdriver to tighten the two screws Failing to do so may cause falling of Hub from the DIN Rail Tighten the third screw at the bottom by turning the Hub at his back To remove th...

Page 16: ...ce of DIN Rail kit Once the heads fixed then push down and press the Hub forward to snap into the bottom rail as shown in the figures above Once the Hub is fixed you can use the screw at bottom to loc...

Page 17: ...ype Description 1 VBus Power USB Type A Port Bus power connected to 5V 2 D USB Type A Port 3 D USB Type A Port Twisted pair differential data line 4 Ground USB Type A Port 5 Ground Powered USB Port Si...

Page 18: ...16 SUNIX Co Ltd TEL 886 2 8913 1987 Email info sunix com tw Mechanical Drawings Please read the below images for Powered USB Hub s layout details Unit mm...

Page 19: ...ls properly in your system the first thing you should do is that check operation system detect the Hub or not This chapter introduces the method to confirm the Powered USB Hub installation and operati...

Page 20: ...k 4 Windows XP service pack 2 and Windows Sever2003 service pack1 or later version Please visit Microsoft web site http www microsoft com or use update function on your system to upgrade the latest ve...

Page 21: ...ctor then you can eject the cable from the Hub SAFTY FIRST Unplugging or ejecting a device without first stopping them can often cause your computer to crash and lose valuable data To safely unplug or...

Page 22: ...ail info sunix com tw 4 Troubleshooting This chapter shows some problems that user came with usually Also you can check it if the Powered USB Hub can not work properly in your system after following h...

Page 23: ...working 2 Computer failed to start after inserting the Powered USB Hub Turn off the computer remove the Powered USB Hub and try to restart the computer If the computer starts successfully it means th...

Page 24: ...upgrade your computer USB interface to USB2 0 high speed specification If your computer already built in USB2 0 interface port but it still can not run USB2 0 high speed commuication Please upgread yo...

Page 25: ...in 1 55A PTC fuse If your powered USB device draws higher current than fuse specification the PTC will turn off the power for each individual port if an unusual overload is sustained If our current mo...

Page 26: ...sunix com tw 5 Appendix This chapter shows Powered USB Hub s core technologies and shows you how to contact with us for information about this and other products In this appendix we cover the followin...

Page 27: ...re each Powered USB port is protected with a PTC Positive Temperature Coefficient reset able fuse SUNIX PUB1300H built in 3Amp PTC fuse on 24VDC Powered USB port and 1 55Amp PTC fuse on 12VDC Powered...

Page 28: ...tions at podiums and kiosks panel mount cable is a great way to keep your connections extremely reliable safety and professional Rugged and User friendly Design SUNIX PUB1300H is a rugged aluminum cha...

Page 29: ...Polybrominated Biphenyl PBB and Polybrominated Diphenyl Ether PBDE flame retardants One of the main concerns of manufacturers of equipment is getting rid of lead since lead is one of the main ingredie...

Reviews: