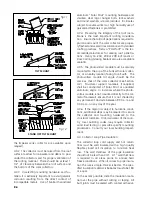
rate at which the anode rod is consumed. In
general, the higher the average system tempera-
ture the faster the rate of corrosion. By changing
the anode rod after the fifth year of system oper-
ation, and every three to five years thereafter, it is
possible to extend the life of the solar storage
tank. Periodic replacement of the anode rod in
your solar storage tank can significantly extend
the tank life.
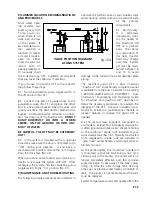
9.3 The solar storage tank also should be flushed
annually to minimize sediment build-up on the
bottom of the tank. If you live in an area with
high mineral content in your water, flush the tank
on a semi-annual basis. Disconnect the power to
the solar tank at the circuit breaker or time
switch (if present) before flushing. Turn off the
circulating pump toggle switch (No. 21).
Open the flush valve on the bottom of the stor-
age tank (No. 15) and drain a sufficient volume
of water to eliminate the sediment. After the
procedure is complete make sure the tank is
completely full of water before restoring power
to the thermostat and heating element. Turn
the circulating pump toggle switch to the "on"
position.
9.4 If you live in a dusty climate it is a good idea
to wash off the dirt that settles on the collector
glass once a month. Clean glass allows the col-
lector to maintain a high level of thermal per-
formance.
9.5 Check the exterior pipe insulation annually
and patch or repair any exposed surfaces or
degraded areas. Repaint as necessary.
9.6 In the unusual instance of collector glass
breakage, the glass should be replaced immedi-
ately. This will reduce the likelihood of water
accumulating inside the collector and deteriorat-
ing the insulation. Contact your installation con-
tractor.
9.7 If you detect a glycol or water leak, or the
glycol loop pressure drops unexpectedly, contact
your installation contractor immediately to diag-
nose the problem and recharge the system.
9.8 If the circulating pump is not operating on a
sunny day and you have no hot water, check the
photovoltaic module and circulating pump wire
connections. Make sure the toggle switch is in
the "on" position. If the connections check out
O.K. contact your installation contractor for serv-
ice.
9.9 If the weather is poor and the auxiliary heat-
ing element will not fire, the bright red reset but-
ton on the thermostat may have to be depressed
to be reset. Single tank systems have one heat-
ing element and one thermostat. Double tank
systems with conventional electric water heaters
have two heating elements and two thermostats
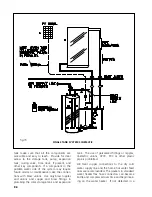
(See Figure 16, No. 28).
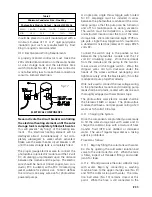
NEVER remove the protective access
plate on the exterior of the solar storage
tank or conventional water heater with-
out disconnecting the 230 volt power
supply at the circuit breaker.
After the circuit breaker has been turned off,
remove the access plate on the storage tank or
water heater and depress the red reset button on
the thermostat. If it clicks when depressed the
heating element should fire immediately when
you reconnect the circuit breaker. It the reset
button does not click and you do not have hot
water after one hour, the heating element or
thermostat may be defective. Contact your
installation contractor for service.
In two tank systems the conventional electric
water heater will be wired for electrical back-up.
The solar tank will serve solely as a storage tank
and will not be wired.
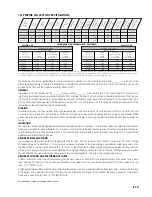
10) SOLARAY SYSTEM COMPONENT PARTS
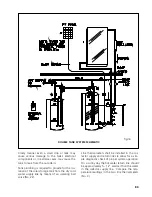
See Figures 15 & 16 for the location of the spe-
cific components numbered below.
1) SunEarth Solar Collector(s): Absorbs the sun's
heat energy and transfers this heat to the HTF cir-
culating through the collector.
2) Photovoltaic Module: Provides 12 volt DC
power to run the circulating pump when an ade-
quate solar resource is available.
3) Tank and Line Thermometers: Used to deter-
mine proper system operation. Line thermome-
ters will show an approximate 5 - 12° tempera-
ture difference between the collector supply and
return lines on sunny days. The tank thermome-
ter displays the hottest temperatures in the solar
storage tank.
4) Swing Check Valve: This valve is intended to
P.16

