7.
8.
SETTING THE CLOCK
To Set the Clock:
1. Plug the power cord into a standard electrical outlet. The clock will flash
on the control panel to indicate that the time has not been set yet.
2. Press the HOUR and MINUTE buttons until you reach the current time.
Note the AM or PM indicator.
The clock is now set!
NOTE:
Pressing any button before setting the clock will cause the clock to start
keeping time from 12:00 a.m. You must set the clock if you want to use the
Brew Later feature.
PREPARING FOR USE
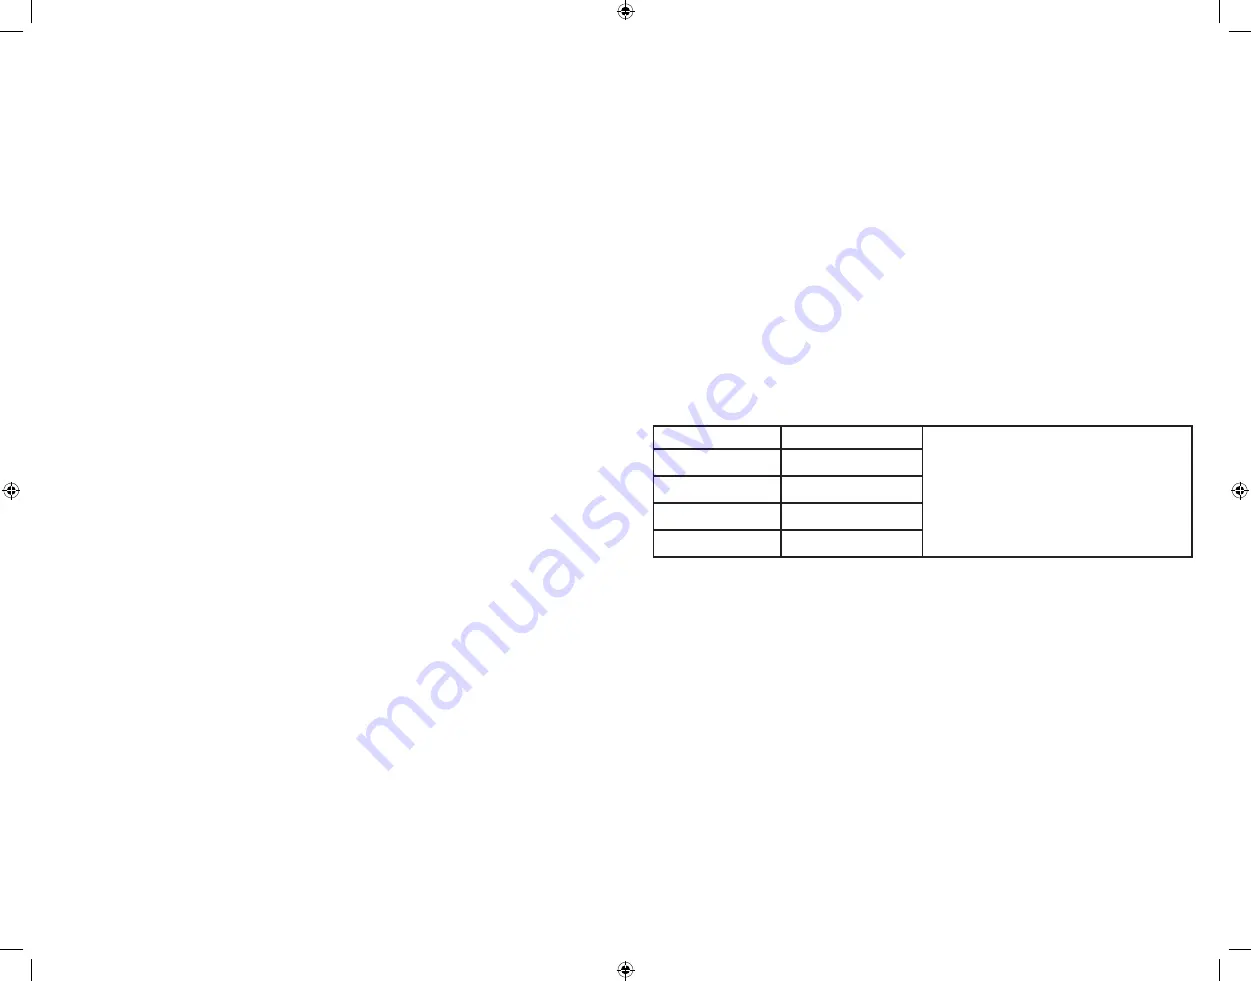
A. Suggested Coffee Measurement Chart
For best results, use a level tablespoon for ground coffee measurement. Make
sure you use medium grind coffee for a perfect brew.
To Brew
Ground Coffee
1 level tablespoon (tbsp) = 5gr./0.17
oz.
1 cup = 5fl. oz. of brewed coffee
Vary the amount of coffee you use to
suit your taste
10 cups
7.5 tbs.
8 cups
6.5 tbs.
6 cups
4.5 tbs.
4 cups
3 tbs.
B. Water Filtration System
You are the owner of a Mr. Coffee® water filtration system. Using the Mr.
Coffee® carbon-based water filter improves the taste of your coffee by
removing up to 97% of the chlorine from the water you may use to brew your
coffee. To use the water filtration system in your Mr. Coffee® Coffeemaker,
please follow these steps:
1. Align the red indicator on the water filter frame attached to the brew
basket, to the letter that corresponds with the month that you are using the
disk. This serves to remind you to change the disk every month (approx. 30
brewing cycles).
NOTE:
For optimum results, use the water filtration system with a
permanent filter (sold separately.)
2. Rinse the water filter disk in fresh water before first use.
3. To place the water filter disks, twist the gray disk cover from your water filtration
system. Insert the new disk into the frame and twist the cover back into place.
4. Follow “Adding Water and Ground Coffee” instructions.
5. When you are done brewing your coffee, rinse the water filter disk with
fresh water. Do not put your water filter disk in the dishwasher.
COFFEEMAKER FEATURES AND BENEFITS
Your new Mr. Coffee® 10-cup programmable thermal coffeemaker has the
following features:
•
Brewing Capacity
– 10 Cups
•
Optimal Brew
– Brews coffee 20% faster at a higher temperature of up to
205 degrees for richer taste.
•
Strong Brew
– Select strong brew for a bolder cup of coffee.
•
Brew Later
– Set it ahead and wake up to fresh brewed coffee.
•
Double Walled Stainless-Steel Thermal Carafe
– Holds temperature and
fresh flavor of coffee so every cup tastes just brewed.
•
Removable Filter Basket
– The filter basket pulls out for fast and easy
cleaning and filling.
•
Removable Water Reservoir
– Allows you to take the water reservoir out for
easy filling.
•
Freshness Timer
– Monitors how fresh the coffee is from the time it’s
brewed.
•
Automatic Clean Cycle
– Easily removes calcium and mineral deposits from
the water tank and heater.
•
Grab-A-Cup Auto Pause
– Stops the brewing cycle to allow you to grab a
cup before brewing is finished.
•
Includes Water Filtration
– Removes up to 97% of the chlorine from the
water and improves the taste of your coffee.
•
Cord Storage
– Safely stores excess cord to keep your countertop neat.
CLEAN YOUR COFFEEMAKER BEFORE USING
THE FIRST TIME
Make sure your first cup of coffee is as good as can be by cleaning your Mr.
Coffee ® Coffeemaker before its first use. Just follow these simple steps:
1. Wash the carafe, carafe lid and the filter basket in a mixture of mild
detergent and water. Rinse each thoroughly (please refer to the Parts
Diagram).
2. Replace all the parts and attach the water reservoir. Then, run a brew cycle
with water only, without adding coffee and coffee filter.
3. When brewing is complete, turn your coffeemaker off, discard the water
in the carafe and rinse the carafe, carafe lid, and filter basket. Your
coffeemaker is now ready to use. Enjoy it!
BVMC-DT100_20ESM1 (US).indd 7-8
10/27/20 3:22 PM


