background image

Sun Ray 150 Enterprise-Gerät – Benutzerhandbuch

de-7

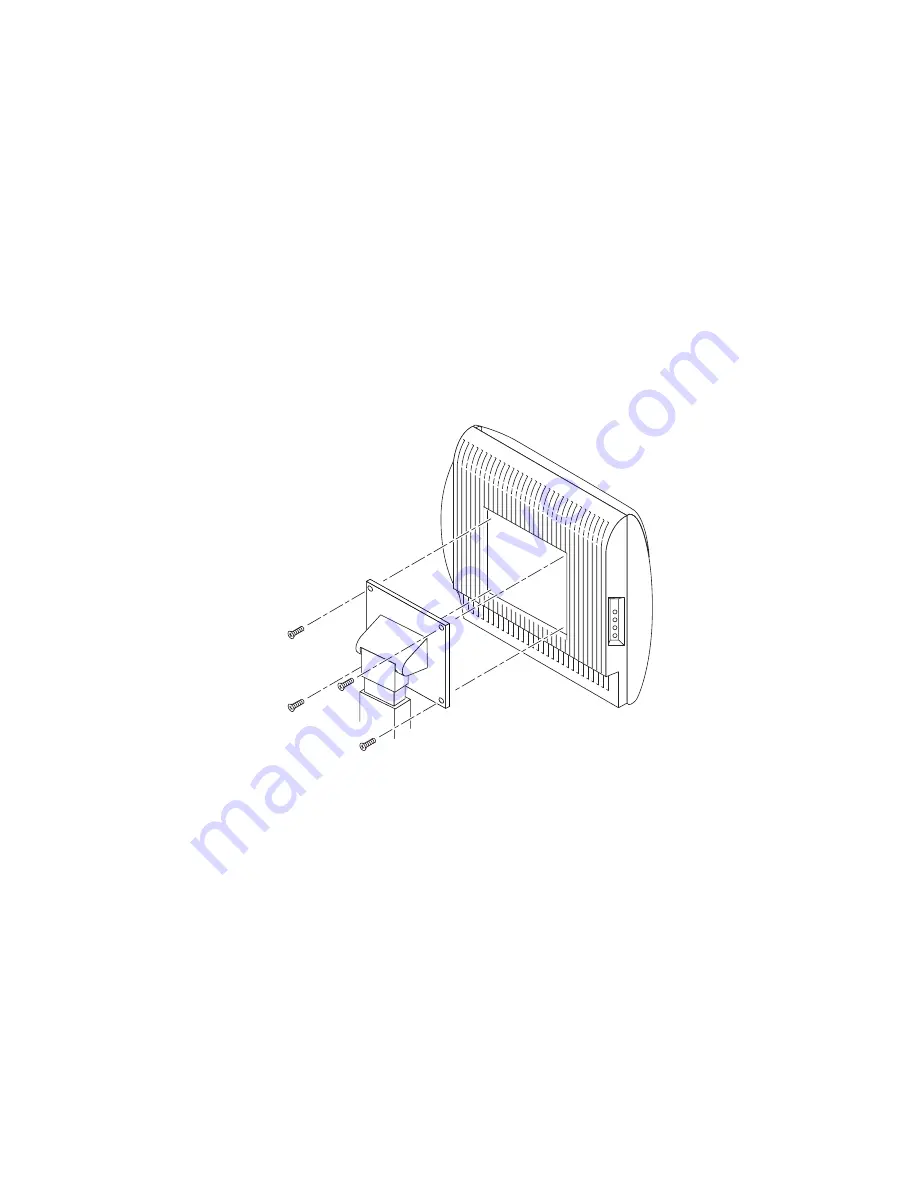
So befestigen Sie einen VESA-Fuß

Das Sun Ray 150 Enterprise-Gerät besitzt ein VESA-Montagesystem. Mit diesem
System können Sie das Gerät an einem Fuß oder Arm befestigen, der den VESA-
Spezifikationen entspricht.

1. Nehmen Sie den alten Fuß ab, indem Sie die vier VESA-Schrauben auf der

Rückseite des Geräts lösen.

2. Befestigen Sie den neuen Fuß oder Arm, indem Sie in die Vertiefung auf der

Rückseite des Geräts die entsprechende VESA-Platte einsetzen und die vier
VESA-Schrauben, wie in der Abbildung gezeigt, festschrauben.

ABBILDUNG 5

Anbringen eines VESA-Fußes am Sun Ray 150 Enterprise-Gerät

Summary of Contents for Sun Ray 150

Page 1: ...303 U S A 650 960 1300 Send comments about this document to docfeedback sun com Sun Ray 150 Enterprise Appliance User s Guide Guide de l utilisateur Benutzerhandbuch Manuale dell utente Guía del usuario Användarhandbok Part No 806 5238 10 June 2000 Revision A ...

Page 2: ...rks or registered trademarks of SPARC International Inc in the U S and other countries Products bearing SPARC trademarks are based upon an architecture developed by Sun Microsystems Inc The OPEN LOOK and Sun Graphical User Interface was developed by Sun Microsystems Inc for its users and licensees Sun acknowledges the pioneering efforts of Xerox in researching and developing the concept of visual ...

Page 3: ...se Appliance fr 1 Sun Ray 150 Enterprise Gerät Benutzerhandbuch de 1 Guida dell utente di Sun Ray 150 Enterprise Appliance it 1 Guía del usuario de Sun Ray 150 Enterprise Appliance es 1 Sun Ray 150 Nätterminal för företag Användarhandbok sv 1 Sun Ray 150 Enterprise Appliance ja 1 Sun Ray 150 Enterprise Appliance ko 1 Sun Ray 150 zh 1 Sun Ray 150 zh_TW 1 ...

Page 4: ...iv Sun Ray 150 Enterprise Appliance User s Guide June 2000 ...

Page 5: ...Follow the instructions Caution Hazardous voltages are present To reduce the risk of electric shock and danger to personal health follow the instructions Caution Do not operate Sun products without the top cover in place Failure to take this precaution may result in personal injury and system damage Caution Do not block or cover the openings of your Sun product Never place a Sun product near a rad...

Page 6: ... l équipement N apportez aucune modification mécanique ou électrique à l équipement Sun Microsystems décline toute responsabilité quant à la non conformité éventuelle d un produit Sun modifié Lieu d installation d un produit Sun Conformité aux normes SELV Le niveau de sécurité des connexions E S est conforme aux normes SELV Attention vous risquez d endommager le matériel ou de vous blesser Observe...

Page 7: ...rheitsvorschriften von modifizierten Sun Geräten nicht haftbar Attention les produits Sun sont conçus pour être exploités avec des systèmes d alimentation électrique monophasés avec prise de terre Pour réduire les risques de décharge électrique ne branchez jamais les produits Sun sur une source d alimentation d un autre type Contactez le gérant de votre immeuble ou un électricien certifié si vous ...

Page 8: ...N 45 635 Part 1000 darf am Arbeitsplatz nicht 70Db A überschreiten Warnhinweis Sun Geräte benötigen ein einphasiges Stromversorgungssystem mit eingebautem Erdleiter Schließen Sie Sun Geräte nie an ein anderes Stromversorgungs system an um elektrische Schläge zu vermeiden Falls Sie die Spezifikationen der Gebäudestromversorgung nicht kennen sollten Sie den Gebäudeverwalter oder einen qualifizierten...

Page 9: ...ubblicazione Modifiche all attrezzatura Non apportare alcuna modifica meccanica o elettrica all attrezzatura Sun Microsystems non è responsabile per la conformità ai regolamenti in vigore per un prodotto Sun che sia stato modificato Collocazione di un prodotto Sun Conformità SELV Lo stato della sicurezza dei collegamenti I O è conforme alle disposizioni SELV Attenzione Rischio di ferite e danni al...

Page 10: ...os símbolos siguientes Attenzione I prodotti Sun sono progettati per il funzionamento con impianti elettrici monofase forniti di connettore neutro a terra Per ridurre il rischio di scossa elettrica non collegare i prodotti Sun ad alcun altro tipo di impianto elettrico Se non si è certi del tipo di elettricità presente nel proprio edificio contattare il manager del sito o un elettricista qualificat...

Page 11: ...DIN 45 635 Parte 1000 el nivel de ruido que afecte al lugar de trabajo debe ser de 70 Db A como máximo Precaución Los productos Sun han sido diseñados para funcionar con sistemas de alimentación monofásicos que dispongan de un conector neutral de conexión a tierra Para reducir el riesgo de shock eléctrico no enchufe ningún producto Sun en ningún otro tipo de sistema de alimentación Si no está segu...

Page 12: ...inns farliga spänningar här Minska risken för elektrisk stöt och fara för din personliga hälsa genom att följa anvisningarna Varning Använd inte Suns produkter utan att höljet finns på plats Om du inte vidtar denna försiktighetsåtgärd kan det resultera i personlig och eller systemskada Varning Du ska inte blockera eller täcka över Sun produktens öppningar Placera aldrig en Sun produkt nära element...

Page 13: ...xiii ...

Page 14: ...xiv ...

Page 15: ...xv ...

Page 16: ...xvi ...

Page 17: ...plies with the following requirements of the Low Voltage Directive 73 23 EEC Supplementary Information This product was tested and complies with all the requirements for the CE Mark when connected to a Sun workstation or server EN55022 CISPR22 1985 Class B EN61000 3 2 IEC1000 3 2 1994 Pass EN61000 3 3 IEC1000 3 3 1995 Pass EN55024 CISPR24 1997 Pass EC Type Examination Certificates EN60950 IEC950 1...

Page 18: ...d used in accordance with the instructions may cause harmful interference to radio communications However there is no guarantee that interference will not occur in a particular installation If this equipment does cause harmful interference to radio or television reception which can be determined by turning the equipment off and on the user is encouraged to try to correct the interference by one or...

Page 19: ...xix BSMI Class B Notice This device complies with Taiwanese BSMI Class B specifications Under BSMI rules no special conditions apply to the operation of a Class B device ...

Page 20: ...xx ...

Page 21: ...isplay on page en 12 Display Mode on page en 14 Maintaining the Appliance on page en 14 Specifications on page en 15 Overview and Setup Package Contents Please make sure the following items are included in the packing carton If any items are missing contact your dealer Sun Ray 150 enterprise appliance Power supply with attached DC power cord Ethernet cable This manual Optional accessory kit includ...

Page 22: ...mponents FIGURE 1 Front and Side Panels of the Sun Ray 150 Enterprise Appliance 1 Power LED Illuminates when the appliance is powered on 2 Smart card LED Illuminates when a smart card is inserted 3 Smart card reader Accepts a valid smart card 4 Brightness controls Adjust screen brightness up or down m icro syste m s 1 2 3 4 ...

Page 23: ...ad Sun Ray appliance If a standard CRT monitor is attached to this port the CRT screen image may be corrupted due to incompatible display modes 3 Video in Input for a device that provides a composite video signal 4 USB ports 1 2 3 and 4 Standard USB ports for peripherals 5 Network connector 100BASE T Ethernet cable receptacle RJ 45 6 Stereo audio signal line in 1 8 inch 3 5 mm stereo mini plug Inp...

Page 24: ...m its packing carton set it up using the following procedure Note Your appliance operates by communicating over the network with a server on which the Sun Ray administration software has been installed If the appliance does not operate correctly after the following procedure check with your system administrator to make sure the Sun Ray enterprise server has been set up To Set Up the Appliance 1 Pl...

Page 25: ...If the appliance displays an image installation is complete FIGURE 3 Back Panel Cabling of the Sun Ray 150 Enterprise Appliance optional cables at connectors 2 and 3 are shown for reference Note If the screen image is too large causing some icons to disappear from view you or your system administrator can use the utxconfig command to change the display mode See Troubleshooting on page en 8 for ins...

Page 26: ... s Guide June 2000 To Insert a Smart Card Insert the smart card with the square circuit facing the back of the appliance and oriented toward the card slot FIGURE 4 Inserting a Smart Card in the Sun Ray 150 Enterprise Appliance m icro syste m s ...

Page 27: ...ce to any stand or extension that meets VESA specifications 1 Detach the old stand by unscrewing the four VESA mount screws on the back of the appliance 2 Attach the new stand or extension by placing its VESA plate in the appliance s back recess and screwing in the four VESA mount screws as shown in the figure FIGURE 5 Attaching a VESA Stand to the Sun Ray 150 Enterprise Appliance ...

Page 28: ... to change the resolution Open a terminal window and type the following command opt SUNWut lib utxconfig r 1024x768 If you type this command with your smart card inserted in the appliance the new display setting will be associated with the smart card and will follow your smart card to any other appliance attached to the Sun Ray enterprise server If you type this command without your smart card ins...

Page 29: ...correct the problem See LED Indicators on page en 11 for more information You cannot adjust the appliance with the buttons on the front panel Please contact Sun technical support Icon What it means Action to take The unit is starting up Wait If the unit does not start within a short time contact your system administrator The server is currently downloading to the unit s PROM Wait The unit will res...

Page 30: ...nnot communicate with the server software Contact your system administrator The sound has been muted Press the Mute key again or use the Settings screen page en 12 to unmute the sound The volume has been changed Press either of the volume keys or use the Settings screen page en 12 to adjust the volume The unit s Ethernet address is displayed when the three audio volume control keys are pressed sim...

Page 31: ...t it means Power Fault Off The unit is not plugged in Yellow The LED briefly lights for 2 3 seconds at power on while the unit checks the hardware If this LED stays on or lights at any other time a hardware fault has occurred Contact your system administrator for a replacement unit Green The unit is powered on and the hardware is functioning normally Blinking The unit is inoperable Contact your sy...

Page 32: ...ssion or Display The Sun Ray 150 enterprise appliance has two sets of controls that enable you to adjust the features on your desktop The Settings screen enables you to adjust features of the Sun Ray session The Brightness buttons enable you to adjust the brightness of the display Adjusting Session Attributes The Sun Ray Settings screen enables you to control the following features of your Sun Ray...

Page 33: ...e the Settings Screen 1 Open the Settings screen using one of the following methods Press Shift Props on the keyboard Open a terminal window and type The Settings screen appears after a few seconds 2 Select the category then the setting you want Contact your system administrator if you have questions Adjusting Screen Brightness The Brightness buttons on the right panel of the Sun Ray 150 enterpris...

Page 34: ...nce Caution To avoid risk of electric shock do not disassemble the cabinet The unit is designed not to be user serviceable User maintenance is restricted to cleaning as explained below To Clean the Appliance 1 Unplug the appliance from the power outlet before cleaning 2 To clean your display screen lightly dampen a soft clean cloth with water or mild detergent If possible use a special screen clea...

Page 35: ...mum 1 1lb Total 4 5 kg maximum 9 9lb All measurements approximate Power adapter 100 240V 47 63Hz 0 5A Power consumption 45W AC maximum in use 15W AC maximum in PowerSaver mode VESA mount Meets FPMPMI standard 100mm spacing Environmental considerations Operating environment Temperature 0C to 40C 32F to 104F Humidity 5 to 93 RH Altitude 0m to 3 2km 0ft to 10 500ft Storage environment Temperature 20C...

Page 36: ...en 16 Sun Ray 150 Enterprise Appliance User s Guide June 2000 ...

Page 37: ... Mode d affichage à la page fr 14 Maintenance du système à la page fr 15 Spécifications à la page fr 16 Présentation et installation Contenu du carton Assurez vous que le carton d emballage contient les éléments suivants Si tel n est pas le cas adressez vous à votre revendeur Sun Ray 150 Enterprise Appliance Bloc d alimentation avec cordon d alimentation secteur Câble Ethernet Le présent manuel Ki...

Page 38: ...URE 1 Panneaux avant et arrière du Sun Ray 150 Enterprise Appliance 1 Voyant d alimentation s allume lorsque le système est mis sous tension 2 Voyant de carte à mémoire s allume lorsqu une carte à mémoire est insérée 3 Lecteur de carte à mémoire accepte toute carte à mémoire valide 4 Contrôles de luminosité permettent de régler la luminosité de l écran m icro syste m s 1 2 3 4 ...

Page 39: ...marque Ce port ne permet pas de relier un moniteur supplémentaire de façon à créer un système Sun Ray à double écran Si vous reliez un moniteur à écran cathodique standard à ce port l incompatibilité des modes d affichage risque d altérer la qualité de l image 3 Entrée vidéo entrée pour un périphérique générant un signal vidéo composite 4 Ports USB 1 2 3 et 4 ports USB standard pour des périphériq...

Page 40: ...positif de verrouillage pour plus de détails sur les instructions d installation Configuration du système Déballez avec précautions le Sun Ray 150 Enterprise Appliance puis installez le en procédant comme suit Remarque Votre système communique via le réseau avec un serveur sur lequel le logiciel d administration Sun Ray est installé Si le système ne fonctionne pas correctement à l issue de la proc...

Page 41: ...nstallation est terminée FIGURE 3 Câblage au panneau arrière du système Sun Ray 150 Enterprise Appliance les câbles optionnels pour les connecteurs 2 et 3 sont représentés à titre de référence Remarque Si l image affichée à l écran est trop volumineuse et que certaines icônes disparaissent de l affichage l administrateur système ou vous même pouvez utiliser la commande utxconfig pour modifier le m...

Page 42: ... 2000 Pour insérer une carte à mémoire Insérez la carte à mémoire introduisez la carte dans son emplacement en orientant le circuit carré vers l arrière du système FIGURE 4 Insertion d une carte à mémoire dans le système Sun Ray 150 Enterprise Appliance m icro syste m s ...

Page 43: ... tout support ou extension respectant les spécifications VESA 1 Pour détacher l ancien support desserrez les quatre vis de montage VESA à l arrière du système 2 Pour fixer le nouveau support ou la nouvelle extension placez sa plaque VESA sur le renfoncement arrière du système et serrez les quatre vis de montage VESA comme indiqué sur la figure FIGURE 5 Fixation d un support VESA au système Sun Ray...

Page 44: ...olution Ouvrez une fenêtre de terminal et entrez la commande suivante opt SUNWut lib utxconfig r 1024x768 Si la carte à mémoire est insérée dans l appareil lorsque vous entrez cette commande le nouveau paramètre de l affichage est associé à cette carte et il applique ses instructions à tout autre système relié au serveur d entreprise Sun Ray Si la carte à mémoire n est pas insérée dans l appareil ...

Page 45: ... problème Voir Voyants à la page fr 11 pour de plus amples informations Vous ne pouvez pas régler le système en utilisant les boutons du panneau avant Adressez vous à l assistance technique Sun Icône Explication Solution L unité démarre Attendez Si l unité ne démarre pas dans un bref délai contactez l administrateur système Le serveur est en train de télécharger des informations dans la mémoire mo...

Page 46: ...uniquer avec le logiciel du serveur Contactez l administrateur système Le son a été coupé Appuyez de nouveau sur la touche Mute ou utilisez l écran de configuration page fr 13 pour activer le son Le volume a été changé Appuyez sur les touches de volume ou utilisez l écran de configuration page fr 13 pour régler le volume L adresse Ethernet de l unité apparaît lorsque les trois touches du contrôle ...

Page 47: ...nistrateur système L accès vous est refusé Contactez l administrateur système Voyant État Explication Alimentation Panne Hors tension L unité est actuellement débranchée Jaune La DEL s allume brièvement pendant 2 à 3 secondes lors de la mise sous tension pendant que l unité vérifie le matériel Si cette DEL reste allumée ou s allume à tout autre moment une panne matérielle s est produite Demandez à...

Page 48: ...n Ray 150 Enterprise Appliance propose deux groupes de contrôles écran qui vous permettent d ajuster les réglages sur votre bureau L écran de configuration vous permet d ajuster les réglages de la session Sun Ray Les boutons de la partie Brightness vous permettent de régler la luminosité de l affichage Carte à mémoire Hors tension Pas de carte à mémoire insérée Sous tension La carte à mémoire a ét...

Page 49: ... de l affichage sur le système Sun Ray 150 Enterprise Appliance il est recommandé d employer la commande utxconfig comme décrit dans la section Dépannage à la page fr 8 FIGURE 6 Écran de configuration du système Sun Ray 150 Enterprise Appliance Pour utiliser l écran de configuration 1 Ouvrez l écran de configuration en appliquant l une des méthodes suivantes Appuyez sur Maj Props à partir du clavi...

Page 50: ...150 Enterprise Appliance vous permettent de régler la luminosité de l affichage Pour régler la luminosité Utilisez les boutons prévus à cet effet pour régler la luminosité Mode d affichage Le système Sun Ray 150 Enterprise Appliance affiche les images à une résolution de 1024 x 768 60 Hz Si le serveur d entreprise Sun Ray utilise un autre mode d affichage vous risquez de constater un effet de pano...

Page 51: ...tème 1 Débranchez le système de la prise murale avant de passer au nettoyage 2 Pour nettoyer l écran humidifiez légèrement un chiffon doux et propre avec de l eau ou un détergent non abrasif Si possible utilisez un chiffon de nettoyage spécial ou une solution appropriée au revêtement antistatique 3 Pour nettoyer l armoire utilisez un chiffon légèrement imbibé d un détergent non abrasif Attention N...

Page 52: ... maximum 1 1 livres Total 4 5 kg maximum 9 9 livres Les mesures sont toutes approximatives Adaptateur d alimentation 100 240 V 47 63 Hz 0 5 A Consommation 45 W CA maximum pendant l utilisation 15 W CA maximum en mode PowerSaver Montage VESA Respecte la norme FPMPMI avec espacement de 100 mm Considérations relatives à l environnement Environnement de fonctionnement Température 0 C à 40 C 32 F à 104...

Page 53: ...dus auf Seite de 14 Wartung des Geräts auf Seite de 14 Spezifikationen auf Seite de 15 Übersicht und Installation Paketinhalt Überprüfen Sie bitte ob die folgenden Gegenstände in der Verpackung enthalten sind Sollte etwas fehlen setzen Sie sich bitte mit Ihrem Händler in Verbindung Sun Ray 150 Enterprise Gerät Netzgerät mit Gleichstromkabel Ethernet Kabel Dieses Handbuch Optionales Zubehör Kit mit...

Page 54: ...Frontabdeckung ABBILDUNG 1 Frontabdeckung und Seiten des Sun Ray 150 Enterprise Geräts 1 Strom LED Leuchtet wenn das Gerät eingeschaltet ist 2 Smart Card LED Leuchtet wenn eine Smart Card eingelegt wurde 3 Smart Card Leser Nimmt eine gültige Smart Card an 4 Helligkeitssteuerungen Zum Einstellen der Helligkeit m icro syste m s 1 2 3 4 ...

Page 55: ...chluß ist nicht zum Anschließen eines zweiten Monitors vorgesehen und es kann kein Sun Ray Doppelmonitorgerät erstellt werden Wenn an diesen Anschluß ein Standard CRT Monitor angeschlossen wird treten aufgrund von inkompatiblen Anzeigemodi möglicherweise Bildschirmstörungen auf 3 Videoeingang Eingang für ein Gerät das ein FBAS Signal ausgibt 4 USB Anschlüsse 1 2 3 und 4 Standard USB Anschlüsse für...

Page 56: ... das Sun Ray 150 Enterprise Gerät vorsichtig aus der Verpackung heraus und stellen Sie es gemäß den folgenden Anleitungen auf Hinweis Das Gerät kommuniziert über das Netzwerk mit einem Server auf dem die Sun Ray Administrationssoftware installiert wurde Wenn das Gerät nach dem folgenden Vorgang nicht ordnungsgemäß funktioniert vergewissern Sie sich bei Ihrem Systemverwalter daß der Sun Ray Enterpr...

Page 57: ...Bildschirm des Geräts ein Bild angezeigt wird ist die Installation abgeschlossen ABBILDUNG 3 Kabelanschlüsse auf der Rückseite des Sun Ray 150 Enterprise Geräts die optionalen Kabel in den Anschlüssen 2 und 3 sind zur Referenz abgebildet Hinweis WenndasMonitorbildzugroßist wodurcheinigeSymbolenichtsichtbar sind könnenSieoderIhrSystemverwaltermitdemBefehl utxconfigden Anzeigemodusändern Anleitungen...

Page 58: ...2000 So legen Sie eine Smart Card ein Legen Sie die Smart Card die rechteckige Platine zur Rückseite des Geräts zeigend und in Richtung Karteneinschub ausgerichtet ein ABBILDUNG 4 Einlegen einer Smart Card in das Sun Ray 150 Enterprise Gerät m icro syste m s ...

Page 59: ...n der den VESA Spezifikationen entspricht 1 Nehmen Sie den alten Fuß ab indem Sie die vier VESA Schrauben auf der Rückseite des Geräts lösen 2 Befestigen Sie den neuen Fuß oder Arm indem Sie in die Vertiefung auf der Rückseite des Geräts die entsprechende VESA Platte einsetzen und die vier VESA Schrauben wie in der Abbildung gezeigt festschrauben ABBILDUNG 5 Anbringen eines VESA Fußes am Sun Ray 1...

Page 60: ... Sie die Auflösung auf zwei Arten ändern Öffnen Sie ein Terminal Fenster und geben Sie den folgenden Befehl ein opt SUNWut lib utxconfig r 1024x768 Wenn Sie diesen Befehl mit eingelegter Smart Card eingeben wird die neue Bildschirmeinstellung mit der Smart Card gespeichert und auf alle mit dem Sun Ray Enterprise Server verbundenen Geräte angewandt in die die Smart Card eingelegt wird Wenn Sie dies...

Page 61: ... Sie unter LED Leuchten auf Seite de 11 Das Gerät kann nicht mit den Tasten auf der Frontabdeckung eingestellt werden Wenden Sie sich bitte an den technischen Kundendienst von Sun Symbol Bedeutung Auszuführende Handlung Inbetriebnahme des Geräts Bitte warten Wenn sich das Gerät nicht innerhalb von kurzer Zeit einschaltet setzen Sie sich mit Ihrem Systemverwalter in Verbindung Der Server nimmt ein ...

Page 62: ...nizieren Setzen Sie sich mit Ihrem Systemverwalter in Verbindung Der Ton ist abgeschaltet Drücken Sie erneut die Taste Mute oder verwenden Sie das Fenster Einstellungen page de 12 um den Ton erneut einzuschalten Die Lautstärke wurde verändert Verstellen Sie die Lautstärke durch Drücken einer der Lautstärketasten oder über das Fenster Einstellungen page de 12 Die Ethernet Adresse des Geräts wird an...

Page 63: ... Verbindung Der Zugriff wurde verwehrt Setzen Sie sich mit Ihrem Systemverwalter in Verbindung LED Status Bedeutung Strom Fehler Aus Das Gerät ist nicht eingesteckt Gelb Die LED Leuchte leuchtet nach dem Einschalten 2 bis 3 Sekunden auf während das Gerät die Hardware prüft Wenn die LED Leuchte weiter oder zu einem anderen Zeitpunkt aufleuchtet ist ein Hardware Fehler aufgetreten Setzen Sie sich mi...

Page 64: ...n von Steuerungen mit denen Sie die Funktionen auf Ihrem Desktop einstellen können Im Fenster Einstellungen können Sie Funktionen der Sun Ray Sitzung ändern Mit der Taste Brightness können Sie die Helligkeit des Bildschirms einstellen Ändern der Sitzungsmerkmale Im Sun Ray Fenster Einstellungen können Sie die folgenden Funktionen der Sun Ray Sitzung steuern Audioeingang und ausgang Smart Card Aus ...

Page 65: ...ay 150 Enterprise Gerät Fenster Einstellungen So verwenden Sie das Fenster Einstellungen 1 Öffnen Sie das Fenster Einstellungen mit einer der folgenden Methoden Drücken Sie auf der Tastatur die Tasten Shift Props Öffnen Sie ein Terminal Fenster und geben Sie folgendes ein Nach wenigen Sekunden wird das Fenster Einstellungen eingeblendet 2 Wählen Sie die Kategorie und anschließend die gewünschte Ei...

Page 66: ...sktop nicht wünschenswert ist lesen Sie nach unter Fehlerbehebung auf Seite de 8 Wartung des Geräts Warnhinweis Um die Gefahr von elektrischen Schlägen zu reduzieren darf das Gehäuse nicht auseinandergenommen werden Für das Gerät ist keine Wartung durch den Benutzer vorgesehen Eine Wartung durch den Benutzer beschränkt sich auf die Reinigung wie weiter unten beschrieben So reinigen Sie das Gerät 1...

Page 67: ...68 Auflösung 0 31 mm volle Pixeldichte Gewicht Monitor maximal 4 0 kg Fuß maximal 0 5 kg Gesamt maximal 4 5 kg Alle Meßwerte sind ungefähre Angaben Stromadapter 100 240 V 47 63 Hz 0 5 A Stromverbrauch 45 W Wechselstrom bei Normalbetrieb 15 W Wechselstrom im PowerSaver Modus VESA Fuß Entspricht dem FPMPMI Standard 100 mm Abstand Äußere Bedingungen Betriebsumgebung Temperatur 0 C bis 40 C Feuchtigke...

Page 68: ...de 16 Sun Ray 150 Enterprise Gerät Benutzerhandbuch Juni 2000 ...

Page 69: ... visualizzazione a pagina it 14 Manutenzione dell apparecchio a pagina it 15 Specifiche a pagina it 16 Informazioni generali e installazione Contenuto dell imballaggio Assicurarsi che i seguenti componenti siano inclusi nell imballaggio Nel caso che alcuni componenti non siano presenti contattare il rivenditore Sun Ray 150 Enterprise Appliance Alimentatore con cavo di alimentazione CC collegato Ca...

Page 70: ... di controllo FIGURA 1 Pannelli frontale e laterali del Sun Ray 150 Enterprise Appliance 1 LED di accensione si illumina quando l apparecchio viene acceso 2 LED smart card si illumina quando viene inserita una smart card 3 Lettore smart card accetta smart card valide 4 Controlli di luminosità regolano la luminosità dello schermo m icro syste m s 1 2 3 4 ...

Page 71: ...a Notare che questa porta non è adatta per il collegamento di uno schermo aggiuntivo per creare un Sun Ray a due schermi Se si collega uno schermo tradizionale a questa porta l immagine potrebbe essere incorretta a causa delle modalità di visualizzazione incompatibili 3 Video in ingresso per dispositivi che forniscono un segnale video composito 4 Porte USB 1 2 3 e 4 porte USB standard per la conne...

Page 72: ...aggio e installazione dell apparecchio Dopo aver rimosso con la dovuta cura il Sun Ray 100 Enterprise Appliance installarlo utilizzando le procedure riportate di seguito Nota Questo apparecchio funziona comunicando sulla rete con un server sul quale sia stato installato il software di amministrazione Sun Ray Se l apparecchio non dovesse funzionare correttamente una volta eseguite le procedure segu...

Page 73: ...installazione è completa FIGURA 3 Cavi del pannello posteriore del Sun Ray 150 Enterprise Appliance i cavi opzionali sui connettori 2 e 3 vengono mostrati per riferimento Nota Se l immagine sullo schermo risultasse troppo grande causando la mancata visualizzazione di alcune icone sullo schermo l utente o l amministratore di sistema possono utilizzare il comando utxconfig per modificare la modalità...

Page 74: ...o 2000 Per inserire una smart card Inserire la smart card con il circuito di forma quadrata rivolto verso il retro dell apparecchio e orientato verso la fessura di inserzione FIGURA 4 Inserzione della smart card nel Sun Ray 150 Enterprise Appliance m icro syste m s ...

Page 75: ...parecchio su qualsiasi supporto che rispetti le specifiche VESA 1 Distaccare il vecchio supporto svitando le quattro viti VESA sul retro dell apparecchio 2 Montare il nuovo supporto o estensione inserendo la placca VESA nell apposito recesso sul retro dell apparecchio reinserendo le quattro viti VESA come mostrato in figura FIGURA 5 Montaggio di un supporto VESA sul Sun Ray 150 Enterprise Applianc...

Page 76: ...ono due modi per cambiare la risoluzione Aprire una finestra di terminale e digitare il seguente comando opt SUNWut lib utxconfig r 1024x768 Se si digita questo comando con la smart card inserita nell apparecchio le nuove impostazioni verranno associate alla smart card e seguiranno la smart card stessa in qualsiasi altra apparecchiatura connessa ad un server Sun Ray Enterprise Se si digita questo ...

Page 77: ...are l amministratore di sistema Per ulteriori informazioni vedi Indicatori LED a pagina it 11 Non è possibile regolare l apparecchio con i pulsanti posti sul pannello frontale Contattare il supporto tecnico di Sun Icona Significato Azione L unità si sta avviando Attendere Se l unità non si avvia in breve tempo contattare l amministratore di sistema Il server sta scaricando la PROM dell unità Atten...

Page 78: ...unicare con il software del server Contattare l amministratore di sistema L audio è stato disattivato Per riattivare l audio premere di nuovo il tasto Mute o utilizzare la schermata Impostazioni page it 13 Il volume è stato modificato Per regolare il volume premere uno dei tasti di regolazione del volume o utilizzare la schermata Impostazioni page it 13 L indirizzo ethernet dell unità viene visual...

Page 79: ...inistratore di sistema Accesso negato Contattare l amministratore di sistema LED Stato Significato Power Fault Spento L unità non è collegata alla rete elettrica Giallo Il LED si accende brevemente per 2 3 secondi all accensione mentre l unità controlla lo stato dell hardware Se tale LED rimane acceso o si accende in qualsiasi altro momento si è verificato un malfunzionamento hardware Rivolgersi a...

Page 80: ...della sessione o della visualizzazione Sun Ray 150 comprende due tipi di controllo che consentono di regolare le caratteristiche del desktop La schermata Impostazioni consente di regolare le caratteristiche della sessione di Sun Ray Il pulsante Brightness consente di regolare la luminosità dello schermo Smart card Spento Nessuna smart card inserita Acceso La smart card è stata inserita correttamen...

Page 81: ...l metodo consigliato per la modifica delle impostazioni di visualizzazione di Sun Ray 150 Enterprise Appliance è quello di usare il comando utxconfig come descritto in Soluzione dei problemi a pagina it 8 FIGURA 6 Schermata Impostazioni di Sun Ray 150 Utilizzazione dello schermata Impostazioni 1 Aprire la schermata Impostazioni utilizzando uno dei metodi seguenti Premere Shift Props sulla tastiera...

Page 82: ...el Sun Ray 150 consentono di regolare la luminosità dello schermo Per regolare la luminosità Utilizzare i pulsanti Brightness per aumentare o diminuire la luminosità dello schermo Modalità di visualizzazione Il Sun Ray 150 Enterprise Appliance visualizza le immagini con una risoluzione pari a 1024 x 768 a 60 Hz Se il server utilizza una modalità di visualizzazione differente si può avere un effett...

Page 83: ...io 1 Prima di effettuare al pulizia disconnettere l apparecchio dalla rete elettrica 2 Per pulire lo schermo inumidire un panno soffice e pulito con dell acqua o alcune gocce di detergente delicato Se possibile utilizzare un panno specificamente progettato per la pulizia dello schermo o una soluzione adatta a superfici antistatiche 3 Per pulire il cabinet utilizzare un panno inumidito con del dete...

Page 84: ... 9 9 libbre Tutte le misure sono approssimate Alimentatore 100 240V 47 63Hz 0 5 A Consumi 45 W AC massimo durante l uso 15W AC massimo in modalità di risparmio di energia Supporto di tipo VESA Rispetta gli standard FPMPMI spaziatura 100 mm Caratteristiche ambientali considerazioni Ambiente operativo Temperatura 0C a 40C 32F a 104F Umidità dal 5 al 93 RH Altitudine da 0 m a 3 2 km da 0 a 103 500 pi...

Page 85: ...2 Modalidad de visualización en la página es 14 Mantenimiento de la unidad en la página es 14 Especificaciones en la página es 16 Descripción general e instalación Contenido del paquete Compruebe que la caja de embalaje contenga los siguientes elementos Si falta alguno póngase en contacto con el distribuidor La unidad Sun Ray 150 Enterprise Appliance Fuente de alimentación con cable de CA conectad...

Page 86: ...rontal y lateral de la unidad Sun Ray 150 Enterprise Appliance 1 Indicador LED de encendido Se ilumina cuando la unidad está encendida 2 Indicador LED de tarjeta inteligente Se ilumina al insertar una tarjeta inteligente 3 Lector de tarjeta inteligente Acepta una tarjeta inteligente que sea válida 4 Controles de brillo Aumentan o reducen el brillo de la pantalla m icro syste m s 1 2 3 4 ...

Page 87: ...rado para conectar un monitor adicional y crear una unidad Sun Ray de dos pantallas Si a este puerto se conecta un monitor CRT estándar es posible que la imagen de éste presente anomalías debido a una incompatibilidad de las modalidades de visualización 3 Entrada de vídeo Entrada para un dispositivo que proporcione señal de vídeo compuesto 4 Puertos USB 1 2 3 y 4 Puertos USB estándar para periféri...

Page 88: ...ositivo de bloqueo que usted tenga Instalación de la unidad Extraiga con cuidado de la caja la unidad Sun Ray 150 acto seguido siga el procedimiento que se indica a continuación para instalarla Nota La unidad se comunica a través de la red con un servidor que debe tener instalado el software de administración Sun Ray Si la unidad no funciona correctamente una vez concluido el siguiente procedimien...

Page 89: ... que la instalación ha finalizado FIGURA 3 Cableado del panel posterior de la unidad Sun Ray 150 Enterprise Appliance los cables opcionales de los conectores 2 y 3 se muestran a modo de referencia Nota Si la imagen es demasiado grande y algunos iconos aparecen ocultos puede solicitar ayuda al administrador del sistema o tratar de arreglar el problema usted mismo con el comando utxconfig para cambi...

Page 90: ...ara insertar una tarjeta inteligente Inserte la tarjeta inteligente con el circuito cuadrado mirando hacia la parte posterior de la unidad y orientado hacia la ranura FIGURA 4 Inserción de la tarjeta inteligente en la unidad Sun Ray 150 Enterprise Appliance m icro syste m s ...

Page 91: ...porte que cumpla las especificaciones VESA 1 Separe la base de soporte antigua para ello desenrosque los cuatro tornillos VESA de la parte posterior de la unidad 2 Acople la nueva base o extensión de soporte para ello coloque la placa VESA en la parte posterior de la unidad y enrosque los cuatro tornillos de montaje VESA tal y como se muestra en la figura FIGURA 5 Acoplamiento de una base de sopor...

Page 92: ...al y escriba el comando opt SUNWut lib utxconfig r 1024x768 Si este comando se escribe mientras se encuentra insertada una tarjeta inteligente en la unidad la nueva configuración de visualización se asociará a la tarjeta inteligente y esa misma tarjeta conservará la nueva configuración al utilizarse en cualquier otra unidad que esté conectada al servidor de empresa Sun Ray Si al escribir el comand...

Page 93: ...cadores LED en la página es 11 para obtener más información La unidad no puede ajustarse con los botones del panel frontal Póngase en contacto con el servicio técnico de Sun Icono Qué significa Acción a emprender La unidad se está iniciando Espere Si la unidad no se inicia en unos segundos póngase en contacto con el administrador del sistema En estos momentos el servidor está transfiriendo datos a...

Page 94: ...unicarse con el software del servidor Póngase en contacto con el administrador del sistema Se ha silenciado el sonido Pulse de nuevo la tecla de silenciar o bien active el sonido en la pantalla Configuración página es 12 Se ha modificado el volumen Pulse las teclas de volumen o bien ajuste el volumen en la pantalla Configuración página es 12 La dirección Ethernet de la unidad se muestra al pulsar ...

Page 95: ...Se le ha denegado el acceso Póngase en contacto con el administrador del sistema LED Estado Qué significa Encendido Fallo Desactivado La unidad no está enchufada Amarillo Al encender la unidad el indicador luminoso se enciende brevemente durante 2 ó 3 segundos mientras ésta efectúa una comprobación del hardware Si el indicador permanece encendido o si se enciende en cualquier otro momento signific...

Page 96: ...nciones del escritorio La pantalla Configuración sirve para ajustar las funciones de la sesión Sun Ray Los botones de Brightness sirven para ajustar el brillo de la pantalla Ajuste de los atributos de la sesión La pantalla Configuración de la unidad Sun Ray controla las siguientes funciones de la sesión Sun Ray Entrada y salida de audio Tarjeta inteligente Desactivada No hay ninguna tarjeta inteli...

Page 97: ...esolución de problemas en la página es 8 FIGURA 6 Pantalla de configuración de la unidad Sun Ray 150 Enterprise Appliance Para usar la pantalla Configuración 1 Abra la pantalla Configuración y emplee uno de los métodos siguientes Pulse las teclas Mayús Props Abra una ventana del terminal y escriba La pantalla Configuración aparecerá en breves segundos 2 Seleccione la categoría y luego la configura...

Page 98: ...ión La unidad Sun Ray 150 Enterprise Appliance emite imágenes con una resolución de 1024x768 a 60Hz Si el servidor de empresa Sun Ray emplea otra modalidad de pantalla puede producirse un efecto panorámico Si este efecto constituye un problema para usted consulte Resolución de problemas en la página es 8 Mantenimiento de la unidad Precaución Para eliminar el riesgo de descarga eléctrica no desmont...

Page 99: ...uave levemente humedecido en agua o en un detergente no abrasivo Si es posible emplee un pañuelo de papel especial para limpieza de pantallas o algún otro elemento adecuado para la capa antiestática 3 Para limpiar la carcasa pase un paño levemente humedecido con detergente no abrasivo Precaución No utilice nunca material inflamable para limpiar la unidad Sun Ray 150 ni ningún aparato eléctrico ...

Page 100: ...o Total 4 5kg como máximo Todas las medidas son aproximadas Adaptador de corriente 100 240V 47 63Hz 0 5A Consumo eléctrico 45W como máximo de CA en funcionamiento y 15W como máximo de CA en modalidad PowerSaver Montaje VESA Cumple el estándar FPMPMI con espaciado de 100mm Consideraciones ambientales Entorno para el funcionamiento Temperatura Entre 0º C y 40º C Humedad relativa Del 5 al 93 Altitud ...

Page 101: ...idan sv 12 Visningsläge på sidan sv 14 Underhålla nätterminalen på sidan sv 14 Specifikationer på sidan sv 15 Översikt och installation Paketets innehåll Försäkra dig om att följande artiklar finns med i transportkartongen Om det saknas en eller flera artiklar ska du kontakta återförsäljaren Sun Ray 150 Nätterminal för företag Strömförsörjning med ansluten sladd Ethernet kabel Denna handbok Tillbe...

Page 102: ...ramsidans komponenter FIGUR 1 Fram och baksidan på nätterminalen Sun Ray 150 1 Strömlysdiod tänds när terminalen får ström 2 Smartkortlysdiod tänds när det finns ett smartkort 3 Smartkortläsare accepterar ett giltigt smartkort 4 Ljusstyrkans kontroller justerar skärmens ljusstyrka upp eller ner m icro syste m s 1 2 3 4 ...

Page 103: ...syfte att skapa en Sun Ray enhet med dubbelt huvud Om en standard CRT monitor ansluts till denna port kan det uppstå skärmproblem p g a visningslägen som inte är kompatibla 3 Video in indata för enhet som tillhandahåller sammansatt videosignal 4 USB portar 1 2 3 och 4 standard USB portar för kringutrustning 5 Nätverksanslutning 100Base T Ethernet kabelhonuttag RJ 45 6 Stereoljudsignal linje in 3 5...

Page 104: ... transportkartongen installerar du den genom att använda följande procedur Anm Nätterminalen fungerar genom att kommunicera över nätverket med en server som Sun Rays administrationsprogramvara har installerats på Om nätterminalen inte fungerar på rätt sätt efter följande procedur ska du tala med systemadministratören för att försäkra dig om att Sun Rays företagsserver har installerats Installera n...

Page 105: ...iggande kontakt Om nätterminalen visar en bild är installationen klar FIGUR 3 Bakpanelskablaget för nätterminalen Sun Ray 150 tillvalskablarna på kontakt 2 och 3 visas som referens Anm Om skärmbilden är alltför stor vilket orsakar att du inte kan se en del av ikonerna kan du eller systemadministratören använda kommandot utxconfig till att ändra visningsläget Se Felsökning på sidan sv 8 för anvisni...

Page 106: ...etag Användarhandbok Juni 2000 Så här sätter du i ett smartkort Sätt i smartkortet med den fyrkantiga kretsen mot enhetens baksida och riktad mot kortplatsen FIGUR 4 Isättning av ett smartkort i nätterminalen Sun Ray 150 m icro syste m s ...

Page 107: ...ritt ställ eller tillägg som uppfyller VESA specifikationer 1 Montera av det gamla stället genom att skruva av de fyra VESA monterings skruvarna på enhetens baksida 2 Anslut det nya stället eller tillägget genom att placera tillhörande VESA platta i enhetens bakre försänkning och skruva in de fyra VESA monteringsskruvarna enligt figuren FIGUR 5 Anslutning av ett VESA ställ till nätterminalen Sun R...

Page 108: ...vå sätt att ändra upplösningen Öppna ett terminalfönster och skriv följande kommando opt SUNWut lib utxconfig r 1024x768 Om du skriver detta kommando när smartkortet är isatt i nätterminalen associeras den nya visningsinställningen med smartkortet och kommer att följa ditt smartkort till alla andra enheter som är anslutna till Sun Ray företagsservern Om du skriver detta kommando när smartkortet in...

Page 109: ...emadministratören Se Lysdiodindikatorer på sidan sv 11 för mer information Du kan inte justera nätterminalengenom att använda knapparna på framsidan Kontakta Suns tekniska support Ikon Innebörd Åtgärd att vidta Enheten startar Vänta Om enheten inte startar inom en kort tidsperiod ska du kontakta systemadministratören Servern laddar för närvarande ner till enhetens PROM Vänta Enheten kommer att sta...

Page 110: ...rns programvara Kontakta systemadministratören Du kan inte höra något ljud från enheten Tryck på Tyst tangenten igen eller använd menyn Inställningar sida sv 12 när du vill ha tillbaka ljudet Volymen har ändrats Tryck antingen på volymknapparna eller använd menyn Inställningar sida sv 12 till att justera volymen Enhetens Ethernet adress visas när de tre knapparna för ljudvolymskontroll trycks ner ...

Page 111: ...nebörd Ström fel Av Enheten är inte inkopplad Gul När strömmen tillkopplas är lysdioden tänd i mellan två och tre sekunder medan enheten kontrollerar maskin varan Om lysdioden förblir aktiv eller tänds vid något annat tillfälle har det uppstått ett maskinvarufel Kontakta systemadministratören för en reservenhet Grön Enheten har ström och maskinvaran fungerar normalt Blinkar Det går inte att använd...

Page 112: ...angentbordet Justera session eller visning Nätterminalen Sun Ray 150 har två kontrolluppsättningar med vars hjälp du kan justera skrivbordets funktioner Du kan justera Sun Ray sessionens funktioner på menyn Inställningar Med knapparna för ljusstyrka kan du justera skärmens ljusstyrka Justera sessionsattribut Med menyn Inställningar för Sun Ray kan du styra följande egenskaper för Sun Ray sessionen...

Page 113: ...ningar 1 Öppna menyn Inställningar genom att använda en av följande metoder Tryck på Skift Egenskaper på tangentbordet Öppna ett terminalfönster och skriv Menyn Inställningar visas efter ett par sekunder 2 Välj kategori och sedan den inställning du vill ha Kontakta systemadministratören om du har frågor Justera skärmens ljusstyrka Med hjälp av knapparna för ljusstyrka som finns på den högra sidan ...

Page 114: ...isk stöt genom att inte nedmontera skåpet Enheten är utformad så att användaren inte kan utföra service på den Användarunderhåll är begränsat till rengöring enligt vad som förklaras nedan Rengöra nätterminalen 1 Innan du rengör nätterminalen ska du ta ut sladden ur kontakten 2 Rengör bildskärmen genom att använda en mjuk och ren duk som fuktats med vatten eller milt rengöringsmedel Om det är möjli...

Page 115: ... Ställ 0 5 kg maximalt Totalt 4 5 kg maximalt Alla mått är ungefärliga Strömadapter 100 240V 47 63 Hz 0 5A Energiförbrukning 45 w växelström maximalt under användning 15 w växelström maximalt i PowerSaver läge VESA montering Uppfyller standarden FPMPMI 100 mm avstånd Miljö hänsynstaganden Arbetsmiljö Temperatur 0C till 40C Fuktighet 5 till 93 RH Höjd 0 m till 3 2 km Förvaringsmiljö Temperatur 20C ...

Page 116: ...sv 16 Sun Ray 150 Nätterminal för företag Användarhandbok Juni 2000 ...

Page 117: ...s d autres pays Toutes les marques SPARC sont utilisées sous licence et sont des marques de fabrique ou des marques déposées de SPARC International Inc aux Etats Unis et dans d autres pays Les produits portant les marques SPARC sont basés sur une architecture développée par Sun Microsystems Inc L interface d utilisation graphique OPEN LOOK et Sun a été développée par Sun Microsystems Inc pour ses ...

Page 118: ...anderen Ländern Alle SPARC Warenzeichen werden unter Lizenz benutzt und sind Warenzeichen oder eingetragene Warenzeichen von SPARC International Inc in den USA und in anderen Ländern Produkte die SPARC Warenzeichen enthalten basieren auf einer von Sun Microsystems Inc entwickelten Architektur Die graphische Benutzeroberfläche von OPEN LOOK und Sun wurde von Sun Microsystems Inc für seine Benutzer ...

Page 119: ...ri paesi Tutti i marchi SPARC sono utilizzati sotto contratto e sono marchi o marchi registrati di SPARC International Inc negli USA e in altri paesi I prodotti con il marchio SPARC sono basati su architettura sviluppata da Sun Microsystems Inc OPEN LOOK e Sun Graphical User Interface sono stati sviluppati da Sun Microsystems Inc per i propri utenti e licenziatari Sun riconosce il lavoro pionieris...

Page 120: ...odas las marcas comerciales SPARC se utilizan bajo licencia y corresponden a marcas comerciales o a marcas registradas de SPARC International Inc tanto en EE UU como en otros países Los productos que presentan marcas comerciales SPARC se basan en una arquitectura desarrollada por Sun Microsystems Inc La interfaz OPEN LOOK y la Sun Graphical User Interface han sido desarrolladas por Sun Microsystem...

Page 121: ... och andra länder Alla SPARC varumärken används under licens och är varumärken eller registrerade varumärken som tillhör SPARC International Inc i USA och andra länder Produkter med SPARC varumärken är baserade på en arkitektur som utvecklats av Sun Microsystems Inc OPEN LOOK och Sun Graphical User Interface har utvecklats av Sun Microsystems Inc för dess användare och licenstagare Sun inser hur m...

Reviews: