background image

O

On

ng

go

oiin

ng

g  T

To

oiille

ett  M

Ma

aiin

ntte

en

na

an

ncce

e

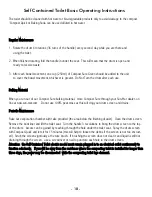
Once your Self Contained toilet is installed and you have gone through the initial start-up procedure, follows the
steps outlined below to keep your composting toilet working optimally.
AAdddd  oonnee  ccuupp  ooff  CCoom

mppoosstt  SSuurree

GGrreeeenn  ppeerr  ppeerrssoonn  ppeerr  ddaayy  ooff
uussee
SSpprraayy  CCoom

mppoosstt  QQuuiicckk  oonn  tthhee

ssuurrffaaccee  ooff  tthhee  ccoom

mppoosstt

TTuurrnn  tthhee  hhaannddllee  cclloocckkwwiissee
eevveerryy  sseeccoonndd  ddaayy  ttoo  m

miixx  tthhee

ccoom

mppoosstt

M

Maakkee  ssuurree  tthhaatt  tthhee  ooppeenniinngg  iinn
tthhee  ddrruum

m  iiss  cceenntteerreedd  uunnddeerr

tthhee  wwaassttee  ppiippee.
EEvveerryy  ttwwoo  wweeeekkss

EEvveerryy  tthhrreeee  m

moonntthhss

TTwwiiccee  ppeerr  yyeeaarr

PPeerriiooddiicc  m

maaiinntteennaannccee

Even if you only use the toilet for urination then at least one cup of Compost Sure
Green should be added per person per day of use. Add the Compost Sure Green
through the hole under the toilet seat of the Self Contained toilet.
EEvveerryy  sseeccoonndd  ddaayy before turning the handle, spray 3-4 sprays of Compost Quick
on the surface of the compost. Compost Quick is an enzyme that will speed up the
composting process.
TTuurrnn  tthhee  hhaannddllee in a clockwise direction to mix and aerate the compost. When mix-
ing, ensure that the drum rotates 6 complete revolutions (36 turns of the handle).

The hole in the drum must be open under the toilet seat, ready to receive waste.

AAdddd  oonnee  ssccoooopp  ooff  M

Miiccrroobbee  M

Miixx to the patented bio-drum to ‘recharge’ the pile. This

will help to ensure your microbe colony stays constant and healthy.
RRaakkee  tthhee  eevvaappoorraattiioonn  cchhaam

mbbeerr: Remove the finishing drawer. Rake any solid debris

from the floor of the unit under the drawer (evaporation chamber), paying extra
attention to the two back corners of the unit as this is where debris may accumu-
late. Remove the solid debris.
CClleeaann  tthhee  ddrruum

m  ssccrreeeenn. Spray the drum screen with Compost Quick and let sit for

15 minutes (this will help to loosen the debris if the screen is not too encrusted).
Scrub the screen vigorously with the wire brush. If brushing the screen does not
clear it and liquid is still not draining through the screen, you may have to resort to
having to use a screwdriver or nail to puncture each hole in the drum screen.
RReem

moovvee  ccoom

mppoosstt  ffrroom

m  tthhee  ddrruum

m. When the drum is half full (even with the middle

of the drum hub at the front of the drum) it is time to remove compost. To remove
compost from the drum:
1) Remove the footrest (EXCEL and EXCEL NE).
2) Pull the drum lock button located above the finishing drawer of the Self

Contained toilet.

3) While holding out the white drum lock button, turn the handle in a 

counter-clockwise direction for one complete revolution of the drum.

C

CA

AU

UT

TIIO

ON

N

1. Do NNOOTT add or clean the toilet bowl liner with chemicals. Chemicals will kill the bacteria.

IINNSSTTEEAADD, clean the bowl liner with Compost Quick.

2. Do NNOOTT add plastic, glass, metal, cleaning fluids, cigarettes. Add only waste and bulking material.
3. Kitchen or garden waste are  NNOOTT  recommended.
4. Do NNOOTT  add baby wipes, diapers or feminine paper as they will not compost.

- 11 -

Summary of Contents for Excel CSEL-01001

Page 1: ...quid containment odours and solid end products in both residential and cottage use RATED CAPACITY Residential Continuous Use EXCEL 3 Adults or a family of 5 or EXCLE NE Units 2 Adults or families of 3...

Page 2: ...hite 115 V CSEL 01001 230 Excel Bone 230 V CSEL 01001W 230 Excel White 230 V CSNL 01101B Excel NE Bone CSNL 01101W Excel NE White CSEM 01400B Compact Bone CSEM 01400WB Compact White CSEM 01400BB Compa...

Page 3: ...on n Space requirements Vent Piping Location Leading the vent through the Roof The Diffusor Drain Installation Handling Effluent Start Up and Use Ongoing Toilet Maintenance 2 3 3 3 3 4 4 4 4 4 5 7 5...

Page 4: ...res below 55 F 13 C additional heat is required if the composting toilet will be used continually or frequently If used for intermittent cottage application 3 4 weekends throughout the cold season no...

Page 5: ...provides the necessary mass to maintain good compost and allows easy aeration of the compost by simply turning the drum Excess liquid will exit through a screen in the bottom of the drum into the eva...

Page 6: ...s s iis s h ho ow w y yo ou u w wiillll r ro ot ta at te e t th he e d dr ru um m d du ur riin ng g r re eg gu ulla ar r o op pe er ra at tiio on n ii Pull the drum locker button located under the foo...

Page 7: ...Installation EXCEL and EXCEL NE ROUGH IN DIMENSIONS COMPACT ROUGH IN DIMENSIONS 5...

Page 8: ...s exposed to the outside or in a non heated space should be insulated if using the unit during cold weather 3 INSTALL VENT SO THAT IT TERMINATES 24 30 ABOVE HIGHEST PEAK OF THE ROOF 4 If you will be i...

Page 9: ...pipe The diffusor design encourages updraft and discourages wind and weather from going down the vent stack We do not recommend installing anything else on the top of the vent as it could impede the...

Page 10: ...nds THERE SHOULD BE NO HORIZONTAL SECTIONS OF VENT 3 INSTALL VENT SO THAT IT TERMINATES 24 30 ABOVE HIGHEST PEAK OF THE ROOF If the vent is being installed on a steeply pitched roof where snow shear m...

Page 11: ...usor design encourages updraft and discourages wind and weather from going down the vent stack We do not recommend installing anything else on the top of the vent as it could impede the venting Unlike...

Page 12: ...seat The Self Contained toilet is now ready for use Step 4 For electric units only The fan will run continuoulsy 24 hours per day 120 Volt Use Plug it in to a three prong electrical outlet 240 Volt Us...

Page 13: ...be open under the toilet seat ready to receive waste A Ad dd d o on ne e s sc co oo op p o of f M Miic cr ro ob be e M Miix x to the patented bio drum to recharge the pile This will help to ensure yo...

Page 14: ...d for 3 4 weekends throughout the winter season then it is considered occasional use All of the same considerations should be taken with these units to winterize them When the temperature dips below 5...

Page 15: ...e counter clockwise until the handle hits a hard stop Open the drawer and use your rake to level the com post Compost should now be allowed to rest in the drawer for 3 4 weeks to finish the composting...

Page 16: ...We do not recommend adding kitchen or garden scraps 1 To eliminate flies you can use any pesticide that is used on your garden Pesticides used for garden use are not anti bacterial so are safe to use...

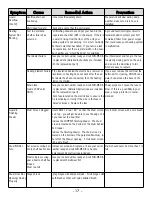
Page 17: ...t is installed above the peak of the roof If not extend the vent Guide wires may be necessary 2 Add lime to the evaporation chamber as much as you think necessary You will have to rake more often if y...

Page 18: ...through the overflow drain by tipping the unit up make sure overflow is hooked up first 1 Rake peat moss away from the safety drains This is the build up area If drains are still clogged proceed to s...

Page 19: ...ions are included with the replacement part Check fuse located on the electric box to ensure that it is functioning correctly If the wire in the fuse is chared or broken Replace the fuse Rotate EXCEL...

Page 20: ...ift the toilet seat Turn the handle 3 revolutions to bring the drum screen to the top of the drum Access can be gained by reaching through the hole under the toilet seat Spray the drum screen with Com...

Page 21: ...Sun Mar composting toilet and toilet systems Microbe Mix also contains citronella to discourage insects 5 50 00 0g g 1 16 6 o oz z jja ar r w wiit th h s sc co oo op p Bulking material containing a m...

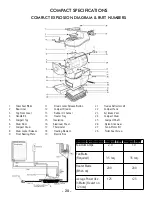
Page 22: ...16 Aluminum Sheet 26 Nylon Drive Gear 7 Compact Drum 17 Thermostat 27 Fan Motor Kit 8 Drum Locker Release 18 Heating Element 28 Toilet Seat Screw 9 Front Bearing Plate 19 Electric Box E Elle ec ct tr...

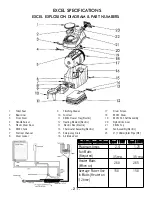
Page 23: ...ment Electric 20 Nylon Drive Gear 5 Plastic Drum Door 13 Electric Box Electric 21 EXCEL Top 6 EXCEL Tank 14 Thermostat Assembly Electric 22 Fan Assembly Electric 7 Footrest Channel 15 Emergency Drain...

Page 24: ...ge or failure resulting from failure of the purchaser to follow normal operating procedure outlined in the Owner s Manual or in any other printed instructions 4 Labour and service charges incurred in...

Reviews: