background image


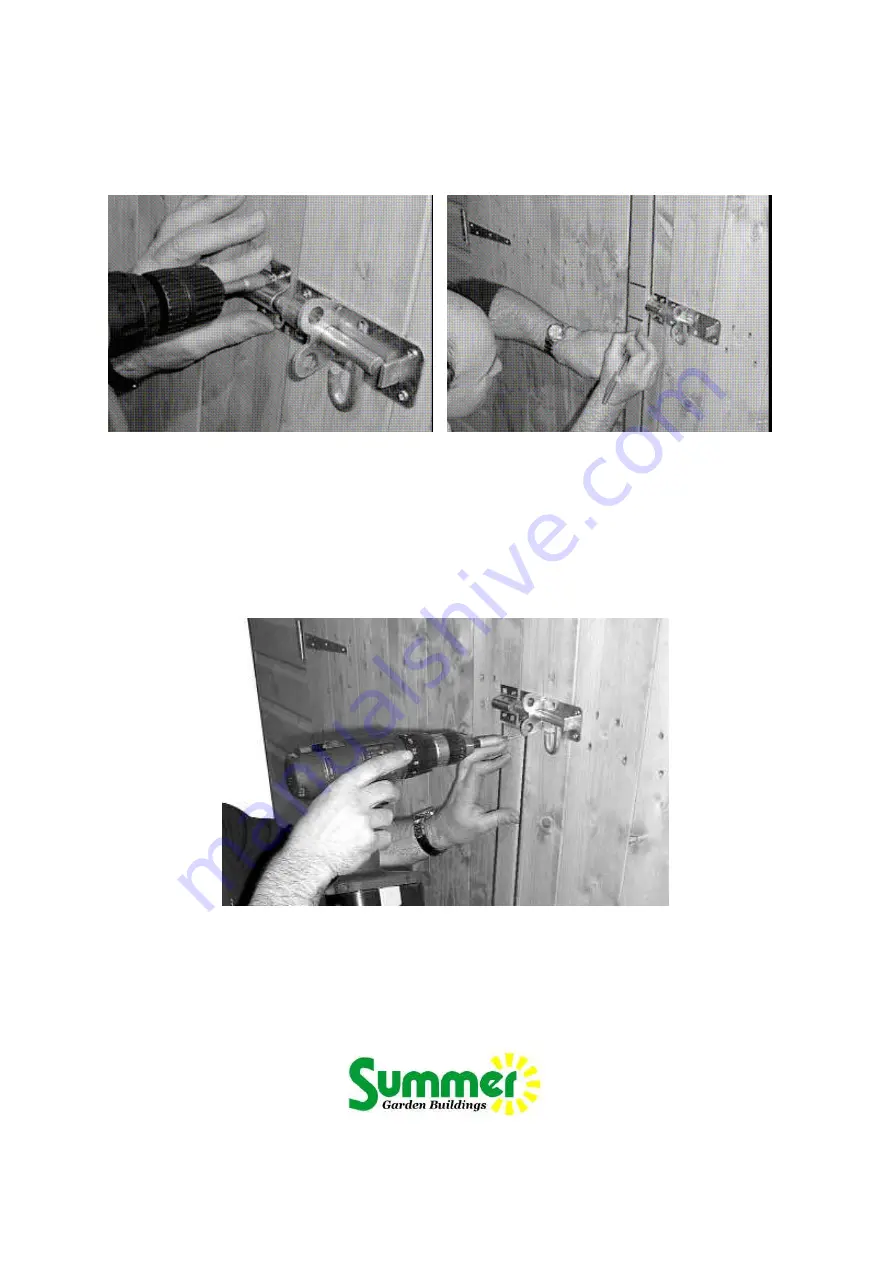
Pad Bolt 


1. Place the pad bolt in position on the outside of the right hand door directly over 
the  central  horizontal  brace.  Ensure  the  edge  is  flush  with  the  edge  of  the  door. 
Secure using 4 x 25 mm screws using the round holes only.  


2.  Place pad bolt housing in position to accommodate the pad bolt. Secure using 2 
x 25 mm screws using the round holes only 
 
3.  Place outside 1720mm door cover strip flush with the top and bottom of the door 
and mark top and bottom of pad bolt position. 
 
4.  Cut out section as marked. 


5.  Attach  the  door  cover  strips  above  and  below  the  pad  bolt.  Half  of  each  strip 
should overhang the edge of the door and when closed also overhang the left hand 
door. Secure using 6 x 25 mm screws. 


Our Help Line provides support and advice to customers of Summer Garden 

Buildings after ordering. For advice before you buy you can phone us free 7 days a 

week on 0800 9777828 or visit www.summergardenbuildings.co.uk


Summary of Contents for 085

Page 1: ...BLY OF THE BUILDING EVERY PRECAUTION IS TAKEN TO ENSURE THAT YOUR BUILDING HAS NO ELEMENT INCORRECTLY PLACED OR POSSIBLY HAZARDOUS HOWEVER PRIOR TO USE PLEASE CHECK ALL SURFACES FOR THE FOLLOWING 1 RAISED GRAIN SPLINTERS sand down timber to smooth finish 2 NAIL SCREW PIN HEADS PROUD tap home to be flush with surface of timber 3 DAMAGED SCREW HEADS RESULTING IN SHARP SPLINTERS OF METAL replace 4 SH...

Page 2: ... bolt 2 Small barrel bolts 6 Casement stays 12 Casement stay pins 12 Window hinges 4 Rolls of felt 7mtr x 1mtr 20 80mm screws 142 60mm screws 174 25mm screws 8 10mm screws 20 60mm nails 312 40mm nails 510 Felt nails 192 Panel pins Our Help Line provides support and advice to customers of Summer Garden Buildings after ordering For advice before you buy you can phone us free 7 days a week on 0800 97...

Page 3: ...floor using 3 x 40 mm nails per piece 4 Once floor joiners are fitted between floor bearers slide another floor pair on top of floor joiners and secure again using 3 x 40 mm nails per piece 5 Along the front and back edge of the completed floor fix two 34x46x1485 framework pieces Secure into floor bearers using 4 x 60 mm screws per framework piece Note the 46mm edge sits against the floor of the b...

Page 4: ...or edge the side window panels sit inside the front and back panels 3 Place other back panel half and secure using 3 x 60 mm screws 4 Fit other side window panel next to one already in position and secure using 3 x 60 mm screws 5 Place side window panel next to back panel and secure using 3 x 60 mm screws 6 Place remaining side window panel and secure using 3 x 60 mm screws The front panels are no...

Page 5: ...om top of framework of adjoining side panel to mark previously made Measure and mark from top of framework of adjoining side panels and center position of double panels The mark is where the lower angled side of the truss support block will be placed 6 Secure truss blocks in position using 2 x 60 mm screws per block 7 Place the truss on top of the two opposite support blocks and secure using 2 x 8...

Page 6: ...idge using a total of 8 x 60 mm nails 7 Secure along the length of the building into framework of walls using 12 x 40 mm nails per side Felt Roof 1 Measure and cut the required four lengths allowing an overhang of approx 50 mm on all sides Starting at the lower edge the eaves place one piece of felt along the length of the building Secure the felt using felt nails spaced at 100 mm intervals but do...

Page 7: ...he front and back panel joins Secure Walls 1 Secure wall panels to the floor on the inside of the building through framework into floor bearers using 2 x 60 mm screws per panel A Floor Assembly Wall Assembly C Truss Assembly D Roof Our Help Line provides support and advice to customers of Summer Garden Buildings after ordering For advice before you buy you can phone us free 7 days a week on 0800 9...

Page 8: ... hinge Repeat for other door 4 Fit door stop strips flush to the inside edge of the top and sides of the door aperture Nail in position using 6 x 40 mm nails for each door stop strip 5 Fit two bolts to the inside inner edge of the left door The top bolt should be positioned so that the solid part of the bolt finishes flush with the top of the door Secure using 4 x 10 mm screws Hold the door tightl...

Page 9: ...ce outside 1720mm door cover strip flush with the top and bottom of the door and mark top and bottom of pad bolt position 4 Cut out section as marked 5 Attach the door cover strips above and below the pad bolt Half of each strip should overhang the edge of the door and when closed also overhang the left hand door Secure using 6 x 25 mm screws Our Help Line provides support and advice to customers ...

Page 10: ...casement stay Place the casement stay centrally on the inside of the window Place the two pins under the casement stay Position so that it is not resting on the framework of the panel and not so high that the pins are of no use 5 Secure the casement stay on the window using 2 x 25 mm screws 6 Mark where the pins will be placed 7 Secure into position using 2 x 25 mm screws per pin Our Help Line pro...

Page 11: ...zing material into the aperture of each window 2 Hold into position with four pieces of beading Secure into position using 2 x 15 mm panel pins per piece of beading Repeat for all window apertures Our Help Line provides support and advice to customers of Summer Garden Buildings after ordering For advice before you buy you can phone us free 7 days a week on 0800 9777828 or visit www summergardenbui...

Page 12: ... Pressure treated buildings come to you already in a light green colour Whilst your pressure treated building will give you an extended life compared to non pressure treated it is still beneficial to apply your own choice of good quality long life preservative or stain although it is not absolutely necessary Any area of timber that you cut nail or screw after the building arrives to you should be ...

Reviews: