Sumix SMX-11M5 Series User Manual Download Page 54

Use of Accessories

54

SMX-11M5x Series USB2.0 Camera User Guide
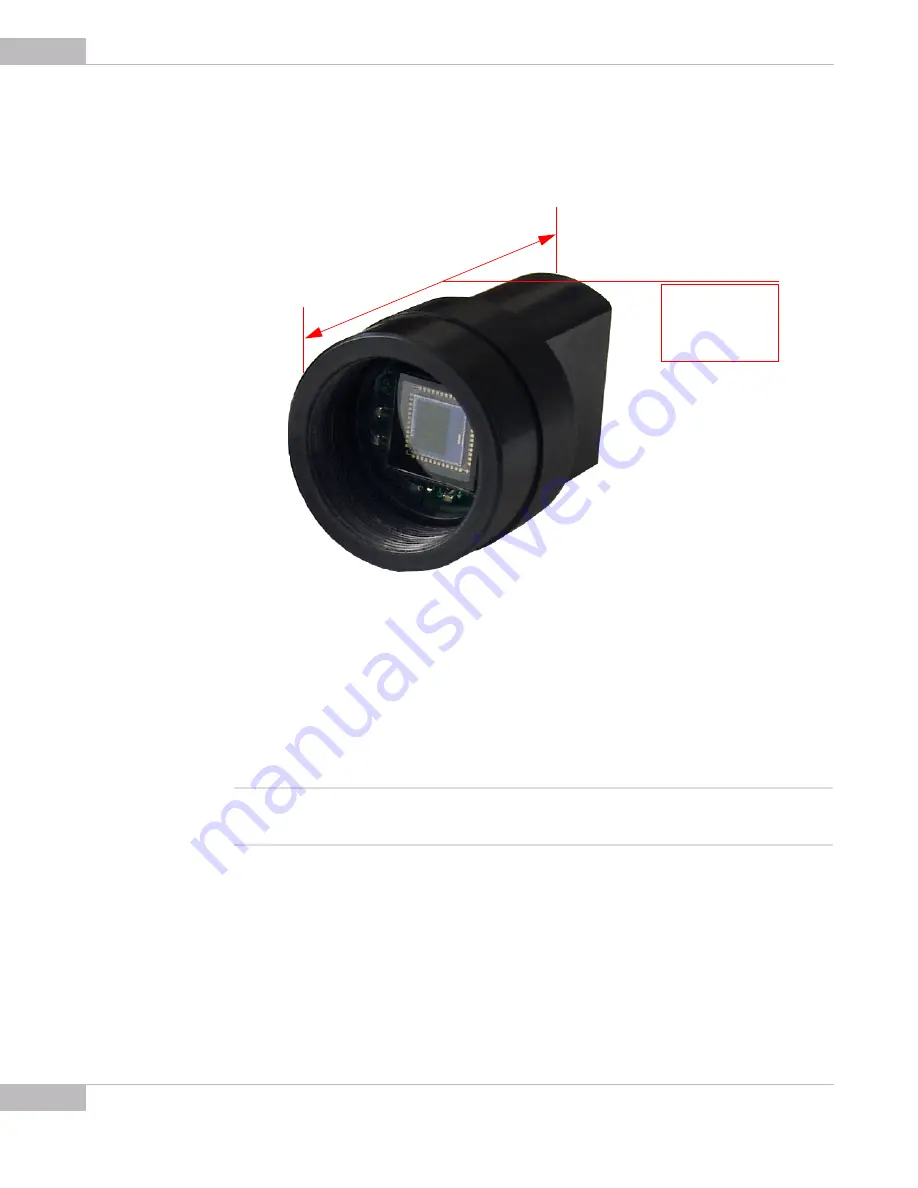
CS-mount

In this case, the camera is used without both C-mount adapter and C-mount adapter 
with IR-cut filter:

Converting the Camera from CS-mount to C-mount or from C-mount to CS-mount

Usually the SMX-11M5x camera goes with the C-mount adapter or C-mount adapter 
with IR-cut filter already screwed in. 

To use the SMX-11M5x camera as CS-mount, screw the C-mount adapter/C-mount 
adapter with IR-cut filter out.

To use the SMX-11M5x camera as C-mount, screw the C-mount adapter/C-mount 
adapter with IR-cut filter in.

Note:

It is recommended to screw in (as well as screwing out) the C-mount adapter/C-mount adapter with IR-cut filter, 
lens or the camera's cover when the camera is facing down or when the camera is in horizontal position - to pre-
vent the sensor contamination.

CS-mount: 
without C-mount 
adapter

Summary of Contents for SMX-11M5 Series

Page 1: ...SMX 11M5X 3ERIES USB2 0 Camera User Guide...

Page 2: ...ata Suite 201 Oceanside CA 92056 Tel 877 233 3385 Fax 508 300 5526 Email camera sumix com www sumix com The information in this document is subject to change without notice The software described in t...

Page 3: ...3 Getting Started 23 Installing Lens 23 Recommendations on the Camera Connection 23 Plugging in the Camera 24 Installing Driver Software 25 Starting the Application 25 Switching Between Cameras 28 Vi...

Page 4: ...eo to Memory 44 Saving Options 45 Chapter 6 Snapshots 47 Snapshots Basics 47 Taking Snapshots Using Software Trigger 47 Global Reset Release Shutter Mode 47 Taking Snapshots Using Hardware Trigger 48...

Page 5: ...min housing with C CS mount The SMX 11M5x cameras have the following benefits 2592 x 1944 active imaging pixels High speed 8 fps at 2592 x 1944 Pixel rate up to 96 MHz Rolling shutter External trigger...

Page 6: ...Introduction 6 SMX 11M5x Series USB2 0 Camera User Guide...

Page 7: ...izard starts The wizard will guide you through the software and hardware drivers installation Close all other applications that are running on your computer and then click the Next but ton to continue...

Page 8: ...SMX 11Mx Camera Setup Wizard 3 In the License Agreement box read the license Then select I accept the agree ment and click Next Figure 2 2 License Agreement dialog box 4 The wizard starts to check you...

Page 9: ...ers are green the parameters satisfy the software requirements update your system if at least one cell is red such configuration is not recom mended update your system if at least one cell is yellow o...

Page 10: ...or leave the one sug gested by the wizard Click Next Figure 2 5 Select Destination location box 7 In the same way in the Select Start Menu Folder box leave the suggested location or specify the folde...

Page 11: ...Series USB2 0 Camera User Guide Figure 2 7 Select Additional Tasks box 9 In the Ready to Install step view the options you selected and click Install Figure 2 8 Ready to Install box 10 The wizard will...

Page 12: ...x Series USB2 0 Camera User Guide Figure 2 9 Installing box During the installation the system will ask you whether you want to install the device software Press Install to proceed Figure 2 10 Windows...

Page 13: ...available the customers are notified and a new installer file is sent to them The update procedure is exactly the same as the installation described in the previous section Simply run the new install...

Page 14: ...SMX 11M5x Series USB2 0 Camera User Guide Figure 2 12 Updating the camera driver 5 Follow the easy on screen instructions On the first step select Browse my com puter for driver software Figure 2 13...

Page 15: ...e the application according to the general Windows application uninstallation rules Alternatively you can click the uninstallation shortcut in the application folder Start All Programs Sumix SMX 11Mx...

Page 16: ...em Camera Was Not Detected or Recognized If after connecting the camera to your computer the system does not detect it there is no icon on the Taskbar or the camera was not recognized by the system Tr...

Page 17: ...restart your computer If any of the above steps did not help and the device is not recognized yet try the following 1 Connect the problematical camera to the computer 2 Open the Device Manager window...

Page 18: ...ager the SMX 11Mx camera is detected as Unknown device 4 Right click and select Update Driver Figure 2 18 Device Manager Updating the SMX 11Mx camera driver 5 Run the Hardware Update Wizard the same w...

Page 19: ...c tion of this Troubleshooter Cannot Install the Hardware If the Found New Hardware Wizard Hardware Update Wizard failed to install the hardware the wizard that starts after the first connection of th...

Page 20: ...rdware Wizard Installing from a list or specific location Advanced 3 Select Search for the best driver in these locations 4 Check the Include this location in the search box 5 Browse to the Drivers fo...

Page 21: ...Series USB2 0 Camera User Guide Figure 2 22 Installing from a list or specific location specifying location 7 In the list select the last item 8 Click Next 9 Wait till the wizard installs all files 1...

Page 22: ...Installation and Update Troubleshooter 22 SMX 11M5x Series USB2 0 Camera User Guide...

Page 23: ...ce the camera down 2 Remove the camera cover 3 Screw the lens in To remove the lens 1 Face the camera down 2 Screw the lens out 3 Put on the cover Note Before screwing the lens in or putting on the co...

Page 24: ...e front USB2 0 port the device might not work properly We recommend to use the back USB2 0 port to avoid problems with the camera work see the picture below Note Design and configuration of the front...

Page 25: ...he Installation Troubleshooter and learn how to fix such problems See Troubleshooter on page 16 Starting the Application After the camera hardware has been installed you can start the application To s...

Page 26: ...eflects all color settings of the camera To open the histogram Press the h button on the keyboard or select Histogram from the Device menu Camera hardware histogram will appear showing signal for diff...

Page 27: ...mpty when the video is not started Device Settings window contains the camera settings To open the Device Settings window Select Settings from the Device menu or press Alt s on the keyboard Figure 3 5...

Page 28: ...vice Settings window Then you will not need to click the Start Video button If the Start Video button is not active in the SMX 11Mx Series USB2 0 Camera Software main window click Device menu select S...

Page 29: ...ick OK Viewing Camera ID The camera ID is shown on the top of the Device Settings window Figure 3 8 Camera ID Reducing CPU Load You can reduce CPU load by enabling the Direct Access to Driver Frame Me...

Page 30: ...Getting Started 30 SMX 11M5x USB2 0 Camera User Guide...

Page 31: ...re sliders are in the lowest position Decimation is 1 1 Viewport size is 800 x 600 the Viewport settings dialog box is activated with the button on the camera application toolbar or Alt v on the keybo...

Page 32: ...l affect the image only if the Enable box is checked Tuning Light in the Image To tune illumination install a lens see Installing Lens on page 23 To tune light in the image 1 Use maximum diaphragm ape...

Page 33: ...r components use the R G B sliders of the Color Balance tab and the Brightness Contrast and Saturation sliders of the Color Correction tab Figure 4 4 Histogram after performing White Balance Hard Cont...

Page 34: ...tly for Red Green and Blue channels R G B All gain sliders control the camera s hardware gain amplifier The R G and B gain sliders control the software gain for each color channel Checking the Lock Ra...

Page 35: ...her frame rate The higher decimation can be used for preview when 1600 x 1200 image can be displayed as 800 x 600 with the frame rate two times higher Viewport Viewport is a rectangular area of the se...

Page 36: ...The gamma correction is done by the camera hardware Figure 4 9 Image correction controls Note For 8 bit camera models the Image Correction tab is disabled To use these controls check the Enable box t...

Page 37: ...an R G B Gain of the Sensor Controls so all changes of Color Balance can be performed with more accuracy than it can be done using R G B Gain of Sensor Controls Note The difference between White balan...

Page 38: ...d transforming it into the output image This control is available for the SMX 11M5C color model Figure 4 12 Advanced sensor controls The Monochrome mode forces the transformation of the sensor pixels...

Page 39: ...ng every N th frame Note Use the averaging only for static pictures Displaying moving objects in the average mode will lead to the image blurring Frame Rate You can change the frame rate for the curre...

Page 40: ...utomatically balance white at the hardware level every time when the picture changes Figure 4 14 Auto White Balance Hardware checkbox For more information on white balance see Color Balance on page 37...

Page 41: ...u select the Save Profile command 2 Save Camera Profile box appears Type in profile title and select a folder where you want to save the file Figure 4 17 Saving camera profile 3 Press Save To load a p...

Page 42: ...Tuning Guidelines Saving and Loading Camera Profiles 42 SMX 11M5x Series USB2 0 Camera User Guide Figure 4 18 Loading camera profile 3 Press Open...

Page 43: ...5 Capture Limits The Limits section in the Capture Options dialog box allows controlling the capture parameters To open the dialog box press Alt c on the keyboard You can lower the noise level in the...

Page 44: ...his is done without a delay between frames Do the following 1 Start video 2 Press the Save Video to Memory button in the toolbar or press Shift F4 on the keyboard Number of frames in the video is set...

Page 45: ...folder will also store snapshots see Snapshots on page 45 b Change the prefix that will be assigned to all frame frame sequence and video files or leave the default ones Use the Single Frame Sequence...

Page 46: ...Capturing 46 SMX 11M5x Series USB2 0 Camera User Guide...

Page 47: ...rt the snapshot process press the Snapshot button Taking Snapshots Using Software Trigger To make a snapshot using the software trigger 1 Turn the video mode on press F5 or the Start Video button in t...

Page 48: ...er 1 Connect an external device equipment 2 Turn the video mode off press Shift F5 or the Stop Video button in the toolbar 3 Set exposure gain viewport etc 4 Set Timeout seconds to wait for external t...

Page 49: ...in Capture Options To change options for saving snapshots 1 Open the Capture Options dialog by pressing Alt c on the keyboard or go to the File menu and select Capture Options Figure 6 6 Snapshot savi...

Page 50: ...at is calculated by the number of last captured file 1 c Select image file format BMP saves any 8 bit or 10 bit image as 8 bit BMP image TIFF saves 8 bit image as 8 bit TIFF image and 10 bit image as...

Page 51: ...apter will show you how to use the cameras with adapters Using C mount Adapter with IR cut Filter The SMX 11M5x Series cameras can be a C mount with the adapter adapter with filter or a CS mount witho...

Page 52: ...Use of Accessories 52 SMX 11M5x Series USB2 0 Camera User Guide C mount In this case the camera is used with the C mount adapter or with the C mount adapter with IR cut filter...

Page 53: ...sible and infrared spectrum The IR cut filter cuts away a significant amount of the overall collected light and thereby affects the sensitivity in a negative way In general color cameras are one facto...

Page 54: ...h IR cut filter already screwed in To use the SMX 11M5x camera as CS mount screw the C mount adapter C mount adapter with IR cut filter out To use the SMX 11M5x camera as C mount screw the C mount ada...

Page 55: ...Use of Accessories 55 SMX 11M5x Series USB2 0 Camera User Guide...

Page 56: ...5x Series USB2 0 Camera User Guide Using Tripod Adapter The SMX 11M5x camera may go with the Tripod adapter already put on To remove the tripod adapter from the camera 1 Loosen the screw of the adapte...

Page 57: ...7 SMX 11M5x Series USB2 0 Camera User Guide To put the tripod adapter on the camera 1 Loosen the screw of the adapter 2 Put the Tripod adapter on the camera Locate the tripod on the camera as shown in...

Page 58: ...Use of Accessories 58 SMX 11M5x Series USB2 0 Camera User Guide...

Page 59: ...ndow F9 Takes a snapshot F12 Brings up the Main window when displaying the live video Esc The same as Shift F5 stops the video Ctrl o Opens Camera Profile Ctrl s Stores Camera Profile Ctrl C Copies an...

Page 60: ...Keyboard Shortcuts 60 SMX 11M5x Series USB2 0 Camera User Guide...

Page 61: ...pplication toolbar Starts live video display in the View window Stops live video display and closes the View window Brings up the Viewport Setup dialog box Captures a frame into BMP TIFF file Captures...

Page 62: ...Toolbar Overview 62 SMX 11M5x Series USB2 0 Camera User Guide...

Page 63: ...Driver removal confirmation 16 Device Manager the SMX 11Mx camera with Warning status 17 Device Manager the SMX 11Mx camera is detected as Unknown device 18 Device Manager Updating the SMX 11Mx camer...

Page 64: ...Color Correction tab 38 Advanced sensor controls 38 The Frame Rate Control window 39 Auto White Balance Hardware checkbox 40 Bit mode drop down box 40 Median Filter checkbox 40 Saving camera profile...

Reviews: