background image

1.1  g

enerAl


notes


on


sAfety

This operation manual is applicable for the hand tool FH 
9-INOX.

The hand tool may only be handled by personnel 
who are qualified.
It is imperative that you observe the safety instruc-

tions provided separately for the drive.

1.2  u

se


of


the


mAchine


for


purposes


for


which


it


is


intended

The hand tool ist designed for dry applications on metal 
surfaces. They take grinding tools with cylindrical shafts 
for polishing and satin finishing workpieces up to 250mm 
in diameter. For all other work, e.g. grinding, milling, or 
deburring, the max workpiece diameter is 55mm.

1.3  i

ncorrect


use

All uses other than those described under section 
1.2 are regarded as incorrect use and are there-
fore not admissible.

1.4  d

eclArAtion


of


incorporAtion

The manufacturer Otto Suhner AG of Industriestrasse 10, 
CH-5242 Lupfig, hereby declares for the partly completed 
machinery (see reverse side for type and serial no.) that 
the following fundamental requirements of the Directive 
2006/42/EC are applied and fulfilled in accordance with 
Annex I: 1.1.2, 1.1.3, 1.1.5, 1.2.1, 1.2.2, 1.3.7, 1.3.8.1, 1.5.1, 
1.5.4, and 1.6.1. Technical documentation was generated 
for the partly completed machinery in accordance with 
Annex VII of the Machinery Directive. Document Agent: 
T. Fischer. Authorised sites are provided with this techni-
cal documentation in paper or electronic form on justi-
fied request. This partly completed machinery may be put 
into operation only when the machine in which the partly 
completed machinery is to be incorporated has been as-
certained to fulfil the conditions under the Machinery Di-
rective. CH-Lupfig, 10/2019. T. Fischer/Division manager


2. C

ommISSIoNINg

2.1  A

ssembly


instructions

It is imperative that you 
read Sections 2 and 3 be-
fore you start operating the 

hand tools.
Use only hand tools, shafts, and grinding tools in perfect 
condition.
Attach the hand tool to the shaft only when the drive is 
switched off and has come to a stop.


1. N

oTES


oN

 S

aFETy

Connect grinding tools only when the drive is switched off 
and has come to a stop.
It is imperative that you use the guards intended for the 
hand tool.
Observe the specifications applying to your country.

2.1.1  A

ttAching

/

detAching


the


hAnd


tool

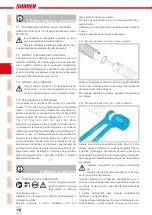
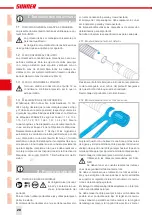
Press the locking button and insert the hose coupling into 
the hand tool hole. Make sure that the locking button is 
engaged.
Follow these instructions in reverse order to detach the 
hand tool.

2.1.2  A

ttAching

/

detAching


the


grinding


tool

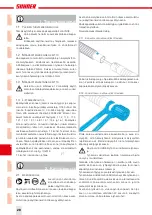
Use a single open ended spanner to hold the spindle in 
place at the key face, and loosen the chuck. Insert the 
abrasive tool’s clamp shaft to the stop in the chuck. Tight-
en the chuck. 
Follow these instructions in reverse order to detach the 
grinding tool.

Use only those tools recommended by SUHNER.
You must also observe the safety instructions is-
sued by the manufacturer of the tool.

You must check that the tool’s diameter is within the limits 
and the max speed is higher than the tool’s idle or set 
speed.
The tool shaft must fit precisely in the receiver.
The tool must be secured as deeply as possible in the 
receiver. The larger the exposed shaft length and the 
shorter the clamped length, the lower the max speed.
The installed tool must be able to rotate freely. Afterwards 
a test run must be conducted without load for at least thir-
ty seconds. Vibrating tools must be replaced immediately.

16

CN

PL

CZ

FI

SE

NL

PT

ES

IT

FR

DE

EN

Summary of Contents for FH 9-INOX

Page 1: ...iginal Betriebsanleitung Documentaci n t cnica Traducci n del Original Betriebsanleitung Manual de Instru es Tradu o do Original Betriebsanleitung Original Betriebsanleitung K ytt ohje K nn s Original...

Page 2: ...2...

Page 3: ...3...

Page 4: ...de non observation la s curit de l utilisa teur n est pas garantie Information Cette information sert la com pr hension du fonctionnement du produit Par cela la pleine capa cit de fonctionnement du pr...

Page 5: ...izada la seguridad del usuario Informaci n Esta informaci n sirve para comprender el funcionamiento del producto Ello per mite aprovechar al m ximo sus presta ciones Documentaci n t cnica Leer la docu...

Page 6: ...t f en bra f rst else ang ende pro duktens funktion P det s ttet f r du m jligheten att ta vara p alla prestationsm jligheter som pro dukten erbjuder Anv ndarhandbok F re idrifttagningen av produkten...

Page 7: ...z suvky Uwaga Koniecznie przeczyta Informacja ta jest bardzo wa na by zagwarantowa prawid owe dzia anie produktu Jej nieprzestrzeganie mo e spowodowa uszkodzenie Informacja dotycz ca bezpiecze stwa os...

Page 8: ...14 1 4 D claration d incorporation 14 2 1 Instructions de montage 14 2 2 Performances 15 2 3 Conditions d exploitation 15 3 1 Indications de travail 15 3 2 Mise en marche en coupure 15 4 1 Maintenanc...

Page 9: ...aci n de incorporaci n 20 2 1 Instrucciones de montaje 20 2 2 Datos de rendimiento 21 2 3 Condiciones de operaci n 21 3 1 Instrucciones de trabajo 21 3 2 Conexi n desconexi n 21 4 1 Maintenance pr ven...

Page 10: ...Monteringsanvisning 26 2 2 Prestandadata 27 2 3 Driftsvillkor 27 3 1 Arbetsanvisningar 27 3 2 Sl p st nga av 27 4 1 F rebyggande underh ll 27 4 2 Reparation 27 4 3 Garantiservice 27 4 4 Lagring 27 4 5...

Page 11: ...z wki dotycz ce obs ugi 33 3 2 W czanie Wy czanie 33 4 1 Konserwacja zapobiegawcza 33 4 2 Naprawa 33 4 3 Gwarancja 33 4 4 Przechowywanie 33 4 5 Utylizacja Wp ywna rodowisko 33 1 1 V eobecn bezpe nostn...

Page 12: ...estgestellt wurde dass die Maschine in welche die unvollst ndige Maschine eingebaut werden soll den Bestimmungen der Maschinenrichtlinie ent spricht CH Lupfig 10 2019 T Fischer Divisionsleiter 2 Inbet...

Page 13: ...muss das Handst ck immer in der Hand ge halten werden Antrieb bei beendeter Arbeit ausschalten Werkzeug l uft noch aus nachdem die Maschine ausge schaltet wird Handst ck so ablegen dass dadurch keine...

Page 14: ...ive Machines CH Lupfig 10 2019 T Fischer Chef de division 2 Mise en service 2 1 Instructions de montage Il est imp ratif de lire les sections 2 et 3 avant la mise en service de la pi ce manuelle Utili...

Page 15: ...t en coupure une fois le travail ter min L outil continue tourner apr s que la machine a t mise en coupure Poser la pi ce manuelle de mani re n engendrer aucun risque D tacher la pi ce manuelle de l a...

Page 16: ...inery Di rective CH Lupfig 10 2019 T Fischer Division manager 2 Commissioning 2 1 Assembly instructions It is imperative that you read Sections 2 and 3 be fore you start operating the hand tools Use o...

Page 17: ...ool has been switched off Put down the hand tool so that there can be no danger Remove the hand tool from the shaft 4 Service Maintenance 4 1 Preventive maintenance Always keep the hand tool clean and...

Page 18: ...eta deve essere installata conforme alle specifiche della direttiva macchine CH Lupfig 10 2019 T Fischer Presidente di divisione 2 Messa in servizio 2 1 Instruzioni per il montaggio Occorre leggere as...

Page 19: ...nto l utensile a mano deve sempre essere tenuta in mano Disinserire l azionamento al termine dei lavori L utensile continua a funzionare fino a fermarsi dopo che viene disinserito Riporre l utensile a...

Page 20: ...visi n 2 Puesta en servicio 2 1 Instrucciones de montaje Es obligatorio leer los cap tulos 2 y 3 antes de la pue sta en funcionamiento del porta til S lo se deben utilizar porta tiles ejes y tiles par...

Page 21: ...se debe sujetar siempre el porta til con las manos Una vez terminado el trabajo desconectar el acciona miento L til sigue funcionando despu s de desconectar la m quina Depositar el porta til de forma...

Page 22: ...o quando a m quina na qual esta parte se destina a ser integrada for declarada em conformidade com o disposto na directiva europeia M quinas CH Lupfig 10 2019 T Fischer Gerente da Divis o 2 Arranque i...

Page 23: ...um teste de funcionamento sem carga durante pelo menos 30 segundos N o utilizar os ferramentas para polir que vibrarem Enquanto estiver em funcionamento a empunhadura n o pode ser largada Desligar o m...

Page 24: ...men als is vastgesteld dat de machine waarin de incomplete machine dient te wor den ingebouwd voldoet aan de bepalingen zoals deze zijn opgesteld in de Machinerichtlijn CH Lupfig 10 2019 T Fischer bed...

Page 25: ...en Gebruik geen trillende slijpwerktu igen Ingeschakeld gereedschap moet altijd in de hand worden gehouden Schakel de aandrijving uit als de werkzaamheden zijn voltooid Het gereedschap draait nog door...

Page 26: ...melser CH Lupfig 10 2019 T Fischer avdelningschef 2 Idrifttagning 2 1 Monteringsanvisning Innan handverktyget tas i drift m ste du l sa avsnitt 2 och 3 Anv nd endast handverktyg axlar och slipverktygs...

Page 27: ...tter att g en stund efter att maskinen har st ngts av L gg ner handverktyget s att det inte kan utg ra n gon fara Demontera handverktyget fr n axeln 4 Underh ll Sk tsel 4 1 F rebyggande underh ll H ll...

Page 28: ...ktiivin m r yksi CH Lupfig 10 2019 T Fischer divisioonan johtaja 2 K ytt notto 2 1 Asennusohje Luvut 2 ja 3 on ehdottoma sti luettava ennen k sikap paleen k ytt nottoa K yt vain moitteettomassa kunnos...

Page 29: ...viel jonkin aikaa koneen pois kytkemisen j lkeen Laske k sikappale alas niin ett kukaan ei voi altistua vaaraan sen vuoksi Irrota k sikappale akselista 4 Kunnossapito Huolto 4 1 Ennaltaehk isev kunno...

Page 30: ...r ho se m ne pln strojn za zen zabudovat vyhovuje usta noven m t to sm rnice o strojn ch za zen ch CH Lupfig 10 2019 T Fischer editel divize 2 Uveden do provozu 2 1 N vod k mont i Pou vejte jen ru n n...

Page 31: ...oj vypnete Ru n n sadec odkl dejte takov m zp sobem aby od n ho nemohlo vzniknout dn nebezpe Odmontujte ru n n sadec od h dele 4 Servis dr ba 4 1 Preventivn dr ba Udr ujte ru n n sadec v trvale ist m...

Page 32: ...VII dyrektywy maszynowej Specjalista ds dokumentacji T Fischer Na uzasadnione danie upowa nionych insty tucji dokumentacja techniczna zostanie udost pniona w formie papierowej lub elektronicznej T mas...

Page 33: ...tam i z powrotem Zbyt mocny nacisk ogranicza wydajno uchwytu oraz ywotno narz dzia szlifierskiego 3 2 W czanie Wy czanie Dobrze z apa za uchwyt W czy nap d Dokona pr bnego uruchomienia bez obci enia...

Page 34: ...g Otto Suhner AG 2006 42 EC I 1 1 2 1 1 3 1 1 5 1 2 1 1 2 2 1 3 7 1 3 8 1 1 5 1 1 5 4 1 6 1 VII T Fischer CH Lupfig 10 2019 T Fischer 2 2 1 2 3 1 2 1 1 2 1 3 SUHNER 30 2 2 G28 18 000min 1 6mm 1 4 0 56...

Page 35: ...2 3 0 50 C 10 C 95 3 3 1 3 2 30 4 4 1 4 2 SUHNER 4 3 4 4 15 C 50 C 30 C 90 50 C 65 4 5 35 PT ES IT EN FR DE NL PL CZ FI SE CN...

Page 36: ...ciones Guardar esta documentaci n para un uso futuro Sujeito a modifica es Para ler e conservar English Fran ais Portug es Espa ol Italiano Deutsch Wijzigingen voorbehouden Voor toekomstig gebruik bew...

Reviews: