background image

9

1

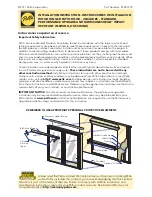
 When determining trigger position on site

(1) Put a mark on the Open area track with reference to the 

front end of the door at full opened position.
(We recommend to put the mark on a masking tape.)

(2) Drill additional holes for pocket trigger.

Remove the door according to the procedure - 

Supplement 1

 : How to remove door, then remove the 

Open area track.

Drill additional holes for Trigger on the Open area track.
(See the below drawing.)

[Example] Door pocket track with its length equal to the 

width of door pocket.

(1) Drill holes for Pocket trigger according to below 
drawing.
(2) Fix Open area track, while following the right above figure, 

since the working sequence is different from regular 
process.

2

 How to process holes for Pocket trigger in 

advance

Front end of the door

When putting a mark, 
the door must be at 
fully opened position.

30

30

2 x 

ϕ

5 additional holes

Mark as front end of the door

Door pocket track

Open area track

Mark on Pocket trigger
(Factory-made)

Pocket trigger

30

Margin 
DN

Door width

Width of door pocket = Track length (door pocket)

Opening width = Track length (opened area)

Margin 
DN

30

2 x 

ϕ

5  

additional holes

Position of front end of the door

Door pocket track

Open area track

Front end of the door 

at full opened position

Mark on Pocket trigger

(Factory-made)

Pocket trigger

(3) Fixing Open area track

Follow the right below figure, since the working 
sequence is different from regular process.

(4) Hanging door

Refer to the procedure 


 and following procedures 

on page 3.

Final confirmation Confirm that all screws are securely tightened and used without mistake.

2

2

1

Working sequence for fixing Open area track

2

1

Pull out Pocket 
trigger a little.

Fix it with screws.

3

Pull out Pocket 
trigger.

Fix it with screws.

4

How to Shift The Connecting Position of the Tracks

Supplement 2

Put a mark on the 
Open area track with 
reference to the front 
end of the door.

Summary of Contents for LAMP FD50-H

Page 1: ...installation is carried out by two people in order to ensure proper installation and avoid unnecessary stress on the parts This sliding door system should be installed by an experienced person who has correct knowledge If the system is not installed correctly the door will not operate smoothly and or may cause injury It is necessary to manufacture the frame with sufficient strength so it endures t...

Page 2: ...ng aluminum ally Drill bit for metal ϕ4 Drill bit for metal for ϕ7 8 countersunk hole The profile of and are the same but the cut length and hole location are different See installation procedure 1 for the detail COMPONENT PARTS INSTALLATION DRAWING EXAMPLE TOOLS REQUIRED FOR INSTALLATION 30 30 30 30 30 30 200 30 Margin DN LGWK RI GRRU SRFNHW 5S 5 í5R í 1 Track length opened area Lo Available open...

Page 3: ...CSK Process holes for track mounting No use No use No use I5 2 I9 6 CSK Process holes for track mounting 1 Cutting Track and Hole Processing 2 Installing Door Pocket Track Door pocket track Attached screws Cross recessed countersunk head tapping screws 4 40 Remove any dirt or aluminum chips from the track Assemble the cover panel to the door pocket after mounting the track The end which has three ...

Page 4: ... back the trigger catcher to the correct position using 6mm diameter hard bar Incorrect set position 7 Assembly of Psrts for Open Area Track Assemble the parts in order of to with care of direction You can insert the parts smoothly from the connecting end which has no burr 1 3 Front trigger Upper roller Two way Soft Closer Pay attention to the direction 1 2 3 Open area track The edge which has thr...

Page 5: ... if the tracks are not aligned The edge which has three countersunk holes is the end to be connected When sliding Pocket trigger use a screwdriver Take care not to damage the track when sliding the Pocket trigger with screwdriver which jumps out of the hole Scratches on the running track may cause a noise of rollers during operation Take care of the alignment of both track when tightening screws S...

Page 6: ...e roller until a click sound is heard Two way Soft Closer Upper roller 2 3 4 Floor guide Support of 10 mm thickness Lever Upper roller main unit Upper roller casing Click Confirm that upper roller main unit is not dislocated from casing for both door head and door tail sides Do not close the door with excessive force It may cause damage or malfunction of soft close mechanism Trigger 1 上 下 上 下 Mark...

Page 7: ...s parallel to upper track with 9 mm clearance between door and floor 13 Vertical adjustment range 7 mm Forward backward adjustment range 4 mm 右 上 下 左 Clockwise Raise Counterclockwise Lower 3 mm 4 mm 10 右 上 下 左 Do not turn adjustment screw beyond adjustment range CAUTION Do not use moter screw driver Adjusting Floor Guide Adjust range 4 mm If the door movement is not smooth remove the door then mak...

Page 8: ...er Slide the Pocket trigger into the Door pocket track Remove the Open area track The trigger can be deformed when to remove the Open area track without sliding the Pocket trigger into the Door pocket track Hold the Open area track when removing the last screw 右 上 下 左 Be careful not to fall the door down 2 1 2 3 4 1 2 3 1 When sliding the Pocket trigger use a screwdriver etc Take care not to damag...

Page 9: ...30 2 x ϕ5 additional holes Mark as front end of the door Door pocket track Open area track Mark on Pocket trigger Factory made Pocket trigger 30 Margin DN Door width Width of door pocket Track length door pocket Opening width Track length opened area Margin DN 30 2 x ϕ5 additional holes Position of front end of the door Door pocket track Open area track Front end of the door at full opened positio...

Page 10: ...ack rollers for aluminum dust Remove the track and pull out the roller Then clean the roller Check for loose screws retaining the upper track Tighten the screw Heavy door operation Check if door touches adjacent parts Correct door position to avoid contact to other objects Adjust position of floor guide or stopper Check if door is warped Use a door without warp Door does not move Check track retai...

Reviews: