background image

STA 01-380 series       7 


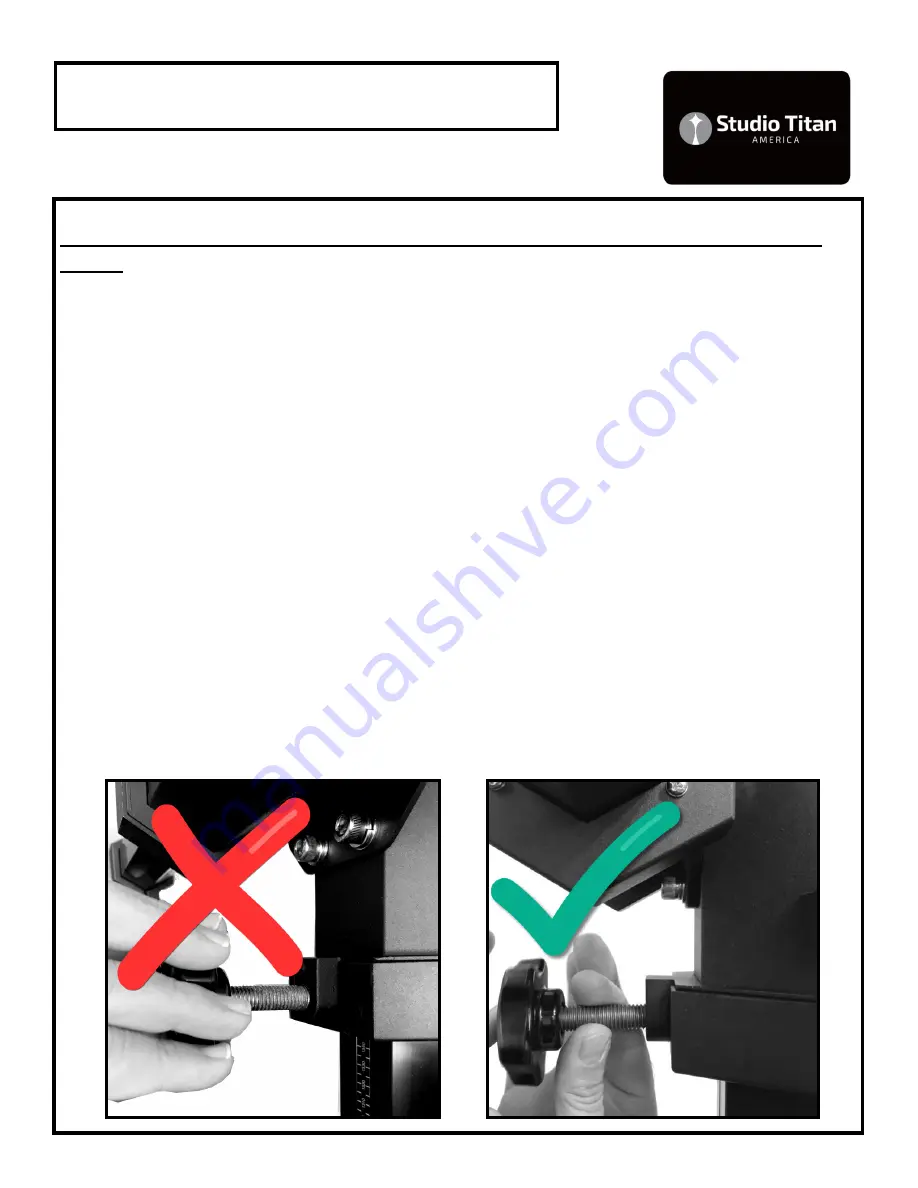
!CAUTION ! Cross Threading Components: 


Cross-threading components during assembly is not covered under war-
ranty.  

Cross-threading is a term that describes damage that is caused when a 
misaligned screw or knob thread is forced into a threaded hole. When this 
occurs, threads are damaged and are no longer capable of proper opera-
tion.  The remedy is replacement or repair of the damaged component/s.           

AVOID cross-threading of mounting screws and knobs during assembly us-
ing this easy to follow procedure:  

While standing in front of and looking into the threaded hole. Place the 
screw or knob thread against the threaded hole. Using one hand, hold the 
thread between your fingers. With the other hand hold the hex key like a 
pencil or place your index finger in the center of the knob.  Align the screw 
or knob with the hole as indicated in the picture with the checkmark be-
low.  Slowly turn it counter-clockwise or left, several turns, until you hear a 
click or feel the start of the thread.  Then proceed slowly, turning clockwise 
or right, gently using only finger force to tighten the screw or knob.  If you 
feel increased resistance, the threads are not aligned, remove and start 
procedure from the beginning again.    


Summary of Contents for STA 01-380 Series

Page 1: ...n and can jump when cut Strapping and Buckles Protec tive Edging Plastic Walls Plastic Caps and Product Components and parts should be handled with care Work slowly use extra caution to avoid any shar...

Page 2: ...ring work Gloves while following the Assembly Steps carefully inspect the contents inside the boxes Specifi cally the Vertical center column top cap pulley should be se curely fastened to the top of t...

Page 3: ...l column assembly The label information is indicated below STUDIO TITAN AMERICA No Model Number Manufacture Date Imported by Importe par STEPHANIE MCNEIL CORPORATION 250 Augusta Ave Suite 204 Toronto...

Page 4: ...with CAUTION very slowly using both hands one at the top and the other at the bottom to steady the stand in order to prevent the stand from tipping over If the surface is not ideal lower the load to w...

Page 5: ...STA 01 380 series 5 Component Identification STA 01 380...

Page 6: ...STA 01 380 series 6 Component Identification STA 01 380 Diagram D...

Page 7: ...ocedure While standing in front of and looking into the threaded hole Place the screw or knob thread against the threaded hole Using one hand hold the thread between your fingers With the other hand h...

Page 8: ...t the Counterweight screw is present securing the counterweight See Diagram E Do NOT re move the Counterweight screw until advised later If the screw is present proceed to step 2 with as sembly If NOT...

Page 9: ...his is a special order please email info studiotitanamerica com for additional infor mation 3 Wearing Gloves using a hex key remove the counterweight transportation securing screw See Diagram E CAUTIO...

Page 10: ...ring wash er and then Flat washer Hand tightening with the Hex Wrench is recommended Refer to sec tion Cross Threading Components If you have a torque wrench tighten the M8 bolts to 45Nm or 33 lb ft n...

Page 11: ...orizontal Arm Bar in the upper most positon parking position Slowly release the Vertical Carriage Knob brake by turn ing it Counter Clock Wise This will release the vertical carriage allowing it to tr...

Page 12: ...h a way so your always standing behind or in front of the stand so that you always stand clear of the Horizontal Arm Bar and accessories Take extra notice of your body position when you are releasing...

Page 13: ...otographer to develop their own technical workflow As the workflow evolves to include advanced imaging practices the results can be seen as sharper images With an adjustable camera head the user can a...

Page 14: ...ways be tightened to lock the Horizontal Arm Bar in place Without a load on the Horizontal Arm Bar it can accelerate upwards quick ly When releasing the Vertical Carriage Knob Brake stand clear of the...

Page 15: ...STA 01 380 series 15 Assembly Diagrams Diagram A Diagram B...

Page 16: ...STA 01 380 series 16 Assembly Diagrams Diagram D...

Page 17: ...WN THE INTERNAL BALANCING WEIGHT OR COUNTERWEIGHT WHEN MOVING DOWNWARDS CAN PINCH YOUR FINGER IF IT IS INSIDE THE BOTTOM OF THE VERTICAL COLUMN TO PREVENT THE COUNTERWEIGHT FROM MOVING DURING SET UP P...

Page 18: ...STA 01 390 3 way head Material composition The Vertical and Horizontal columns are made of aluminum Counter weight is S20C steel The nuts and bolts are made of steel The casters are polyurethane This...

Reviews: