background image

GENERAL SETTIN

GS

Settings navigation 

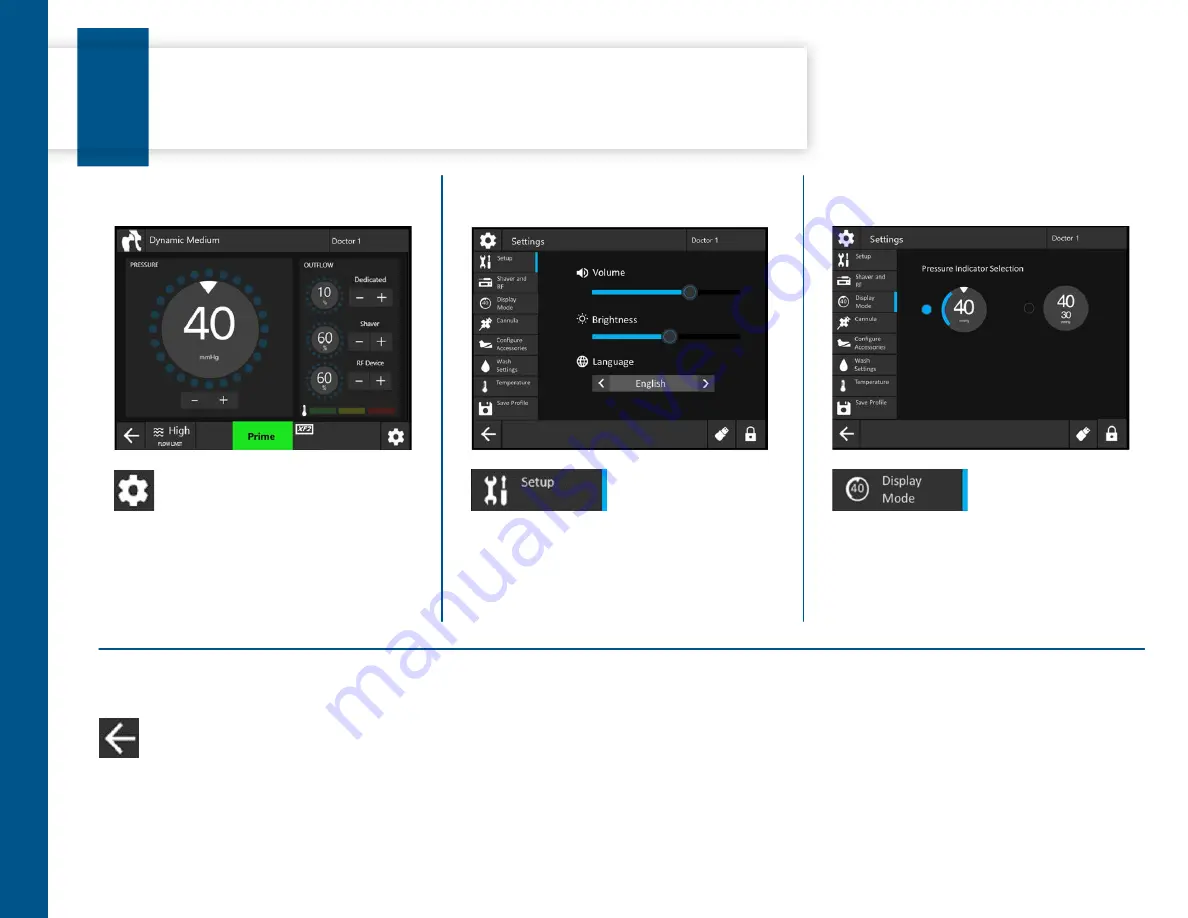
How to access and adjust general settings for the CrossFlow pump.

Step 1: Access settings menu

Step 2: Adjust general settings

Step 3: Change pressure display

Step 4: Return to run screen

= Pump customization menu

= Setup sub-menu

= Actual pressure display 

settings screen

Change how pressure displays on the run screen 
by pressing the desired icon.

Note: 

This new pressure display will now appear 

on the run screen of the pump.

= Exit menu 

General settings are now customized.

3

Refer to the instructions for use for important safety and user advice. Do not operate the device without first reading and understanding the Instructions for Use.

4

Summary of Contents for CrossFlow

Page 1: ...Doctor 1 Dynamic Medium XF2 STOP CrossFlow quick start guide ...

Page 2: ......

Page 3: ...ck start guide Pump interface reference Pump start up Setting navigation Pressure suction and flow settings Wash function Cannula settings Shaver and RF console integration Footswitch and hand control settings Temperature monitoring settings Save surgeon profile settings ...

Page 4: ......

Page 5: ...umber is 0450 000 000 User interface reference 1 Joint settings 2 Set pressure mmHg 3 Actual pressure 4 Adjust set pressure up down 5 End case 6 Flow limit pop up menu 7 Start stop 8 Resection console connection icon 9 Wash use for better visibility 10 Settings menu 11 Temperature indicator during RF use 12 Adjust suction up down 13 Surgeon profile 14 Suction indicators 15 Scope cannula combinatio...

Page 6: ... appear and a progess bar will indicate that the pump is starting up 2 START UP 2 Doctor 1 Dynamic Medium XF2 STOP Doctor 1 Dynamic Medium XF2 STOP Doctor 1 Dynamic Medium XF2 STOP Wait for insert cassette screen to appear then align the colored side of the cassette facing out toward its matching colored button Green checkmarks will indicate that the cassette s have been properly inserted Once the...

Page 7: ...0000 START UP Step 3 Select user profile Step 4 Select joint Step 5 Start pump Select the name of the surgeon performing the case If no profile is uploaded for that surgeon press Dynamic Mode Advance to next screen Once tubing is set up and saline is spiked Prime pump Return to joint selection screen and start new case 3 Shoulder Knee Hip Small joint ...

Page 8: ...ization menu Setup sub menu Actual pressure display settings screen Change how pressure displays on the run screen by pressing the desired icon Note This new pressure display will now appear on the run screen of the pump Exit menu General settings are now customized 3 Refer to the instructions for use for important safety and user advice Do not operate the device without first reading and understa...

Page 9: ...ndicate the console is pumping fluid Flow Flow limit pop up menu accessed to set inflow limit Suction Set pressure Set pressure is the pump s target pressure in the joint NOTE On the CrossFlow console pressure is adjusted in increments of 5mmHg Suction Inflow outflow mode Suction refers to the flow rate the outflow pump will achieve through the outflow cannula shaver and RF tube NOTE Suction will ...

Page 10: ... menu 5 Wash function The wash function allows for a customized quick increase in pressure and flow to clear debris control bleeding and improve visualization in the joint Can customize to last for a duration up to 120 seconds Understanding wash EXAMPLE 50 Pressure increase of 50 mmHg set pressure would become 75mmHg during wash cycle Refer to the instructions for use for important safety and user...

Page 11: ...Dynamic Mode 6 Dynamic mode setting Cannula diameter mm scope diameter mm x Dynamic Low x 1mm Dynamic Medium 1 mm x 2mm Dynamic High x 2mm The IFU part number is P17330 The CrossFlow Pump catalog number is 0450000000 7 Access settings menu Note The selected Cannula setting is displayed on the top banner of the Run Screen Dynamic Mode options provide optimized flow for a range of scope cannula comb...

Page 12: ...le in Other suction must be checked if using RF devices with suction Uncheck if using RF without suction RF console settings Press When using CrossFire consoles When using an approved RF console When no RF console is connected 7 Refer to the instructions for use for important safety and user advice Do not operate the device without first reading and understanding the Instructions for Use 8 Pump cu...

Page 13: ...ONTROL Footswitch and hand control settings How to customize and program settings on compatible footswitches and the CrossFire 2 Hand Control Step 1 Access settings menu Step 2 Customize footswitch Step 3 Assigning button s functionality to the Footswitch and Hand Control 8 The IFU part number is P17330 The CrossFlow Pump catalog number is 0450000000 9 Access settings menu Step 4 Return to run scr...

Page 14: ...S suction RF probes The temperature settings are now customized Temperature monitoring sub menu Press For temperature monitoring display and mitigation actions For temperature monitoring and display with no mitigation actions For no temperature monitoring display or mitigation actions 9 Refer to the instructions for use for important safety and user advice Do not operate the device without first r...

Page 15: ...e current CrossFlow settings to the custom surgeon profile Step 1 Access settings menu Step 2 Save settings to surgeon profile Step 3 Return to run screen 10 The IFU part number is P17330 The CrossFlow Pump catalog number is 0450000000 11 Save profile sub menu Press Save current settings to custom surgeon profile NOTE The settings of the default dynamic profile cannot be saved over ...

Page 16: ...uct label and or instructions for use including the instructions for cleaning and sterilization if applicable before using any of Stryker s products Products may not be available in all markets because product availability is subject to the regulatory and or medical practices in individual markets Please contact your representative if you have questions about the availability of Stryker s products...

Reviews: