Strong SRT 24HY4003 User Manual Download Page 10

21. 

4


No function.

22. 

SLEEP


Select the sleep time, such as 10 min, 20 min etc.

23. 

INFO


Display information about the current source.

24. 


2


Press to pause playback, press again to continue playback.

25. 

5


Press to fast reverse.

26. 

6


Press to fast forward.

27. 

3


Press to stop playback.

28. 

7


Press to play the previous fi le.

29. 

8


Press to play the next fi le.

30. 

COLOUR BUTTONS


Press to execute the prompt function in TV or DTV mode.

31. 

I/II


Press to select sound output depending on the broadcasting channel.

32. 

TEXT


Press to enter or exit the teletext menu.

33. 

FREEZE


Freeze the picture on the screen (not available in USB mode).

34. 

PVR LIST


No function.

35. 

QUICK


No function.

36. 

AD


 Press to turn on audio description, a narrator will describe what is happening 

on the screen for blind or visually impaired viewers. Press again to turn it off .

(depending on broadcast)

37. 

3D


No function.

Teletext control buttons
HOLD


Press to hold the teletext page on screen without update and changes. Press 

again to release the hold state.

SIZE


Enlarge the teletext display. Press this button once to enlarge upper half of 

the screen. Press this button again to enlarge lower half of the screen. Press 

this button again to resume to normal screen size.

5


6


Press this button to display concealed information, such as solutions to 

riddles or puzzles. Press again to remove the information from the display.

MIX


Press this button to superimpose the teletext over the TV programme. Press 

again to return to normal teletext mode.

SUB-PAGE


Press this button to enter or exit subpage mode (if subpage is available). Press 

the 

RED

 or 

GREEN

 buttons to select a subpage.

INDEX


Press this button to display index page.

CANCEL


Press this button to return to TV programme temporarily while searching for a 

Teletext page. When the search is done, the page number will be displayed on 

the upper left of the screen. Press again to return to the Teletext page.

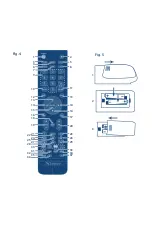
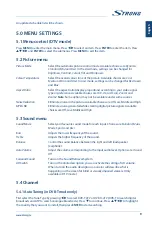
2.5 Installing the batteries

Fig. 5

Place 2x AAA batteries in the battery compartment of the remote control. Make sure to match the 

polarity markings inside the compartment.

NOTE:


 Pictures are only for reference. Actual items may diff er.

1.  Slide the cover horizontally.

2.  Put 2x AAA batteries in the compartment and make sure the polarity is correct.

6

Summary of Contents for SRT 24HY4003

Page 1: ...nuale utente Manual del Usuario Manual do Utilizador Gebruiksaanwijzing Instrukcja obs ugi U ivatelsk p ru ka Pou vate sk pr ru ka Korisni ki priru nik Uputsvo za rukovanje Haszn lati tmutat Instruc i...

Page 2: ...10 cm Fig 1 Fig 2 Fig 3 10 cm 10 cm 10 cm PCMCIA USB SERVICE 10 8 9 11 2 2 1 4 6 3 7 7...

Page 3: ...Fig 4 Fig 5 2 5 8 11 13 23 26 34 37 29 17 14 20 33 14 1 3 6 4 22 25 15 18 9 10 12 21 32 31 36 35 24 28 27 16 19 14 14 30 7 1 3 2...

Page 4: ...www strong tv 22May201713 31 Supplied by STRONG Co Japan Represented by STRONG Ges m b H Franz Josefs Kai 1 1010 Vienna Austria Email support_at strong tv...

Page 5: ...osure in whole or in part or the production of derivative works therefrom without the express permission of Dolby Laboratories is prohibited Copyright 2003 2009 by Dolby Laboratories All rights reserv...

Page 6: ...es Dolby and the double D symbol are trademarks of Dolby Laboratories HDMI the HDMI logo and High Definition Multimedia Interface are trademarks or registered trademarks of HDMI Licensing LLC in the U...

Page 7: ...risk of damage to hearing one should lower the volume to a safe comfortable level and reduce the amount of time listening at high levels The mains plug or appliance coupler is used as disconnect devic...

Page 8: ...fectly protected in the event of repair or warranty 1 3 Accessories 1x Installation instructions 1x stand assembly instruction 1x remote control 2x AAA batteries 1x power adapter 12V DC 3 A 1 4 Equipm...

Page 9: ...Access Module CAM 2 4 Remote control Fig 4 1 q Press to turn theTV on or standby 2 Press to mute or restore the volume 3 PICTURE Change picture mode 4 SOUND Change sound mode 5 ZOOM Change aspect rat...

Page 10: ...eletext display Press this button once to enlarge upper half of the screen Press this button again to enlarge lower half of the screen Press this button again to resume to normal screen size 5 6 Press...

Page 11: ...so please change the lighting orTV s position or operate the remote control closer to the remote sensor 3 0 FIRSTTIME INSTALLATION After all connections have been made properly switch on yourTV The l...

Page 12: ...by pressing EPG on the remote control Press EPG to bring up the EPG interface The second bar from the top will display the current date and time On the list below the channel you are currently watchi...

Page 13: ...iddle and High MPEGNR Eliminates noise generated while creating digital picture signals Available choices are Off Low Middle and High 5 3 Sound menu SoundMode Select your favourite sound mode for each...

Page 14: ...to select Full or NetworkScan recommended Selecting Full scan theTV will perform a complete scan on the most used frequencies Selecting NetworkScan it is also possible to insert a specific frequency...

Page 15: ...OLOUR BUTTONS on the remote control to skip programmes rename and delete programmes or move programmes and add programmes to the favourite list by pressing FAV SignalInformation Showing the informatio...

Page 16: ...case of a storage device formatted as a different utility programme which is not supported byWindows it may not be recognized 7 When using a USB Hard Disk Drive which is not powered independently ensu...

Page 17: ...the Input search time screen Press to move the cursor and use the number buttons to insert the time Press ENTER theTV will start playing from the set time AspectRatio Highlight the button and press E...

Page 18: ...t modes None to disable the function 1 to repeat one track only and All to repeat the entire list once it is finished Info Highlight the button and press ENTER to check the information of the shown ph...

Page 19: ...ture may be marred by dots show blocking or break ups When the signal is extremely weak it may be necessary to install 1 a special antenna to improve the reception 2 Adjust the position and orientatio...

Page 20: ...nal is too strong dish is oversized Connect a signal attenuator to the LNB input Ask a local satellite specialist for advice Bad picture blocking error during heavy rain Heavy rain will attenuate sate...

Page 21: ...e Remark MP4 MOV mp4 rnov m4v Motion JPEG MPEG 4 SP ASP XviD MPEG AUDIO AVI avi MotionJPEG MPEG 4 SPIASP XviD LPCM MPEG AUDIO ASFI wmv3 xvid MPEG 4 SPIASP XviD MS ADPCM Intel ADPCM MKVI mkv xvid MPEG...

Page 22: ...18...

Reviews: