background image

Balance


 Control the sound balance between the right and left loudspeaker 

(earphone).

Auto Volume control


 Adjust the volume corresponding to the input audio level. Options are ON 

and OFF.

S/PDIF type


 When connected to a digital amplifi er you can select 

PCM

 to have all audio 

converted to a 2-channel stereo. Select 

Auto

 to keep the audio settings as 

they are or OFF to turn off .

S/PDIF Delay


 Here it is possible to set up S/PDIF Delay and Speaker Delay.

Audio delay


 Adjust sound and picture if they are not in sync with each other. For example 

when you use audio receiver or soundbar.

7.4 Channel menu

Press 

 to display the main menu. Press 

 

 to select 

Channel

 in the main menu, after that press 

OK

to enter.Press 

 

 to choose the menu and press 

OK

 to enter the sub-menu.

NOTE:


 This function is only available in TV mode.

Channel scan


 Scan for all available analogue and digital channels.

Channel List


 Show all searched channels in a list.

EPG


 Press 

OK

 to enter the Programme Guide menu.

Channel organiser


 Skip, sort, edit and delete channels (see chapter 7.4.1 for more details)

Channel diagnostics (on digital TV channels)

 Press 

OK

 to display some signal information on current digital channel, 

such as signal strength, Frequency etc.

Teletext


 Use 



 to select the teletext language.

7.4.1 Channel organiser

Select “Setting” -> “Channel” -> “Channel organiser”. You fi nd 4 submenus: Channel skip, Channel sort, 

Channel edit, Channel delete

7.4.1.1 Channel skip

Enter Channel skip. If you want to hide the channel from the channel list, just select it.

7.4.1.2 Channel sort

Enter Channel sort. There are two types: Channel swap and Channel insert
Channel swap: to exchange the channel order of two channels of the same type, fi rst need to select 

the two channels to be exchanged, press the OK key to exchange the order of two channels. When the 

number of channels exceeds one page, the Quick jump function will take eff ect, which is used to quickly 

jump to the channel number entered by the user.
Channel insert, which is used to adjust the order of selected channels. After selecting the channel to be 

inserted, move the cursor to the place to be inserted and press the RED button to insert

11

English

Summary of Contents for 43FC5433

Page 1: ...ički priručnik Uputsvo za rukovanje Používateľská príručka Használati útmutató Käyttöohje Brukermanual Manual del Usuario Gebruiksaanwijzing Brugervejledning Manual de Utilizare Instrukcja obsługi FHD SMART ANDROID TV with DVB T2 C S2 SRT 43FC5433 Questo manuale d istruzione è fornito da trovaprezzi it Scopri tutte le offerte per Strong FC5433 SRT 43FC5433 o cerca il tuo prodotto tra le migliori o...

Page 2: ......

Page 3: ......

Page 4: ...www strong tv Supplied by STRONG Austria Represented by STRONG Ges m b H Teinfaltstraße 8 4 Stock A 1010 Vienna Austria Email support_fr strong tv 17 Jul 2020 19 38 ...

Page 5: ...of the EU declaration of conformity is available at the following internet address https www strong tv en doc Subject to alterations In consequence of continuous research and development technical specifications design and appearance of products may change Manufactured under license from Dolby Laboratories Dolby and the double D symbol are trademarks of Dolby Laboratories The terms HDMI and HDMI H...

Page 6: ...MME GUIDE EPG 8 5 0 NETWORK CONNECTION 8 5 1 Connecting to a wired network 9 5 2 Connecting to a wireless network 9 5 3 Network settings 9 6 0 HOME MENU 10 7 0 MENU SETTINGS 10 7 1 Menu control 10 7 2 Picture menu 10 7 3 Sound menu 10 7 4 Channel menu 11 7 5 SmartTV menu 12 7 6 System menu 12 8 0 USB 13 8 1 Reminder when using the USB player 13 8 2 USB menu 13 9 0TROUBLESHOOTING 16 10 0 SPECIFICAT...

Page 7: ...risk of damage to hearing one should lower the volume to a safe comfortable level and reduce the amount of time listening at high levels n The mains plug or appliance coupler is used as disconnect device it shall remain readily operable When not in use and during movement please take care of the power cord set e g tie up the power cord set with cable tie or something like that It shall be free fro...

Page 8: ...airorwarranty 1 3 Accessories n 1x installation instructions n 1x Safety Instructions Warranty Cards n 2x remotes control n 2x AA batteries and 2x AAA batteries You can choose to use both remote control or just one 1 4 Equipment set up Fig 1 Install the display on a solid horizontal surface such as a table or desk For ventilation leave a space of at least 10 cm free all around the set To prevent a...

Page 9: ...o connect yourTV to a compatible digital amplifier or Home theatre set 3 Mini AV IN To connect your video camera or other device using 3 5 mm AV cable to your TV to play videos on yourTV screen 4 ANT IN ConnectacoaxialcabletoreceivesignalfromtheDVB T T2antennaorDVB Ccable 5 SAT IN Connect a coaxial cable to receive signal from the Dish LNB 6 HDMI 3 Connect HDMI input signal from a signal source su...

Page 10: ...to mute or restore the volume 3 0 9 Choose channel directly 4 FAV Press to view your assigned favourite channels Press to cycle through your favourite channels press OK to confirm 5 LIST Press to enter the channel list 6 Adjust the volume up or down 7 TV Switch back to theTV mode 8 Opens the smart menu 9 P Change programmes up or down 10 Enter the home desktop 11 Open the menu options 12 Navigate ...

Page 11: ...ons 1 Please note the batteries polarity to avoid short circuit 2 Whenthebattery svoltageisinsufficientwhichaffectstheuserange youshouldreplaceitwithanew battery Removethebatteriesfromtheremote controlunitifyoudonotintendtouseitforalongtime 3 Do not use different types of batteries for example Manganese and Alkaline batteries together 4 Do not put the battery into fire and charge or decompose the b...

Page 12: ... will now have the possibility to scan Cable tuner Select Digital or Analogue option to scan cable broadcasts or choose for I don t want to scan After you have chosen digital as an example you now have the option to choose your own cable provider if available or you can perform a manual scanning process Correct frequencies are usually available through your cable provider Please contact your provi...

Page 13: ...able to the router and to the Ethernet port on the back of theTV 3 Use the NetworkConfiguration menu to configure theTV 5 2 Connecting to a wireless network Fig 6b NOTE The graphics are for representation only To connect to a wireless network 1 Ensure you have n A router broadcasting a highspeed wireless signal n A highspeed Internet connection 2 Use the NetworkConfiguration menu to configure theT...

Page 14: ...t Adjust the picture setting that best suits your viewing environment Backlight Adjust the backlight levels of the picture Brightness Adjust the brightness of the picture Contrast Adjust the difference between the light and dark areas of the picture Saturation Adjust the richness of colour Tint Adjust the balance between the red and green levels Sharpness Adjust the crispness of the edges in the pi...

Page 15: ...nelorganiser Skip sort edit and delete channels see chapter 7 4 1 for more details Channeldiagnostics ondigitalTVchannels Press OK to display some signal information on current digital channel such as signal strength Frequency etc Teletext Use to select the teletext language 7 4 1 Channel organiser Select Setting Channel Channel organiser You find 4 submenus Channel skip Channel sort Channel edit ...

Page 16: ...e app on your smartphone or mobile device Please download an app for media sharing and wireless display from the App Store or Google Play Store to use these features on yourTV WARNING n Configure the network settings before using SmartTV n Slow responses and or interruptions may occur depending on your network conditions n If you experience a problem using an application please contact the content...

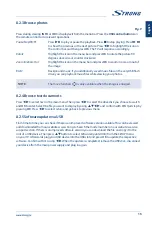
Page 17: ...ice make sure theTV is not in USB mode otherwise the USB storage device or the files stored in it may be damaged 6 Please use only a USB storage device which is formatted in FAT16 FAT32 NTFS playback only file system provided with theWindows operating system In case of a storage device formatted as a different utility programme which is not supported byWindows it may not be recognized 7 When using ...

Page 18: ...Press 2 to play or pause the playback Press 3 to stop playing Press 7 8 to play the previous or the next music file Press to highlight the corresponding icon on the control bar and then press OK TheTV will response accordingly FastForward FastReverse Press and hold 5 6 for seconds to draw the playing progress as you wish then press 2 on the remote control to start playing from the new position NOT...

Page 19: ...vailable when the image is enlarged 8 2 4 Browse text documents Press to select Text in the main menu Then press to select the drive disk you choose to watch and OK to enter Select the file you want to display by using and confirm with OK Quit step by pressing OK Press to select return and go back to previous menu 8 2 5 Software update via USB From time to time you can check if there is an improve...

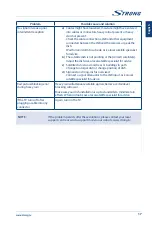
Page 20: ...erly ripples on the picture It is usually caused by local interference such as cars daylight lamps and hair driers Adjust the antenna to minimize the interference Snowy dots blocking and interference If the antenna is located in the fringe area of a television signal where the signal is weak the picture may be marred by dots show blocking or break ups When the signal is extremely weak it may be ne...

Page 21: ...ellite dish is too small trees or buildings in path Change to a larger dish or change position of dish d Signal is too strong dish is oversized Connect a signal attenuator to the LNB input Ask a local satellite specialist for advice Bad picture blocking error during heavy rain Heavy rain will attenuate satellite signals below a certain level blocking will occur Make sure your dish installation is ...

Page 22: ...rtners the application providers and the providers of the services may collect and use technical data and related information including but not limited to technical information about this device system and application software and peripherals STRONG its manufacturing partners the application providers and the providers of the services may use such information to improve its products or to provide ...

Reviews: