background image

Introduction to Assembling Your Case

It’s not rocket science, but our cases can be slightly more challenging to assemble because we don't follow the typical mass production oriented design but instead 
try to offer greater flexibility and designs that break the mould. This greater flexibility does however mean component locations are not fixed and therefore overlaps 
and conflicts can occur, so a bit of extra planning is suggested. It's also important to note that this guide will only show a ‘standard’ build, but there are many 
alternative layouts and configurations possible. We do not provide a detailed explanation on any of the advanced options because it does require you to be 
confident with modding and being able to figure things out for yourself. To avoid frustration, please take the time to read the user guide and become familiar with the 
product and assembly procedure. Additional information and help is also available on our website or by contacting our support team.

Several different screws will be utilized in the assembly so the user guide indicates which screws should be used and their corresponding fixing location. Screws are 
defined by head type, e.g. ‘Philips countersunk’ and by thread and length e.g. ‘M3x6’, and will be labelled accordingly, e.g. PCS-M3x6. For the standard assembly 
you will only need a Philips screwdriver, but if you plan on a more advanced build such as flipping the motherboard orientation, you will also require a Hex 
screwdriver, both 2 and 2.5mm are suggested (depending on what needs to be disassembled)

P

CS

-M x

3

6

6mm

3mm

P

hilips 

Thread Cut  etic

M

Diameter 

3

Length 

6

C

S

ounter unk

Table of Contents

COPYRIGHT NOTICE

Copyright © 2020. All Rights Reserved. No part of this publication may be reproduced, stored in a retrieval system, or transmitted, in any form or in any means – by electronic, mechanical, 

photocopying, recording or otherwise – without prior written permission. All trademarks and registered trademarks in this publication are the property of their respective owners.

Before we get into this super exciting user guide, we would just like to share a few words of appreciation .......
In a market dominated by generic designs, marketing fads and RGB lighting, we are on a mission to create products that are not just different 
for the sake of it, but incorporate quality materials, superior finishing, and innovate at every level. These qualities are not easily conveyed in an 
industry preoccupied with specs, numbers and flashing lights, so your choice shows an appreciation and understanding of what makes our products 
different, and we sincerely thank you for that.

We genuinely do our best to ensure that all our products are manufactured to the highest quality and finish we can achieve. If anything falls 
short of your expectations or you have any questions that are not covered in this user guide, please do not hesitate to get in touch with us online. 
We respond to every question or comment and your feedback is a critical part of our ongoing product development and of course our commitment 
to offer you the best service possible.

From everyone in the team, we hope that you have a great experience with this product  :) 

P

T

hilips  hin 

heesehead

C

PTC-XXX

P

hilips 

ounter unk

C

s

PCS-XXX

H

ex 

heese ead

C

h

HCH-XXX

2

PDH-XXX

P

hilips 

ome ead

D

h

2
3
4
5
6

Message, TOC, Introduction
Product Specifications & Overview
Removing All Panels in Preparation for Installation
Options for Orientation
CPU Cooler Assembly Overview

7
8
9

10
11

Installing Component and Cooler Hardware
Fitting Motherboard
Fitting I/O, DC Jack and Front/Back Panel
Installing Drives, Pads for Horizontal Orientation
Replacing Panels

Summary of Contents for DB1

Page 1: ...DB1 ...

Page 2: ...ication may be reproduced stored in a retrieval system or transmitted in any form or in any means by electronic mechanical photocopying recording or otherwise without prior written permission All trademarks and registered trademarks in this publication are the property of their respective owners Before we get into this super exciting user guide we would just like to share a few words of appreciati...

Page 3: ...5 m 2 2 Front Port USB Type A 3 0 Dimensions 222 x 222 x 101mm Volume 4 98ℓ Primary Material AL 6063 Finish Sandblast Anodised Colour Options Silver or Black Weight 1 8kg Specification 1 5 5mm DC jack or 4PIN DIN 2 Determined by the motherboard used 3 Modular can be replaced with optional Type C Acrylic Panel Side Panel PVC Net CPU Mount 6mm Heat Pipe USB Type A Silicon Bumper Power Button LED Pil...

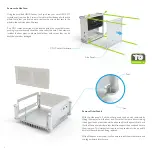
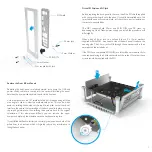
Page 4: ...them with care as they can be easily deformed or damaged 4 CPU Cooler Hardware Side Panel HCS M4x12 2 5 Slot Remove Other Panels With the side panel off all the other panels can be easily removed by sliding them away from the heat sink Note that there are slots cut along the edge of the heat sink also on the side panel that the panels fit into and that the silicon bumpers have tabs that also suppo...

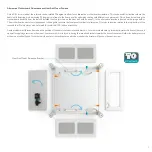
Page 5: ...e motherboard orientation is independent of being able to rotate the front panel to allow for alternative I O module location relative to the top bottom of the case and the I O module can also be rotated for preferred USB button orientation Another adjustment that can be made is the position of the heat sink mount retention brackets For most motherboards placement towards the front of the case is ...

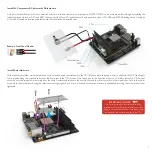
Page 6: ...ion screws are M3 so if your motherboard already has a backplate with that thread you won t need to install the supplied M3 nuts to the back of the motherboard The rest of the parts are individual packed for protection and should be assembled as shown For optimal cooling performance the heat pipes must run perpendicular to the heat sink fins It is also critical to apply thermal paste to every cont...

Page 7: ... centrally on the IHS Next apply thermal paste along the exposed surfaces of the heat pipes in the CPU mount Don t apply any to the heat sink mount yet Carefully lower the CPU mount assembly onto the copper shim ensuring it has the correct orientation relative to the heat sink fins and that it sits correctly on the copper shim Secure the cooler assembly to the motherboard using the retention screw...

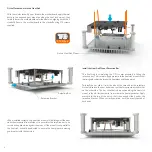
Page 8: ... it from the side of the case under the retention bracket closest to the heat sink mount until it almost reaches the bracket on the other side The bar should also be position along the heat sink mount in the slot furthest away from where the heat pipes enter Apply pressure to the top of the bar so that it bends and slide it under the retention bracket When correctly position it will be evenly spac...

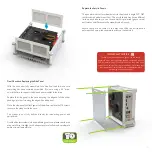
Page 9: ...hould be supplied with the PSU Replace the Front Back Panels Replacing the front panel is relatively simple just ensure the USB and power switch cables are routed into the case whilst sliding the panel between the bumper tabs and into the slot in the heat sink As the rear panel has the I O shield installed it will require being installed at an angle in order to clear the motherboard ports This can...

Page 10: ...e set and layout the m 2 socket location will vary but if located on the back it will be easily accessible and should be installed now before replacing the side panel Please refer to the motherboard user guide for more detail on installing the drive 10 2 5 Drive M 2 Drive Rubber Pads for Horizontal Case Orientation If you plan on using the DB1 in the horizontal orientation a set of 4 rubber pads i...

Page 11: ...ables to the drive Replace the side panel to the case ensuring the edges of all the other panels go into the slots along the edge of the side panel Once the side panel sits flush against all the pillars replace the M4 screws to secure the side panel to the case The system is now fully built and ready for connecting power and peripherals As with all fanless systems when positioning your case please...

Page 12: ...Designed in Europe Printed in China Copyright 2020 All Rights Reserved ...

Reviews: