background image

Installing a 2.5" Drive

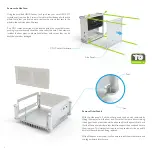
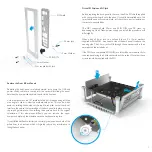
The DB1 can accommodate a single 2.5" drive which is mounted to the side panel using the included brackets. There are 2 possible screw position and as the side 
panel is symmetrical, the combination of location and rotation allows for optimal placement. It is recommended to position the drive away from the back of the 
CPU to avoid excess heat and of course it using a motherboard with an m.2 drive, away from that. There is no need to connect the cables until just before closing 
the case.

PTC-M3x3

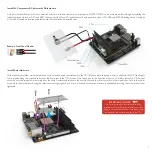
M.2 Drive Installation

Depending on the motherboard feature set and layout the m.2 socket 
location will vary but if located on the back, it will be easily accessible and 
should be installed now before replacing the side panel. Please refer to the 
motherboard user guide for more detail on installing the drive.

10

2.5" Drive

M.2 Drive

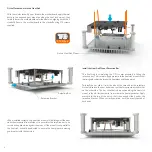
Rubber Pads for Horizontal Case Orientation

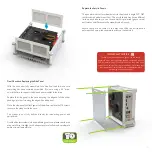
If you plan on using the DB1 in the horizontal orientation, a set of 4 rubber 
pads is supplied that should be fitted to the side panel (which becomes the 
bottom panel).

The pads are self-adhesive, simply peel the protective backing and stick 
them directly to the outside of the panel. There is no specific location, but 
towards the outer edges will provide more stability. If placing the case on 
an uneven surface, try using 3 feet instead of 4 to overcome that issue.

Summary of Contents for DB1

Page 1: ...DB1 ...

Page 2: ...ication may be reproduced stored in a retrieval system or transmitted in any form or in any means by electronic mechanical photocopying recording or otherwise without prior written permission All trademarks and registered trademarks in this publication are the property of their respective owners Before we get into this super exciting user guide we would just like to share a few words of appreciati...

Page 3: ...5 m 2 2 Front Port USB Type A 3 0 Dimensions 222 x 222 x 101mm Volume 4 98ℓ Primary Material AL 6063 Finish Sandblast Anodised Colour Options Silver or Black Weight 1 8kg Specification 1 5 5mm DC jack or 4PIN DIN 2 Determined by the motherboard used 3 Modular can be replaced with optional Type C Acrylic Panel Side Panel PVC Net CPU Mount 6mm Heat Pipe USB Type A Silicon Bumper Power Button LED Pil...

Page 4: ...them with care as they can be easily deformed or damaged 4 CPU Cooler Hardware Side Panel HCS M4x12 2 5 Slot Remove Other Panels With the side panel off all the other panels can be easily removed by sliding them away from the heat sink Note that there are slots cut along the edge of the heat sink also on the side panel that the panels fit into and that the silicon bumpers have tabs that also suppo...

Page 5: ...e motherboard orientation is independent of being able to rotate the front panel to allow for alternative I O module location relative to the top bottom of the case and the I O module can also be rotated for preferred USB button orientation Another adjustment that can be made is the position of the heat sink mount retention brackets For most motherboards placement towards the front of the case is ...

Page 6: ...ion screws are M3 so if your motherboard already has a backplate with that thread you won t need to install the supplied M3 nuts to the back of the motherboard The rest of the parts are individual packed for protection and should be assembled as shown For optimal cooling performance the heat pipes must run perpendicular to the heat sink fins It is also critical to apply thermal paste to every cont...

Page 7: ... centrally on the IHS Next apply thermal paste along the exposed surfaces of the heat pipes in the CPU mount Don t apply any to the heat sink mount yet Carefully lower the CPU mount assembly onto the copper shim ensuring it has the correct orientation relative to the heat sink fins and that it sits correctly on the copper shim Secure the cooler assembly to the motherboard using the retention screw...

Page 8: ... it from the side of the case under the retention bracket closest to the heat sink mount until it almost reaches the bracket on the other side The bar should also be position along the heat sink mount in the slot furthest away from where the heat pipes enter Apply pressure to the top of the bar so that it bends and slide it under the retention bracket When correctly position it will be evenly spac...

Page 9: ...hould be supplied with the PSU Replace the Front Back Panels Replacing the front panel is relatively simple just ensure the USB and power switch cables are routed into the case whilst sliding the panel between the bumper tabs and into the slot in the heat sink As the rear panel has the I O shield installed it will require being installed at an angle in order to clear the motherboard ports This can...

Page 10: ...e set and layout the m 2 socket location will vary but if located on the back it will be easily accessible and should be installed now before replacing the side panel Please refer to the motherboard user guide for more detail on installing the drive 10 2 5 Drive M 2 Drive Rubber Pads for Horizontal Case Orientation If you plan on using the DB1 in the horizontal orientation a set of 4 rubber pads i...

Page 11: ...ables to the drive Replace the side panel to the case ensuring the edges of all the other panels go into the slots along the edge of the side panel Once the side panel sits flush against all the pillars replace the M4 screws to secure the side panel to the case The system is now fully built and ready for connecting power and peripherals As with all fanless systems when positioning your case please...

Page 12: ...Designed in Europe Printed in China Copyright 2020 All Rights Reserved ...

Reviews: