background image


Page 4 

OVERVIEW


1.1 – Product Features 


True Day & Night surveillance & large aperture lens (F1.4) 


The best cost / performance outdoor solution with IP65 


IR effective distance up to 30 metres with 56 IR LEDs 


Smart Light Control to avoid overexposure 


Excellent outdoor ID design with cable management 


Low-latency video streaming with H.264 compression format 


Free CMS software with E-Map for multiple devices control & surveillance 


Powerful mobile surveillance supporting iPhone, BlackBerry, WinCE & J2ME 


Motion detection and alarm notification functions 


1.2 – Package Contents 


Network Camera 


Installation Sticker 


Installation Guide 


RJ45 Cable Extender Adapter 


Mains Adapter 


RJ45 Network Cable 


CD-ROM Disc (including user manuals “Video Viewer” software) 


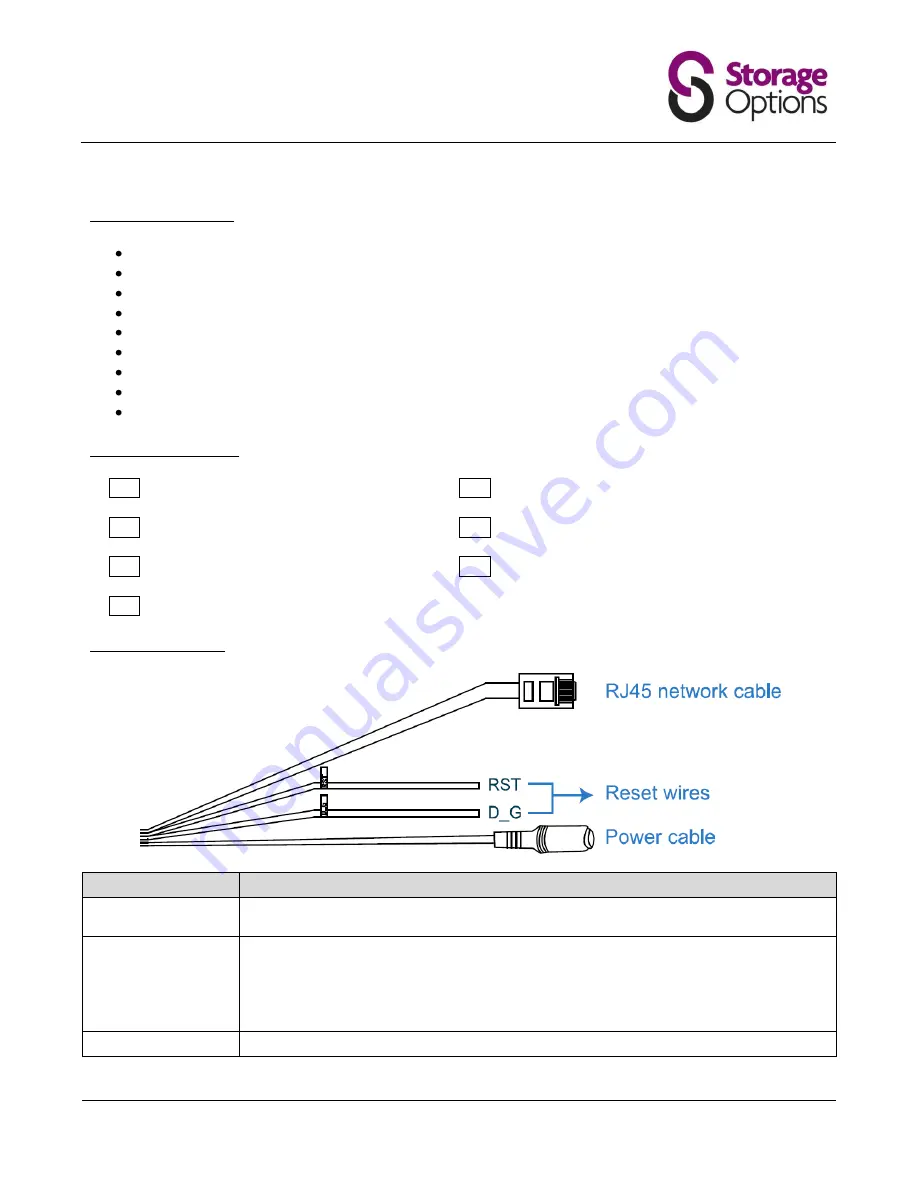
1.3 – Cable Overview


CABLE 

DESCRIPTION 

RJ45 Network Cable 

Connect  it  to  the  supplied  RJ45  cable  extender  adapter  for  cable  extension,  and  prepare 
another RJ45 network cable with suitable length for your connection. 

Reset Wires 

Remove  the  insulating  coating  of  these  two  wires,  and  twist  them  together  to  reset  to 
default.  This will reset all parameters, including the IP address to factory default settings. 

Note:

  Disconnect  power  before  twisting  these  two wires  together,  and  connect  to  power 

again  to  reset  default.    When  fitting,  you  may  wish  to  provide  internal  cabling  access  to 
these wires 

Power Cable 

Connect to DC 12V power supply. 


Summary of Contents for Ip camera Pro

Page 1: ...For the latest up to date manual please visit www storageoptions com IP CAMERA PRO INSTRUCTION MANUAL...

Page 2: ...ripping or splashing and that no objects filled with liquids such as vases shall be placed on the product TRADEMARK ACKNOWLEDGEMENTS Internet Explorer Microsoft Windows Mozilla QuickTime are registere...

Page 3: ...The Camera 4 2 Control Panel Overview 4 3 Frequently Used Functions 8 8 10 SYSTEM CONFIGURATION 13 5 1 General 5 2 Network 5 3 Video 5 4 Camera 14 16 18 19 ACCESSING THE CAMERA VIA YOUR WEB BROWSER 2...

Page 4: ...llation Sticker Installation Guide RJ45 Cable Extender Adapter Mains Adapter RJ45 Network Cable CD ROM Disc including user manuals Video Viewer software 1 3 Cable Overview CABLE DESCRIPTION RJ45 Netwo...

Page 5: ...sten the screws to a and b as indicated and make sure the screws are not fully tightened 1 2 3 Based on your installation environment put the power and data cable through the bracket and determine the...

Page 6: ...th the screw and wrench supplied with the socket Loosen the screw a little on the camera joint with the supplied wrench to adjust the horizontal angle of the camera then re tighten to fix it in place...

Page 7: ...as Microsoft Internet Explorer or Mozilla Firefox depending on different using situations To check or configure up to 16 surveillance devices simultaneously with the record function please use Video V...

Page 8: ...dress Book panel will be displayed on the right side of the control panel Step 2 Click to select the IP address of the camera you intend to connect and double click it Step 3 The live view is displaye...

Page 9: ...ick to choose the language of this program or set the password when activating this program Log Click to view all event and recording logs search the desired log s by date or playback the recording of...

Page 10: ...larger than the current disk capacity in Free MB When Manual is checked click or on the main control panel to start the manual recording immediately and the recordings will be saved in the location s...

Page 11: ...ack To play a recording click or and select the Record tab A list of all the recordings will be shown by default and you can also sort the logs by date start time end time etc by simply clicking the c...

Page 12: ...com Step 1 Click and select the IP address of your network camera in the address book Step 2 Click to show the upgrade page Update Server Step 3 Click Add to browse to the upgrade files Step 4 Click...

Page 13: ...or delete an existing user account Online User Check the current online user s Trigger 1 Enable disable the motion detection 2 Set the motion detection area 3 Select the event notification method Netw...

Page 14: ...ete modify an existing account setting DO NOT ATTEMPT TO DELETE THE ADMIN ACCOUNT Step 1 Click New and fill in the following information Option Desciption User Name Set a user name that will be used f...

Page 15: ...nction When Enable is selected click Setting to enter the motion detection area setting page as follows Sensitivity Set the detection sensitivity High Normal Low Area Setting Set the motion detection...

Page 16: ...etwork is PPPOE or DHCP For details please refer to CREATING AN ACCOUNT FOR DDNS SERVICE on page 25 SNTP Simple Network Time Protocol is used to synchronize your camera time with the networked compute...

Page 17: ...t s Filter Choose to permit or block the IP address es which can access this camera Function Description Error Login Count Set the maximum count for login failure When the maximum count is reached the...

Page 18: ...me 5 3 Video Set the image resolution quality and frame rate Item Description JPEG MPEG H 264 Select the image resolution and quality Image Resolution CIF 4CIF Image Quality BEST HIGH NORMAL LOW Frame...

Page 19: ...drag the slider to adjust the brightness Applicable values are from 0 127 The larger the value the brighter the image Sharpness Sharpness enhances the clarity of image detail by adjusting the aperture...

Page 20: ...The Camera Step 1 Open your web browser and key in http ipaddress portnum in the URL address box For example for IP address 192 168 1 10 and port number 81 please key in http 192 168 1 10 81 into the...

Page 21: ...selected you will be promoted to enter the user name and password to access the camera Video Quality Supervisor Power Normal User Click drag the slider to select the video quality Basic Normal High Be...

Page 22: ...to 5 4 Camera on page 19 Main Menu Sub Menu Reference Network Network Remote Config Network QoS Remote Config Network QoS DDNS Remote Config Network DDNS SNTP Remote Config Network SNTP FTP Remote Con...

Page 23: ...number is 88 iPhone Internet services via 3G networks are subscribed and available to use For details please check with your local network operator or service provider Your mobile phone is available t...

Page 24: ...Eyes for WinCE EagleEyes for WinCE NewVersion J2ME AP for Network MJPEG format DVR J2ME AP for Network MPEG H 264 format DVR IP camera WinCE AP for Network MJPEG format DVR WinCE AP for Network MPEG4...

Page 25: ...yndns com and click Create Account to sign up a DDNS account 2 Enter all the information necessary for signing up an account according to the website instructions Key in a user name for login for exam...

Page 26: ...ing process and NO payment information is required 6 Click Activate Services after checkout and your to use DDNS services will be ready to use 7 Return to Video Viewer and go to Network DDNS Select On...

Page 27: ...mage Sensor 1 3 HR colour CCD image sensor Pixels 768 H x 494 V NTSC 752 H x 582 V PAL Minimum Illumination 0 05 Lux F1 4 0 Lux IR ON Shutter Speed 1 60 1 50 to 1 100 000 sec S N Ratio More than 48dB...

Page 28: ...Page 28...

Reviews: