


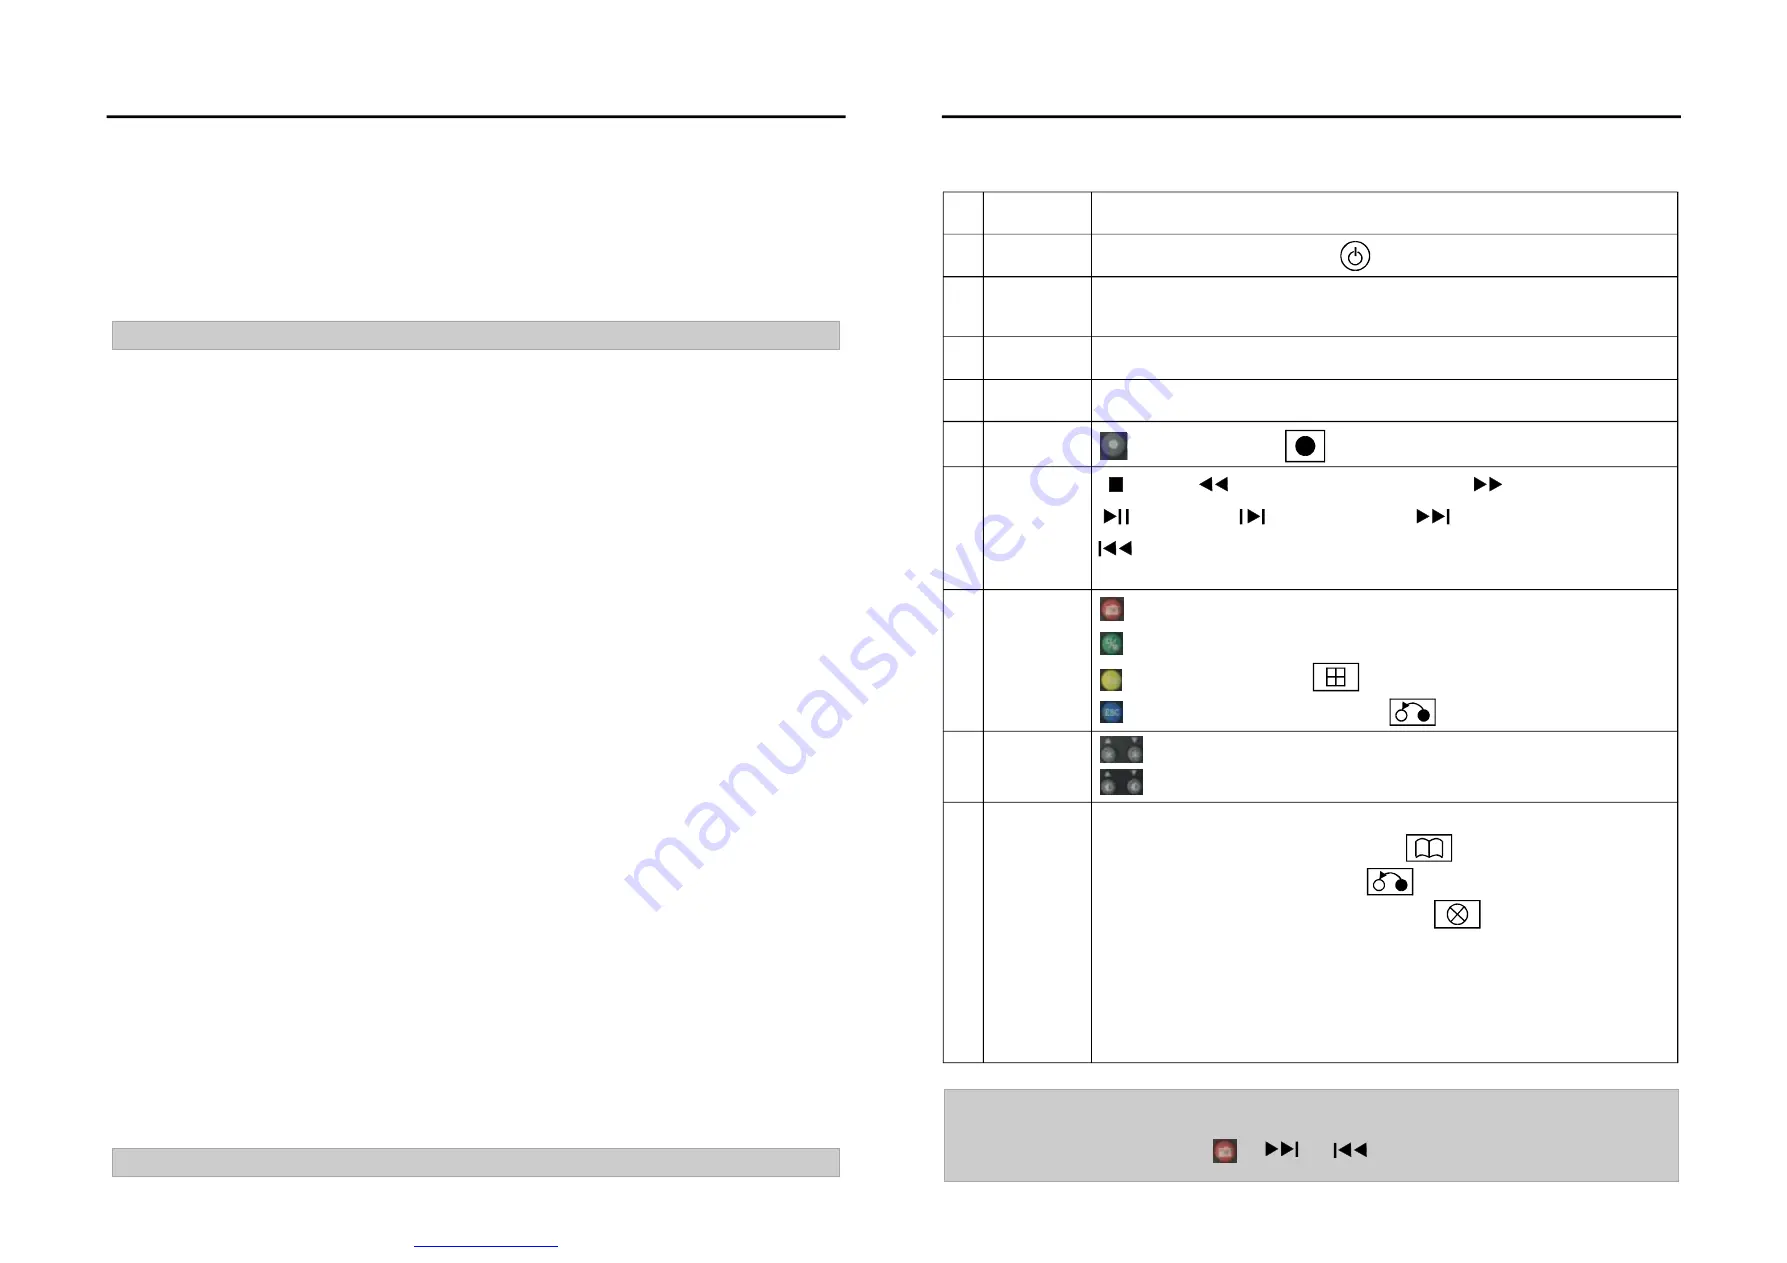
Chart 2-5 Remote control buttons
4.10.2
Camera Advanced Setup
4.10.3
Enter Tool System menu Camera setup
Adanced Setup interface
When motion event appear in destined area,there s some linkage response to setup: Trigger record, Triger
alarm output, Sound alarm, upload center
When video of selected channel loss, linkage response of video loss event could be setup, including:
Trigger alarm output, Sound alrm, Upload center
Enter<Tool> - (System menu>--<Network setup> advanced setup
interface
Choose PPPoE, press to enter PPPoE interface for USER and Key word.The equipment will dial no.
when information loggin successfully. After dialing, the IP address and other network message will be
showed on the interface.
To setup DNS serve address, DNS serve IP address should be log in.
Choose to turn on Dynamic domain name, press to enter interface for setup dynamic domain name.
Choose one of domain name server, log in address of dynamic domain name, user and keywor.
This product now offer 6 kind of domain name server.
Choose to turn on auto registation. Press
to enter auto registation interface. Then log in IP address &
port of host computer,interval of register
Cross to open File communcation. To visit record file in DVR HD via neighber of PC.
Open network neighger, log in IP address, such as
.168.10.220 to enter login interface. Log in
Admin user name and keyword to get into list of communicate. Click videoout file to look over record file.
When play software is setup, the record file could be play by Windos Media Player
Motion event response
Video loss response
Camera offset
Setup PPPOE
Setup dynamic domain name
Note:
Setup auto registation
File communnicate
The way to visit communicate file
Note:
'
Note :
Setup of Motion area and Sensitive, please refer to 4.4.2 Motion detection setup
Network Connections
\\192
Including horizontal offset and vertical offset. Setup up and down, left and right offset for video image.
LCD WITH BUILT-IN DVR USER MANUAL
LCD WITH BUILT-IN DVR USER MANUAL
-34-
-11-
①
⑤
⑦
⑧
⑨
Record, same as the
button of front panel.
。
:
Stop
,
:
play in slow mode/fast rewind
,
:
fast forward
,
:
Play/pause,
:
go to next frame,
:
go to next section ,
:
Go to previous section
,
Arrow buttons
The same as arrow buttons of front panel
:
④
:
Picture capture
:
Switch from single split to multiple splits view mode
:
Auxiliaries, same as the
button of front panel.
:
Return to upper menu, same as the
button of front panel
:
:
Adjust brightness up/down
djust contrast up/down
。
A
②
【
DEL
】:
Delete
③
【
PROG
】:
et sequence ,
Enable PTZ control, same as the
button of front panel.
【
SET
】:
Set parameters, same as the
button of front panel.
alarm notifications, same as the
button of front panel.
et preset
all preset
all sequence
Scan automatically
S
【
PTZ
】:
【×】:
Cancel
【
PRESET
】:
S
【
CALL
】:
C
.
【
SEQ
】:
C
.
【
SCAN
】:
.
⑥
NO.
Name
Description
Power on/off
Turn on/off the device, same as the
button of front panel
【
CN/EN
】:
Switch from Chinese to English, or reverse.
【
ID
】:
Set ID of remote controller.
Function
Buttons
Numbers
Input numbers or select to switch among relevant channels.
Function
Buttons
Play control
Function
Buttons
Note:
The following buttons are disabled currently:
【
ID
】、【
CN/EN
】、【
PROG
】、【
PRESET
】、
【
CALL
】、【
SEQ
】、【
SCAN
】
.
、
、
、
Adjust Picture
parameters
Function
Buttons
Function
Buttons
文件使用
"pdfFactory Pro"
试用版本创建