background image

15 


Installation 

Note:

 Before installation, please ensure the device is disconnected from the 

power source.   
 
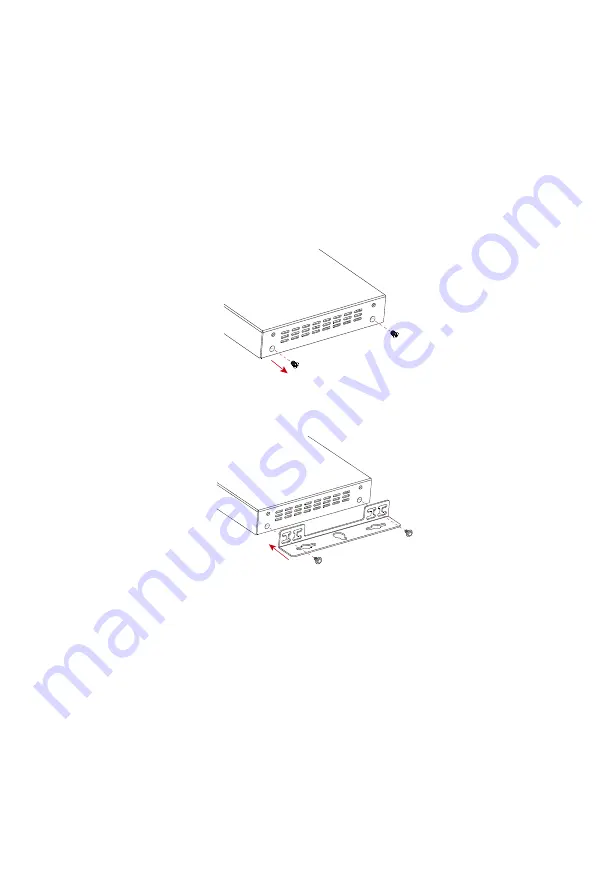
Steps to install the encoder in a suitable location: 
1.  Remove the four screws from the two side panels.   


2.  Position and install the mounting brackets on the two side panels using 

the mounting screws provided in package.   


3.  Attach the brackets to the surface you want to hold the unit against using 

the screws (provided by others). 

4.  Repeat the above steps for decoder. 

Summary of Contents for APOLLO SA-6000D

Page 1: ...4K HDMI over IP Encoder Decoder w KVM SA 6000E SA 6000D USER MANUAL...

Page 2: ...not install or place this product near any heat sources such as radiators heat registers stoves or other apparatus including amplifiers that produce heat 8 Protect the power cord from being walked on...

Page 3: ...der 12 Decoder 14 Installation 15 Typical Application 16 Scenario 1 16 Scenario 2 17 Hardware Installation 18 Operating the Devices 19 Introduction to Different Operation Tools 19 Using DIP Switch to...

Page 4: ...ft 100m over a single Cat 5e cable or above Standard features like bi directional serial bi directional IR and independent analog audio input output are included The codecs allow USB extension to take...

Page 5: ...5e cable or above Allows video output to follow input resolution or to convert the input resolution to 3840 x 2160 30Hz 4 4 4 and 1080p 60Hz Supports HDMI input and output transmission distance up to...

Page 6: ...rotated 180 and 270 clockwise presenting imagery that meets customer expectations Supports Auto IP zero configuration networking zeroconf a set of special technologies that automatically assign dynam...

Page 7: ...6 Decoder 1 x SA 6000D Unit 1 x Phoenix Male Connector 3 5mm 3 Pins 1 x IR Emitter 3 9ft 1 2m 1 x Broadband IR Receiver 3 9 ft 1 2 m 30 kHz 50 kHz 2 x Mounting Brackets...

Page 8: ...ect the rear panel RS232 port to a RS232 device such as a computer for bi directional serial communication with a RS232 device on the IP control box side Debug In this mode you can connect the rear pa...

Page 9: ...port is connected to an audio source both encoder and decoder will output the audio signal from the audio source instead of that from the HDMI video source If this audio port is connected via an audio...

Page 10: ...munication with an IR receiver at the SA 6000D side on the network Decoder Front Panel 5 4 3 2 1 No Name Description 1 Power LED On SA 6000D is powered on Off SA 6000D is powered off 2 Status LED On S...

Page 11: ...V Connect this port to a 12 V 1 A power adapter 2 Reset Use this button to reset device or quickly remove link relationship between decoder and encoder Device reset When SA 6000D is powered on use a p...

Page 12: ...L position connect this port to a RS232 device such as a computer to bi directionally communicate with a RS232 device at the IP control box side When the front panel MODE switch is toggled to the DEBU...

Page 13: ...Hz 1280 x 960 60Hz 1280 x 1024 60Hz 1360 x 768 60Hz 1366 x 768 60Hz 1400 x 1050 60Hz 1440 x 900 60Hz 1600 x 900 60Hz 1600 x 1200 60Hz 1680 x 1050 60Hz 1920 x 1080 60Hz 1920 x 1200 60Hz Input Video Sig...

Page 14: ...lby 5 1 7 1 Atmos DTS 5 1 7 1 DTS X Ethernet Dolby 5 1 Dolby True HD Dolby Digital Plus DTS 5 1 DTS HD DTS True HD LPCM 2 0 2 1 5 1 7 1 Audio Out Stereo Control Method Front panel link DIP switch Wind...

Page 15: ...le HDMI type A 19 pins Audio Out 1 x 3 5 mm Stereo jack Output Audio Format HDMI LPCM 2 0 2 1 5 1 7 1 Dolby 5 1 7 1 Atmos DTS 5 1 7 1 DTS X Audio Out Stereo Control Method Front panel link DIP switch...

Page 16: ...in a suitable location 1 Remove the four screws from the two side panels 2 Position and install the mounting brackets on the two side panels using the mounting screws provided in package 3 Attach the...

Page 17: ...HDMI OUT HDMI OUT HDMI OUT HDMI IN HDMI IN HDMI IN HDMI IN AUDIO IN Remote Remote Display Display KVM HDMI OUT HDMI OUT USB Keyboard and Mouse Amplifier 1 GbE Ethernet Switch Apple TV IP Control Box...

Page 18: ...AUDIO IN HDMI OUT Remote Display Remote Remote Display HDMI OUT KVM HDMI OUT USB Keyboard and Mouse 1 GbE Ethernet Switch Apple TV IP Control Box Desktop with PC Configurator iPad with PF IP Touch Wi...

Page 19: ...HDMI IN IR OUT USB PC USB Keyboard and Mouse AUDIO IN AUDIO OUT Serial Comm unication Serial Communication IR IN Amplifier AUDIO OUT Display Remote IR OUT IR IN RS23 2 Devic e iPad with PF IP Touch W...

Page 20: ...nals as a whole PC configurator Apollo Visual Composer Touch IP Control Box Both of the following routing policies are available Route audio video together with IR and USB signals as a whole Route aud...

Page 21: ...nt to link the decoder to a different encoder change the decoder switch settings in the same way as how the encoder s switch is positioned If you want to remove their link relationship reset decoder t...

Page 22: ...or example to introduce how to configure Mouse Roaming as below 1 Connect one computer to the HDMI IN and USB Host ports of each encoder and one set of mouse and keyboard to the USB Hub ports of one d...

Page 23: ...ate VW Name a video wall VW1 and choose rows and columns OK 4 Create a layout for the video wall Click VW1 in the RX list Create Layout Scene in the working area name this layout layout1 and choose Mo...

Page 24: ...nd choose Select Master right click the other one and choose Select Slave Click Apply OK Note To cancel Select Master Select Slave setting right click on the decoder and choose Delete Master Delete Sl...

Page 25: ...24 Now you can use the Master Roaming mouse to control both computers...

Page 26: ...decoder through PF PC Console 1 Double click Apollo Configurator exe Click Search to search online devices 2 Click Batch Commands to open Batch Commands window Click Video Tab Choose SA 6000D in the...

Page 27: ...Firmware Upgrade You can use Apollo Maintenance Tool to update the encoders and decoders to their latest versions to obtain new features For more information see the user guide of Apollo Maintenance T...

Page 28: ...Version V1 0 1 Tel 47 22 90 37 00 http www stoltzen eu Sales sales stoltzen eu Technical support stoltzen eu Address Dronning Mauds Gate 15 0250 OSLO Norway...

Reviews: