background image

16

MODEL: SWC46 | PRODUCT CODE: 54317 | 08/2016

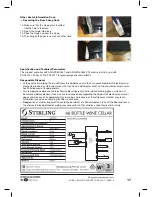
Other Useful Information Cont.

Reversing the Door Swing

The wine cellar has the capability of the door 
opening from either the left side or the right side  
to suit your individual installation requirements.  
If you want to reverse the opening direction,  
follow the instructions below.

WARNING

•   To avoid personal injury to yourself and/or 

damage to property, it is highly recommended 
that someone assist you during the door 
reversal process. 

•   Make sure the wine cellar is disconnected from 

the power supply when changing the side at 
which the door opens. 

•   Keep all parts you remove from the wine cellar 

for installation on the other side.

1.  Remove the hinge cap from the top of the door.
2.   Unscrew the hinge and place screws in a safe 

place as they will be used later.

3.  Remove the hinge and the plastic washer.
4.   Remove the plastic screw hole plugs from the 

other side of the wine cellar.

5.   Lift the door upwards off the bottom hinge and 

put it to one side.

6.   Remove the hinge plug from the left hand side 

of the wine cellar door.

7.   Put the hinge plug just removed onto the other 

side of the door.

8.  Remove the bottom hinge.
9.   Remove the screw hole plugs from the other 

side of the wine cellar.

10. Install the hinge in the new position.
11. Put the door on the hinge.
12.  Place the washer over the screw holes and 

place the hinge on top.

1

3

5

9

8

12

7

11

2

4

6

10

Summary of Contents for SWC46

Page 1: ...MODEL SWC46 PRODUCT CODE 54317 08 2016 Issue Date 08 2016 IM Version No V1 1 46 Bottle Wine Cellar Model Number SWC46 INSTRUCTION MANUAL...

Page 2: ...roducts brought to you by STIRLING are manufactured to the highest standards of performance and safety and as part of our philosophy of customer service and satisfaction are backed by our comprehensiv...

Page 3: ...ome 4 Warranty 5 General Safety Instructions 7 Product Overview 9 Getting Started 9 Installation 10 Instructions 12 Specifications 13 FAQ s and Troubleshooting 14 Other Useful Information 18 Repair an...

Page 4: ...ll rights and remedies in respect of the product that the consumer has under the Competition and Consumer Act 2010 and similar state and territory laws Our goods come with guarantees that cannot be ex...

Page 5: ...ngling Secure it at the back of the appliance so no one steps on or places anything on the cord or against it Keep the cord out of reach of children When moving the appliance make sure not to damage t...

Page 6: ...mpt to alter or modify this wine cellar in any way Repair Do not attempt to repair or replace any part of your wine cellar unless it is specifically recommended in this manual All other servicing shou...

Page 7: ...duct Overview 5 7 1 2 6 3 4 1 Electronic Control Panel inside top of cabinet 2 Hinge Cover 3 Glass Door 4 Recessed Handle on both sides 5 Chrome Shelves 5 Chrome Basket 1 6 Security Lock centred benea...

Page 8: ...intervals 2 LED Display Displays the current temperature inside the wine cellar cabinet 3 Light Control Button Press the light control button to turn the interior light ON and OFF 4 Power Control But...

Page 9: ...anding only and should not be recessed or built in Floor surface This wine cellar must be properly positioned on a dry sturdy level surface that is strong enough to support it when it is fully loaded...

Page 10: ...ding the wine cellar Odour You may notice an odour when you first switch on the wine cellar This is due to the parts being new and is no cause for concern The odour will subside as the wine cellar sta...

Page 11: ...n together for approximately 5 seconds 2 The temperature value will change and the F indicator will be illuminated on the control panel Loading the wine cellar Standard bottle capacity Your wine cella...

Page 12: ...s leave the light off during normal operation Note If the light is not working or needs to be replaced please call our After Sales Support on 1300 11 4357 for further guidance Door Lock Your wine cell...

Page 13: ...ed properly and for any obstructions preventing the door closing properly Check temperature setting and decrease if required Replace gasket Vibrations Wine cellar is not level Wine cellar is touching...

Page 14: ...et seal clean to keep the unit running efficiently Wash the shelves and the outside of the cabinet with a mild detergent solution Wipe dry with a clean soft cloth Dust or anything else blocking the ve...

Page 15: ...oper steps to protect the contents Service and Repair Do not attempt to alter or modify this wine cellar in any way Do not attempt to repair or replace any part of the wine cellar unless it is specifi...

Page 16: ...all parts you remove from the wine cellar for installation on the other side 1 Remove the hinge cap from the top of the door 2 Unscrew the hinge and place screws in a safe place as they will be used l...

Page 17: ...with your household rubbish Electrical and electronic products contain substances that can have a detrimental effect on the environment and human health if disposed of inappropriately This refrigerat...

Page 18: ...ay be lost We recommend you save this data elsewhere prior to sending the product for repair You should also be aware that rather than repairing goods we may replace them with refurbished goods of the...

Page 19: ...19 MODEL SWC46 PRODUCT CODE 54317 08 2016...

Page 20: ...20 MODEL SWC46 PRODUCT CODE 54317 08 2016...

Reviews: