background image

21

AFTER SALES SUPPORT

1300 886 649

[email protected]

AUS

MODEL: GYJ45-68     PRODUCT CODE: 52533 05/2016

Other Useful Information (Cont.)

Spare parts 

The following spare parts for the GYJ45-68 4.5kg Clothes Dryer are available for 
purchase from our after sales support centre.
• 

Bearings for drum 

• 

Capacitor 

• 

Door handle assembly

• 

Door hinge 

• 

Door lock

• 

Door lock base

• 

Door seal

• 

Drum belt 

• 

Drum motor

• 

Exhaust filter

• 

Exhaust vent shroud 

• 

Fan

• 

Fan assembly 

• 

Fan belt 

• 

Fan motor 

• 

Heating element

• 

Levelling feet 

• 

Lint filter 

• 

Pulley 

• 

Thermostat

• 

Timer

• 

Wall mount with screws

To purchase a spare part, call the centre on 1300 886 649 or email us at  
[email protected]

Summary of Contents for GYJ45-68

Page 1: ...el Number GYJ45 68 N13275 4 5kg Clothes Dryer INSTRUCTION MANUAL AFTER SALES SUPPORT 1300 886 649 info tempo org AUS MODEL GYJ45 68 PRODUCT CODE 52533 05 2016 IM Version No V2 5 Issue Date 03 February 2016 ...

Page 2: ... choosing to buy a STIRLING product All products brought to you by STIRLING are manufactured to the highest standards of performance and safety and as part of our philosophy of customer service and satisfaction are backed by our comprehensive 3 Year Warranty We hope you will enjoy using your purchase for many years to come ...

Page 3: ...L GYJ45 68 PRODUCT CODE 52533 05 2016 Contents 02 Welcome 04 Warranty Details 05 General Safety Instructions 08 Product Overview 10 Getting Started Installation 15 Instructions 18 FAQs 19 Other Useful Information 23 Repair and Refurbished Goods or Parts Notice ...

Page 4: ...nefits conferred by this warranty are in addition to all rights and remedies in respect of the product that the consumer has under the Competition and Consumer Act 2010 and similar state and territory laws Our goods come with guarantees that cannot be excluded under the Australian Consumer Law You are entitled to a replacement or refund for a major failure and to compensation for any other reasona...

Page 5: ...t subject to splashing or ingress of moisture Protect the power cord Do not kink or damage the power cord Position the cord out of the way so no one steps on or places anything on the cord or against it Do not run the cord under floor coverings Arrange the cord away from traffic areas where it will not become a trip hazard Damage Do not operate the appliance after it malfunctions or has been dropp...

Page 6: ... for the clothes dryer and may present a fire risk Preparation Make sure all pockets of clothing to be dried are empty Hard sharp objects such as coins safety pins bra wires nails screws lighters or matches must be removed as they can cause extensive damage to the dryer WARNING Any damage or malfunction resulting from foreign objects is not covered by your warranty and may lead to expensive repair...

Page 7: ...the temperature of the items They should not be removed from the clothes dryer or piled or stacked while hot Undergarments that contain metal reinforcements such as underwire bras which can come loose during drying and damage the clothes dryer Plastic articles such as shower caps or waterproof baby bibs Rubber backed articles clothes fitted with foam rubber pads pillows galoshes and rubber coated ...

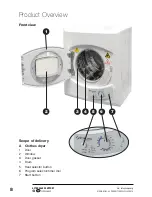
Page 8: ...fo tempo org AUS MODEL GYJ45 68 PRODUCT CODE 52533 05 2016 5 6 7 Product Overview 1 2 4 3 Front view Scope of delivery A Clothes dryer 1 Door 2 Window 3 Door gasket 4 Drum 5 Heat selector button 6 Program selector timer dial 7 Start button ...

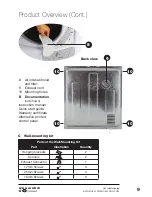
Page 9: ...rt Illustration Quantity Hanging brackets 2 Spacers 2 Exhaust Connector 1 12mm Screws 4 25mm Screws 4 16mm Screws 3 9 10 10 10 10 Low High 8 Back view C Wall mounting kit 8 Air intake shroud and filter 9 Exhaust vent 10 Mounting holes B Documentation not shown Instruction manual Quick start guide Warranty certificate Alternative printed control panel ...

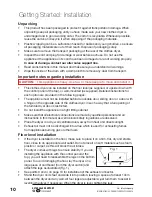
Page 10: ...or or a door with a hinge on the opposite side of the clothes dryer in such a way that a full opening of the tumble dryer door is restricted Do not install the appliance in a tight fitting cabinet Make sure that all electrical connections are made by qualified personnel and all instructions in this manual as well as local safety regulations are observed Place the dryer in a dry well ventilated are...

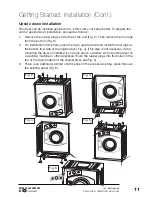
Page 11: ... For installation on the floor place the dryer upside down and install the four legs at the bottom top side of the original dryer Fig 4 This step is not necessary if wall mounting the dryer or installing it on a rack above a washer Do not put the dryer on a washing machine or other appliance Push the rubber plugs into the holes on the top of the dryer bottom of the original dryer see Fig 5 3 There...

Page 12: ...ing Kit Part Illustration Quantity Hanging brackets 2 Spacers 2 Exhaust Connector 1 12mm Screws 4 25mm Screws 4 16mm Screws 3 Getting Started Installation Cont Additional tools required for mounting onto a plasterboard wood stud wall Drill with a 3mm drill bit Phillips head screwdriver 4 Timber screws ø12x50mm Helper to help lift the dryer onto the wall Wall mounting instructions follow on the nex...

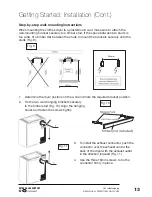
Page 13: ...ount the brackets securely onto the studs Fig 9 1 Determine the dryer position on the wall and mark the required bracket position 2 Fix the two wall hanging brackets securely to the timber stud Fig 10 Align the hanging hooks and fasten the screws tightly Getting Started Installation Cont 3 To install the exhaust connector push the connector over the exhaust vent at the back of the dryer with the e...

Page 14: ...s dryer onto the wall bracket Fig 13 7 Once the clothes dryer is properly installed plug the electrical cord into an appropriately earthed three pin 240V wall socket Fig 12 Mounting holes Mounting holes Spacers 12mm long screws NOTE If you are attaching a flexible duct not supplied to the exhaust outlet make sure to keep it as short as possible as long exhaust ducts reduce the efficiency of the ma...

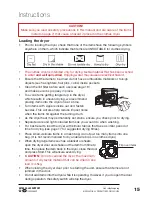
Page 15: ...heat may permanently set stains ensure you check prior to drying Separate dark and light coloured items as you would do when washing For best results load the dryer with similar fabrics that take a similar period of time for drying see page 17 for suggested drying times Place small delicate items in a mesh bag do not put too many items into one bag It is not recommended to dry underwire bras in a ...

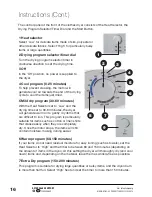
Page 16: ...ng the dryer will thoroughly dry and cool down items and depending on the material leave them as wrinkle free as possible 5 Mild dry program 30 60 minutes With the Heat Selector set to Low and the drying time set to 30 60 minutes the dryer will generate warm air to gently dry items that are difficult to iron This program is particularly suitable for items such as cotton or linen shirts that crease...

Page 17: ...r is etc The above list is only a guide Instructions Cont CAUTION HOT SURFACE Do not touch the air intake during a drying cycle it will be hot 9 Start button After having set up the Heat Selector and Timer Dial press the Start button The dryer will start and work until the program is finished If the during this process the door is opened or power is switched off the dryer will stop working In orde...

Page 18: ...ying Is the dryer operating in a small and poorly ventilated area Have you set the dryer to the Mild Dry program low heat and less than 60 minutes drying time Check and clean the filters Reduce the amount of washing in the dryer Dry damp items again for a little longer Untwist the items and dry them for a little longer Place the dryer in a well ventilated area Try using the Warm or Extra Dry setti...

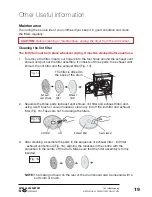
Page 19: ...fore cleaning or maintenance unplug the dryer from the wall socket The filter is affixed to the back of the drum 2 Separate the three parts exhaust vent shroud lint filter and exhaust filter and using a soft brush or vacuum cleaner clean any lint off the lint filter and exhaust filter Fig 15 Take care not to damage the filters 3 After cleaning assemble the parts in the sequence of exhaust filter l...

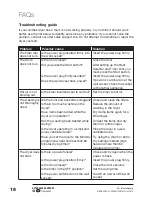
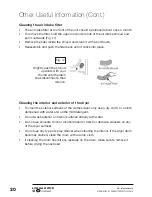
Page 20: ...use any type of spray cleaner when cleaning the interior If the dryer drum becomes stained clean the drum with a damp cloth If cleaning the drum has left any residues on the drum make sure to remove it before drying the next load Cleaning the air intake filter The air intake filter at the front of the unit should be cleaned about once a month To remove the filter hold the upper and lower ends of t...

Page 21: ...le for purchase from our after sales support centre Bearings for drum Capacitor Door handle assembly Door hinge Door lock Door lock base Door seal Drum belt Drum motor Exhaust filter Exhaust vent shroud Fan Fan assembly Fan belt Fan motor Heating element Levelling feet Lint filter Pulley Thermostat Timer Wall mount with screws To purchase a spare part call the centre on 1300 886 649 or email us at...

Page 22: ...d human health if disposed of inappropriately Observe any local regulations regarding the disposal of electrical consumer goods and dispose of it appropriately for recycling Contact your local authorities for advice on recycling facilities in your area Technical specifications Product STIRLING 4 5kg Clothes Dryer Model Number GYJ45 68 Capacity 4 5kg Voltage Frequency 220 240V AC 50 60Hz Rated Inpu...

Page 23: ...t We recommend you save this data elsewhere prior to sending the product for repair You should also be aware that rather than repairing goods we may replace them with refurbished goods of the same type or use refurbished parts in the repair process Please be assured though refurbished parts or replacements are only used where they meet ALDI s stringent quality specifications If at any time you fee...

Page 24: ... it to the store for a refund For an electronic copy of this manual go to www stirlingappliances com au and download a copy Instruction Manual Revision Index Version No Issue Date Description V1 0 14 October 2014 Original release V1 1 06 November 2014 Minor updates V1 2 10 November 2014 Minor updates V1 3 24 November 2014 Compliance updates V 1 4 19 December 2014 Minor compliance updates p 6 10 V2...

Reviews: