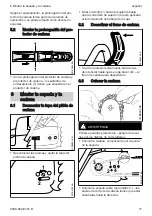
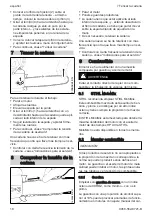
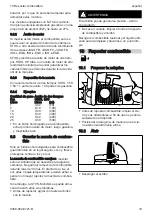
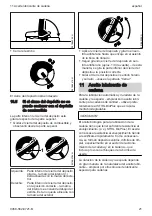
background image

Elegir cuñas de tala apropiadas en función del

diámetro del tronco y del ancho de la ranura de

corte (análogamente, corte de tala (E)).
Para elegir la cuña de tala (longitud, anchura y

altura apropiados), acudir a un distribuidor espe‐

cializado STIHL.

4.6

Elegir un corte de tala apro‐

piado

La elección del corte de tala apropiado depende

de los mismos aspectos que se han de tener en

cuenta al establecer el sentido de la tala y las

rutas de escape.
Se distinguen varias manifestaciones diferentes

de estos aspectos. En este manual de instruccio‐

nes se describen solo los dos modelos más fre‐

cuentes:

001BA260 KN

Izquierda: Árbol normal – árbol en posición ver‐

tical con copa uniforme

Derecha: Árbol que cuelga hacia delante – la

copa está orientada en el sentido de

la tala

4.7

Corte de tala con banda de

seguridad (árbol normal)

A) Troncos delgados
Realizar este corte de tala si el diámetro del

tronco es más pequeño que la longitud de corte

de la motosierra.

001BA261 KN

1.

2.

Antes de iniciar el corte de tala, avisar a los

demás en voz alta gritando "¡atención!".

► Hacer un corte de tala (E) por penetración – al

hacerlo, insertar la espada por completo

► Aplicar el tope de garras detrás de la arista de

ruptura y utilizarlo como punto de giro – cam‐

biar lo menos posible la posición de la moto‐

sierra

► Moldear el corte de tala hasta la arista de rup‐

tura (1)

Al hacerlo, no cortar la arista de ruptura

► Moldear el corte de tala hasta la banda de

seguridad (2)

Al hacerlo, no cortar la banda de seguridad

001BA273 KN

3.

► Poner una cuña de tala (3)
Inmediatamente antes de caer el árbol, avisar

por segunda vez gritando "¡atención!".

► Cortar la banda de seguridad desde fuera, en

horizontal al nivel del corte de tala con los bra‐

zos extendidos

B) Troncos gruesos
Realizar este corte de tala si el diámetro del

tronco es más grande que la longitud de corte de

la motosierra.

001BA263 KN

4.

5.

1.

2.

3.

Antes de iniciar el corte de tala, avisar a los

demás en voz alta gritando "¡atención!".

► Aplicar el tope de garras a la altura del corte

de tala y utilizarlo como punto de giro – cam‐

biar lo menos posible la posición de la moto‐

sierra

español

4 Técnica de trabajo

14

0458-562-8721-B

Summary of Contents for MS 382

Page 1: ...MS 382 Manual de instrucciones Instruction Manual 2 43 43 81 2 43 43 81...

Page 2: ...ad Procuramos hacer todo lo posible para que usted est satis fecho con este producto y pueda trabajar con l sin problemas En el caso de que tenga usted alguna pregunta sobre este producto dir jase a s...

Page 3: ...es de edad no deber n trabajar con este analizador a excepci n de j venes de m s de 16 a os que est n aprendiendo bajo tutela No dejar que se acerquen ni os animales ni espectadores El usuario es el r...

Page 4: ...e ni se derrame combusti ble y aceite para cadenas 2 5 Limpiar Limpiar las piezas de pl stico con un pa o Los detergentes agresivos pueden da ar el pl stico Limpiar de polvo y suciedad la m quina no e...

Page 5: ...ar los dispositivos de mando ni los de seguridad Las empu aduras tienen que estar limpias y secas libres de aceite y suciedad esto es importante para manejar la motosierra de forma segura Suficiente c...

Page 6: ...la mables p ej virutas de madera cortezas de rbol hierba seca combustible del chorro caliente de gases de escape y de la superficie del silenciador caliente peligro de incendio Los silenciadores con c...

Page 7: ...iones siempre a un distribuidor especializado STIHL Los distribuido res especializados STIHL siguen peri dicamente cursillos de instrucci n y tienen a su disposici n las informaciones t cnicas Emplear...

Page 8: ...a queda aprisionada brevemente en el corte por la punta de la espada 3 3 Freno de cadena QuickStop Con este freno se reduce el peligro de lesiones en determinadas situaciones no se puede impedir el re...

Page 9: ...cables de corriente el ctrica etc trabajar con especial precauci n En caso necesario infor mar a la polic a a las empresas de abasteci miento p blico o a la del ferrocarril 4 T cnica de trabajo Los tr...

Page 10: ...rueden Al efectuar trabajos en altura Emplear siempre una plataforma elevadora No trabajar nunca sobre una escalera o estando de pie en el rbol No trabajar nunca sobre objetos inestables No trabajar n...

Page 11: ...ral del rbol Formaciones de ramas muy fuertes creci miento asim trico da os en la madera Sentido y velocidad del viento no talar si el viento sopla fuerte Sentido de la pendiente rboles contiguos Carg...

Page 12: ...muesca de ca da quede en ngulo recto respecto del sentido de la tala En el procedimiento para trazar la muesca de ca da con un corte inferior horizontal corte hori zontal y corte superior biselado co...

Page 13: ...s ancha Corte por penetraci n Como corte de alivio al tronzar En trabajos de talla de madera 001BA269 KN 3 1 2 Utilizar cadenas de aserrado de baja tenden cia al rebote y trabajar con especial cuidad...

Page 14: ...es de iniciar el corte de tala avisar a los dem s en voz alta gritando atenci n Hacer un corte de tala E por penetraci n al hacerlo insertar la espada por completo Aplicar el tope de garras detr s de...

Page 15: ...ando atenci n Cortar la banda de seguridad desde fuera en horizontal al nivel del corte de tala con los bra zos extendidos 4 8 Corte de tala con banda de retenci n rboles que cuel guen hacia delante A...

Page 16: ...de retenci n 001BA268 KN Inmediatamente antes de caer el rbol avisar por segunda vez gritando atenci n Cortar desde fuera la banda de retenci n obli cuamente desde arriba con los brazos exten didos 5...

Page 17: ...adena 1 2 001BA185 KN Girar el tornillo 1 hacia la izquierda hasta que la corredera de sujeci n 2 est aplicada al lado izquierdo del rebaje de la caja 6 2 Desactivar el freno de cadena 001BA186 KN Tir...

Page 18: ...pada tirando de aquella con la mano De ser necesario retensar la cadena Una cadena nueva se ha de retensar con m s frecuencia que otra que lleve m s tiempo en ser vicio Controlar con cierta frecuencia...

Page 19: ...o gasolina y mezclarlos bien 9 3 Guardar la mezcla de combus tible Solo en bidones homologados para combustible guard ndolos en un lugar seguro seco y fresco protegidos contra la luz y el sol La mezcl...

Page 20: ...combustible accesorio especial Repostar combustible 10 4 Cerrar 001BA234 KN El estribo est en posici n vertical Aplicar el cierre del dep sito las marcas en el cierre del dep sito y en el dep sito de...

Page 21: ...de esta manera se gira la parte inferior del cierre del dep sito a la posici n correcta Girar el cierre del dep sito en sentido horario y cerrarlo v ase el apartado Cerrar 11 Aceite lubricante de cade...

Page 22: ...sito Al vaciarse el dep sito de combustible tiene que quedar todav a un resto de aceite lubricante de cadena en el dep sito Si no baja el nivel de aceite en el dep sito podr existir una irregularidad...

Page 23: ...o la mano izquierda no se encuentre en el asidero tubular detr s del protector salva manos como p ej en el corte de talado El freno de cadena funciona solamente si no se ha modificado nada en el prote...

Page 24: ...dor salta la palanca del mando unificado desde el arranque en caliente n a la posici n de servicio F Para desconectar el motor poner la palanca del mando unificado en Stop 0 15 2 1 Posici n de maripos...

Page 25: ...ego tirar con rapidez y fuerza al hacerlo presionar el asidero tubular hacia abajo no extraer el cord n hasta el extremo del mismo peligro de rotura No dejar retro ceder bruscamente la empu adura de a...

Page 26: ...ha parado tras el arranque al dar gas Posici n de gas de arranque n Con el motor caliente en cuanto el motor haya funcionado aprox un minuto Sujetar la motosierra y ponerla en marcha 15 6 Tras el pri...

Page 27: ...onales durante la fase de rodaje Durante este fase se tienen que adaptar las piezas m viles entre s en el motor se da una elevada resistencia de fricci n El motor alcanza su potencia m xima tras 5 has...

Page 28: ...de ajuste a E posici n Ematic Aumentar el caudal de aceite a suministrar Girar el perno de regulaci n en sentido horario el perno de regulaci n se limita mediante un tope final 2 Reducir el caudal de...

Page 29: ...4 0 mm Rapid 1 4 4 0 mm Picco 3 8 P 5 0 mm Rapid 3 8 0 325 6 0 mm Rapid 0 404 7 0 mm Si la ranura no tiene como m nimo esta profundi dad Sustituir la espada De no hacerlo los eslabones impulsores roz...

Page 30: ...tado en f brica a valores est ndar Este ajuste del carburador est armonizado de manera que el motor recibe una mezcla ptima de combustible y aire en cualesquiera estados operativos 20 2 Ajuste est nda...

Page 31: ...tornillo regulador princi pal H en sentido horario empobrecer la mezcla hasta el tope como m x INDICACI N Tras bajar de gran altitud se ha de reposicionar de nuevo el ajuste del carburador al ajuste e...

Page 32: ...or y dejarlo funcionar en ralent hasta que se pare Quitar la cadena de aserrado y la espada lim piarlas y rociarlas con aceite protector Limpiar a fondo la m quina especialmente las aletas del cilindr...

Page 33: ...sicos una fuerte exposici n a vibraciones un rendimiento de corte insatisfactorio y un alto des gaste Limpiar la cadena Controlar la cadena en cuanto a fisuras y remaches da ados Renovar las piezas da...

Page 34: ...por talimas tienen marcas para el ngulo de afilado Utilizar nicamente limas especiales para cade nas de aserrado Otras limas no son adecuadas por su forma y el picado 24 5 Para el control de los ngul...

Page 35: ...ora el ctrica 24 7 Distancia del limitador de pro fundidad 689BA023 KN a El limitador de profundidad determina el grado de penetraci n en la madera y con ello el gro sor de las virutas a Distancia nom...

Page 36: ...operaci n no rebajar m s el punto m s alto del limitador de profun didad ADVERTENCIA Los limitadores de profundidad demasiado bajos aumentan la tendencia al rebote de la motosierra 689BA052 KN Colocar...

Page 37: ...dificultad fuerte acumulaci n de polvo maderas con mucha resina maderas tropicales etc y jornadas laborales diarias m s largas deber n reducirse correspondientemente los intervalos indicados Los inte...

Page 38: ...X X X Dep sito de combustible Limpiar X Dep sito de aceite lubricante Limpiar X Lubricaci n de la cadena Comprobar X Cadena de aserrado Comprobar fijarse tambi n en el estado de afilado X X Comprobar...

Page 39: ...ual de instrucciones Todos los da os originados por la inobservancia de las instrucciones de seguridad manejo y man tenimiento son responsabilidad del usuario mismo Ello rige en especial para Modifica...

Page 40: ...ilizaci n De ellos forman parte entre otros La cadena la espada Las piezas de accionamiento embrague cen tr fugo tambor del embrague pi n de cadena El filtro para aire aceite combustible Dispositivo d...

Page 41: ...tic ES Longitudes de corte 40 45 50 63 cm Paso 3 8 Ancho de ranura 1 6 mm Estrella de reenv o de 11 dientes 28 6 3 Cadenas de aserrado 3 8 Rapid Micro 36 RM modelo 3652 Rapid Super 36 RS modelo 3621 R...

Page 42: ...o y conservaci n que est n especificados en este manual de ins trucciones Las reparaciones de mayor alcance las deber n realizar nicamente distribuidores especializados STIHL recomienda encargar los t...

Page 43: ...49 4 Working Techniques 50 5 Cutting Attachment 56 6 Mounting the Bar and Chain 57 7 Tensioning the Chain 58 8 Checking Chain Tension 58 9 Fuel 58 10 Fueling 59 11 Chain Lubricant 61 12 Filling Chain...

Page 44: ...d appearance of our products periodically Therefore some changes modifications and improvements may not be covered in this man ual 2 Safety Precautions Special safety precautions must be observed to r...

Page 45: ...ng that could get caught on branches brush or moving parts of the machine Do not wear a scarf necktie or jewellery Tie up and confine long hair headscarf cap hard hat etc Wear suitable safety shoes wi...

Page 46: ...chapters in the instruction manual Check the fuel system for leaks paying spe cial attention to visible parts such as the tank cap hose connections and the manual fuel pump on machines so equipped If...

Page 47: ...tion and secure fitting Check sharpness Never touch the saw chain when the engine is running If the saw chain becomes jammed by an object switch off the engine immediately before attempting to remove...

Page 48: ...e speed The machine must be serviced regularly Do not attempt any maintenance or repair work not described in the Instruction Manual All other work should be carried out by a servicing dealer STIHL re...

Page 49: ...ckstop chain brake This device reduces the risk of injury in certain situations it cannot prevent kickback When activated the chain brake stops the saw chain within a fraction of a second see the sect...

Page 50: ...ncreased risk of accidents Country specific legislation on felling technique must be complied with during felling work 4 1 Sawing Do not operate your saw with the starting throttle lock engaged Engine...

Page 51: ...Use a sturdy and stable support sawhorse Never hold the log with your leg or foot never allow another person to hold the log or help in any other way Limbing use a low kickback chain Work with the saw...

Page 52: ...to the direc tion of fall Clear escape paths eliminate obstacles Put down tools and equipment at a safe dis tance but not on the escape paths When felling stand only to the side of the fall ing trunk...

Page 53: ...lp pre vent sapwood splintering when the tree falls Make cuts at both sides of the trunk at same height as bottom of felling notch to a depth of about 1 10 of trunk diameter On large diameter trees cu...

Page 54: ...ted Position the felling wedge in the felling cut and drive in with suitable tools Only use aluminum or plastic wedges do not use steel wedges Steel wedges can seriously damage the saw chain and cause...

Page 55: ...ood before the hinge 1 guide the chainsaw absolutely horizontally and swivel as widely as possible Make the felling cut up to the hinge 2 Do not cut into the hinge Make the felling cut up to the stabi...

Page 56: ...the first cut Engage the spiked bumper behind the hinge and use this as the rotation point reposition the chainsaw as little as possible Tip of the guide bar must penetrate the wood before the holding...

Page 57: ...n sion either comes standard with the saw or is available as a special accessory 5 2 Fitting Chain Scabbard Exten sion 001BA245 KN 1 1 Push the scabbard extension and chain scab bard together the lugs...

Page 58: ...side of the bar While still holding the bar nose up tighten down the nuts firmly Go to Checking Chain Tension A new chain has to be retensioned more often than one that has been in use for some time C...

Page 59: ...1 50 1 part oil 50 parts gasoline 9 2 4 Examples Quantity of gaso line STIHL two stroke engine oil 1 50 Liters Liters ml 1 0 02 20 5 0 10 100 10 0 20 200 15 0 30 300 20 0 40 400 25 0 50 500 Pour oil i...

Page 60: ...eling and do not overfill the tank STIHL recommends you use the STIHL filler noz zle for fuel special accessory Fill the fuel tank 10 4 Closing 001BA234 KN Grip must be vertical Fit the cap marks on t...

Page 61: ...of the cap to be turned to the correct position Turn the cap clockwise and lock it in position see section on Closing 11 Chain Lubricant For automatic and reliable lubrication of the chain and guide...

Page 62: ...n the tank does not go down the reason may be a fault in the oil supply system Check chain lubrication clean the oilways con tact your dealer for assistance if necessary STIHL recommends that you have...

Page 63: ...uard must be free of dirt and easily moveable 14 4 Chain Brake Maintenance The chain brake is subject to normal wear It is necessary to have it serviced and maintained regularly by trained personnel S...

Page 64: ...chamber 15 3 Holding the Saw There are two ways of holding the saw when starting 15 3 1 On the ground 0000 GXX 0124 A0 KN Place your saw on the ground Make sure you have a firm footing check that the...

Page 65: ...XX 0127 A0 KN Press in the button to open the decompression valve The decompression valve closes as soon as the engine fires For this reason you must press in the button before each starting attempt W...

Page 66: ...that all settings are correct Check that there is fuel in the tank and refuel if necessary Check that the spark plug boot is properly con nected Repeat the starting procedure or It is possible that t...

Page 67: ...rottle oper ation After a long period of full throttle operation allow engine to run for a while at idle speed so that the heat in the engine can be dissipated by flow of cooling air This protects eng...

Page 68: ...half empty NOTICE If an increased oil flow is no longer required reset the adjusting screw to the standard setting 18 Taking Care of the Guide Bar 3 1 2 143BA026 KN Turn the guide bar over every time...

Page 69: ...blow it clear with compressed air from the inside outwards If filter is caked with dirt Wash the filter in STIHL special cleaner spe cial accessory or a clean non flammable sol ution e g warm soapy wa...

Page 70: ...ct Idle setting is too lean Turn the low speed screw L slowly counter clockwise until the engine runs and acceler ates smoothly It is usually necessary to change the setting of the idle speed screw LA...

Page 71: ...tor type spark plugs with a properly tightened adapter nut 21 3 Installing the Spark Plug Screw home the spark plug fit the boot and press it down firmly Fit the carburetor box cover 22 Storing the Ma...

Page 72: ...the Chain Sprocket Clean the crankshaft stub and needle cage and lubricate with STlHL grease special accessory Push the needle cage on to the crankshaft If the machine has a QuickStop Super chain bra...

Page 73: ...gle are exceptions Ripping chains have an X in the des ignation B Side plate angle The correct side plate angle results automatically when the specified file holder and file diameter are used Tooth sh...

Page 74: ...rive links Rotate the file a little periodically in order to avoid uneven wear To remove file burr use a piece of hardwood Check angle with file gauge All cutters must be equally long With varying cut...

Page 75: ...NG Depth gauges that are too low increase the kick back tendency of the chain saw 689BA052 KN Lay the file gauge on the saw chain the high est point of the depth gauge must be flush with the file gaug...

Page 76: ...of work and or daily Whenever tank is refilled Weekly Monthly Annually If faulty If damaged As required Complete machine Visual inspection condition leaks X X Clean X Throttle trigger throttle trigge...

Page 77: ...ews Tighten2 X Chain catcher check X replace X Safety information label replace X 26 Minimize Wear and Avoid Damage Observing the instructions in this manual helps reduce the risk of unnecessary wear...

Page 78: ...ge Damage to the machine resulting from the use of poor quality replacement parts 26 2 Parts Subject to Wear and Tear Some parts of the power tool are subject to nor mal wear and tear even during regu...

Page 79: ...1 6 mm 28 6 4 Chain sprocket 7 tooth for 3 8 rim sprocket Max chain velocity to ISO 11681 27 5 m s Chain speed at maximum power output 21 7 m s 28 7 Noise and Vibration Data For further details on com...

Page 80: ...echnically identical Only use high quality replacement parts in order to avoid the risk of accidents and damage to the machine STIHL recommends the use of original STIHL replacement parts Original STI...

Page 81: ...tadt Certification No K EG 2015 7259 Technical documents deposited at ANDREAS STIHL AG Co KG Produktzulassung The year of manufacture and serial number are applied to the product Done at Waiblingen 03...

Page 82: ...English 32 EC Declaration of Conformity 82 0458 562 8721 B...

Page 83: ...32 EC Declaration of Conformity English 0458 562 8721 B 83...

Page 84: ...www stihl com 04585628721B 04585628721B 0458 562 8721 B 0458 562 8721 B...

Reviews: