


5.- Seleccione la carpeta de destino. Si desea la ubicación
predeterminada, presione Siguiente.
6.- Seleccione la unidad donde desea instalar el programa. Presione
Siguiente tres veces más, si desea utilizar las opciones preestablecidas.
7.- Presione Finalizar para concluir la instalación.
USANDO POR PRIMERA VEZ SU SINTONIZADOR USB
Antes de comenzar a utilizar el sintonizador es necesario que realice
un “puenteo” entre el COM-440 y la tarjeta de audio de su
computadora. Solo conecte un cable 3,5mm en la salida de audio del
COM-440 (OUT) hacia la entrada (AUDIO IN) de su tarjeta de audio. De
esta forma podrá escuchar los programas de TV en sus bocinas.
Para comenzar a utilizar su sintonizador USB en la computadora, siga
estos pasos:
1.- Conecte una antena de televisión en el conector de antena del
sintonizador (5).
2.- Conecte el cable USB a la computadora (1).
3.- Conecte unas bocinas a la salida de audio (3).
4.- Ejecute el programa PowerVCR II.
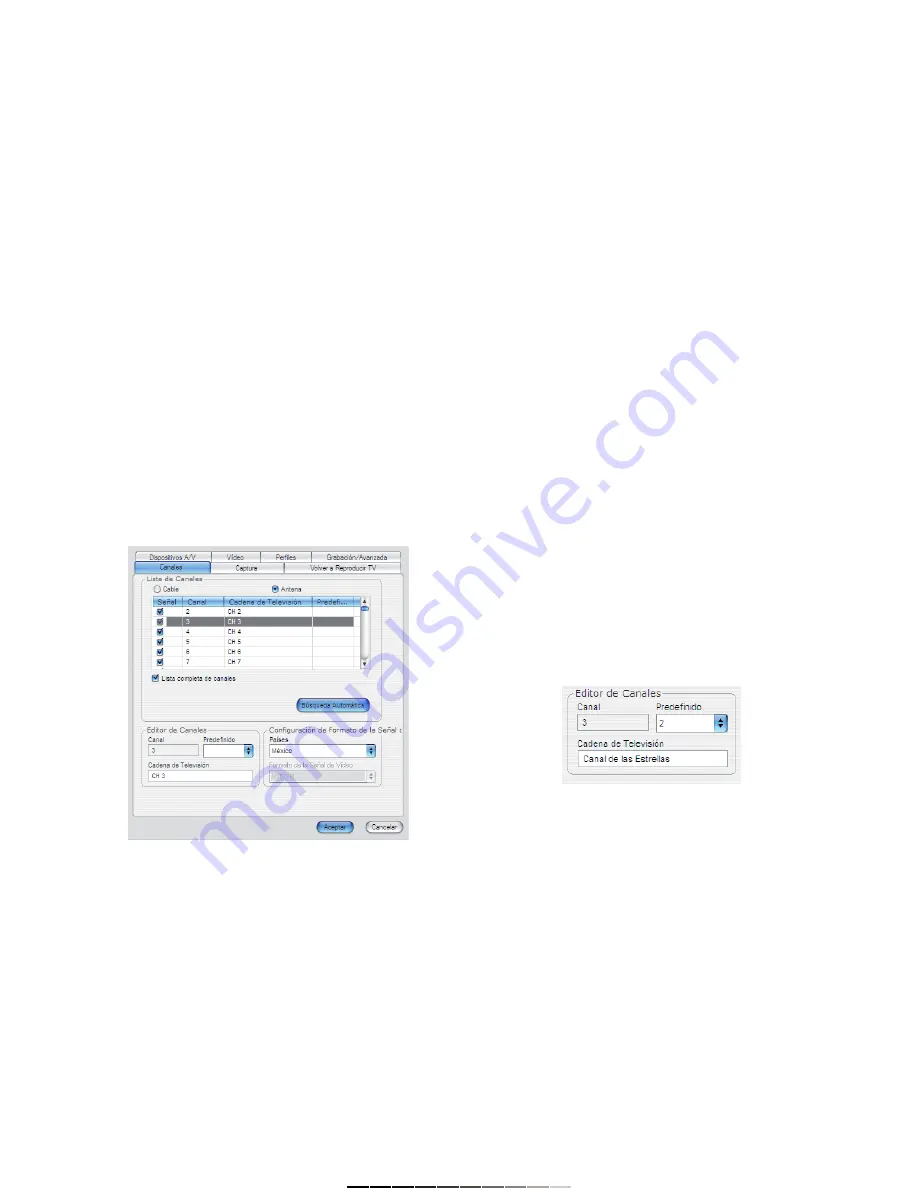
5.- En la pantalla de Configuración de Sistema presione el botón de
Búsqueda Automática. En pantalla se desplegarán los canales disponibles
en su localidad (Fig. 10).
6.- Una vez que el proceso de búsqueda haya terminado, es necesario
editar la información de los canales. Seleccione un canal e introduzca el
nombre del canal (Canal de las Estrellas, TV7, Azteca 13, etc).
7.- En caso de que los canales aparezcan desfasados, es decir, el canal 7
se vea en el canal 8, o el canal 5 se vea en el 6, edite el campo
Predefinido, en el menú de Editor de Canales. Ejemplo: si el canal 7
aparece en el canal 8, introduzca en la ventana de Predefinido el número
7 (Fig.11). Si el canal 2 aparece en el canal 3, introduzca en la ventana de
Predefinido el número 2. De esta forma podrá acceder a los canales de
forma directa.
8.- En el panel PowerVCR II presione la pestaña de Canales. Ahora
presione el botón de modo y cámbielo a Modo Predefinido (el botón
aparecerá presionado) (Fig. 12).
9.- Ahora podrá cambiar los canales de forma directa.
10.- Para grabar, presione el botón de Grabación del panel VCR II
(Fig. 12).
Nota:
La ventana de Configuración de Sistema aparece automáticamente la
primera vez que ejecuta el programa PowerVCR II. Posteriormente si
desea realizar otra búsqueda o editar la información de canales, presione
el botón de Configuración de Sistema (Fig. 13).
5.- Choose destination location. If you want to use the pre-established
location, press Next.
6.- Select Power VCR II’s working drive. Press Next thrice, if you want to
use the pre-established options.
7.- Press Finish to finalize the installation.
USING BY FIRST TIME THE TV TUNER CAPTURE BOX
Before start to use the TV tuner you must make a “bridge” between
COM-440 and the audio card on the computer.
Just plug a 3,5mm from the Audio Output connector on the COM-440
to Audio In connector on the audio card. In this way you can hear the
TV programs and Video files on your speakers.
To start to use the TV tuner capture box with the computer, follow these
steps:
1.- Plug a TV antenna into the TV antenna connector in the Video Capture
Card (5).
2.- Connect the USB cable to computer (1).
3.- Plug the speaker system to audio output jack (3).
4.- Run PowerVCR II.
5.- On System Settings menu, press Auto Scan button. On screen appears
all available channels on your neighborhood (Fig. 10).
6.- Once the process finished, it is necessary that you edit the channel
information. Choose a channel and type the Channel Station name (Fox,
Sony Entertainment, AXN, Discovery Channel, etc.)
7.- If the channels appears out of phase, for example, if you watch the
channel 7 on channel 8, or watch the channel 5 on channel 6, you must
edit the Preset menu. Example: if you watch the channel 7 on channel 8,
select the number 7 on Preset window, on Channels Editor menu (Fig. 11).
If you watch the channel 2 on channel 3, select the number 2 on Preset
menu. In this way, if you want to change a TV channel, just press the
number of the desired channel.
8.- On PowerVCR II panel press TV tuner control. Then press Mode button
and switch to Preset Mode (the button appears pushed) (Fig. 12).
9.- Now you can change the channels in a direct way.
10.- To record a TV program, press Record button from PowerVCR II
panel (Fig. 12).
Note:
The System Settings menu appears automatically the first time that you
run the PowerVCR II program. If you want to make another Auto Scan or
edit the channel information, press System Settings button (Fig. 13).
Fig.
10
Fig.
11


