background image

INSTALACIÓN DE DRIVERS

Asegúrese de instalar los controladores primeramente antes de 
conectar el sintonizador a la computadora.

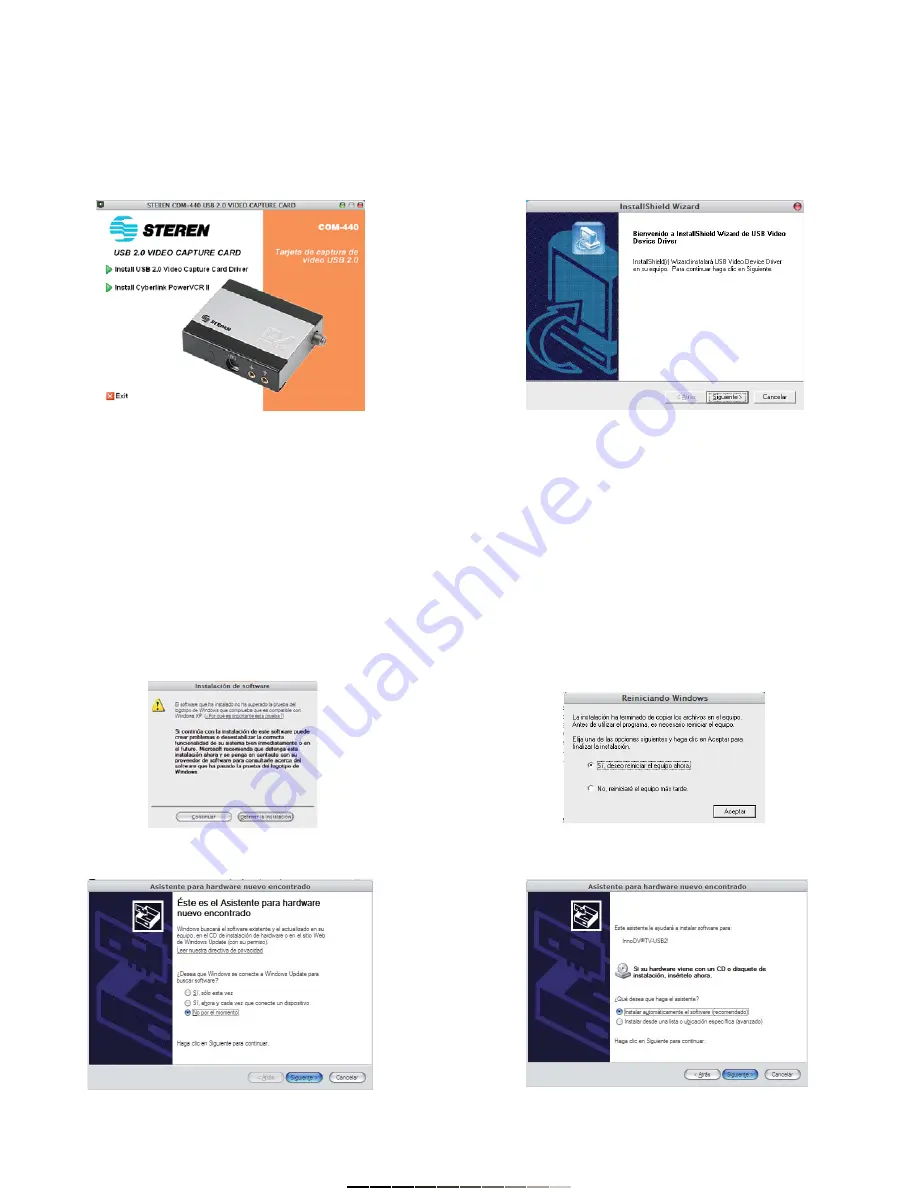
1.- Inserte el disco de instalación. Automáticamente aparece una ventana 
de instalación (Fig. 1).
2.- Seleccione Install USB 2.0 Video Capture Card Driver. El asistente de 
instalación comienza. Presione Siguiente para continuar (Fig. 2).

3.- El proceso de instalación comienza, y los archivos de controladores se 
copiarán a la computadora. Durante el proceso, puede aparecer un 
mensaje de advertencia. Presione Continuar para reanudar la instalación. 
De otra forma, cancelará la actualización, y tendrá que volver a comenzar 
(Fig. 3).
4.- Presione Finalizar para concluir con el proceso de copiado. Para 
completar la instalación, deberá reiniciar el equipo (Fig. 4).
5.- Conecte el sintonizador a un puerto USB disponible.
6.- La computadora detecta el nuevo equipo y mostrará el mensaje Nuevo 
Hardware Encontrado. El asistente para nuevo hardware aparece. 
Seleccione No por el momento, y presione Siguiente para continuar
(Fig. 5).
7.- Seleccione Instalar automáticamente el software (recomendado) y 
presione Siguiente para continuar. La instalación comienza (Fig. 6).


DRIVERS INSTALLATION

It is required to install drivers before connecting the Video Capture 
Card to Computer.

1.- Insert CD installation on CD-ROM drive. Automatically loads an 
installation window (Fig. 1).
2.- Choose Install USB 2.0 Video Capture Card Driver. The InstallShield 
Wizard starts. Press Next to continue (Fig. 2).

3.- The installation process begins and the program will copy driver files to 
computer. During the installation process, a warning message may 
appears on screen, Press Continue to resume the installation process. 
Otherwise, you cancel the process and you must start from the beginning 
(Fig. 3). 
4.- Press Finish to finalize the copy process. To complete the installation, 
you must restart the computer (Fig. 4).
5.- Connect the Video Capture Card to an available USB port.
6.- Windows will detect automatically a new device and display the 
message New Hardware Found. Now, the Found New Hardware Wizard 
appears. Choose Not in this moment and press Next to continue 
(Fig. 5).
7.- Choose Install the software automatically (recommended) and press 
Next to continue. The installation begins (Fig. 6).

Fig. 

       Fig. 

2

Fig. 

       Fig. 

4

Fig. 

       Fig. 

6

Summary of Contents for COM-440

Page 1: ... DISTRIBUIDOR DISTRIBUTION NOMBRE DISTRIBUIDOR ADDRESS DOMICILIO PRODUCT PRODUCTO BRAND MARCA MODEL MODELO SERIAL NUMBER No DE SERIE DATE OF DELIVERY FECHA DE ENTREGA Call Center Centro de Atención a Clientes del Interior 01 800 500 9000 Mexico City Cd de México 53 54 22 90 Warranty CONDITIONS 1 This warranty card with all the required information the invoice or purchase ticket the product box or ...

Page 2: ...sto S vídeo entrada para conector de S vídeo o adaptador para vídeo compuesto 3 Salida de audio permite conectar bocinas externas para escuchar el audio de la señal de vídeo recibida 4 Entrada de audio 5 Conector de antena de TV conector de antena de TV para sintonizar programas de televisión 1 2 3 4 5 INSTRUCTION MANUAL FOR USB 2 0 VIDEO CAPTURE CARD Model COM 440 Brand Steren Before using your n...

Page 3: ...ione Instalar automáticamente el software recomendado y presione Siguiente para continuar La instalación comienza Fig 6 DRIVERS INSTALLATION It is required to install drivers before connecting the Video Capture Card to Computer 1 Insert CD installation on CD ROM drive Automatically loads an installation window Fig 1 2 Choose Install USB 2 0 Video Capture Card Driver The InstallShield Wizard starts...

Page 4: ...8 4 Acepte el Contrato de Licencia e introduzca los datos de usuario De igual forma ingrese el número de serie CD KEY que viene impreso en la cubierta del disco de instalación Presione Siguiente para continuar Fig 9 8 During the installation process a warning message may appears on screen Press Continue to resume the installation process Otherwise you cancel the process and you must start from the...

Page 5: ...icamente la primera vez que ejecuta el programa PowerVCR II Posteriormente si desea realizar otra búsqueda o editar la información de canales presione el botón de Configuración de Sistema Fig 13 5 Choose destination location If you want to use the pre established location press Next 6 Select Power VCR II s working drive Press Next thrice if you want to use the pre established options 7 Press Finis...

Page 6: ...en the application loads Update graphics card driver The driver must support the screen keep flashing DirectX 8 or higher La pantalla está en blanco cuando Revise las conexiones ve y graba video de la TV o alguna Verifique los parámetros de la fuente de audio y vídeo otra fuente de vídeo en el programa de vídeo Video playback window is blank when Check the connections watching and recording video ...

Reviews: