background image

24

 -

24

 -

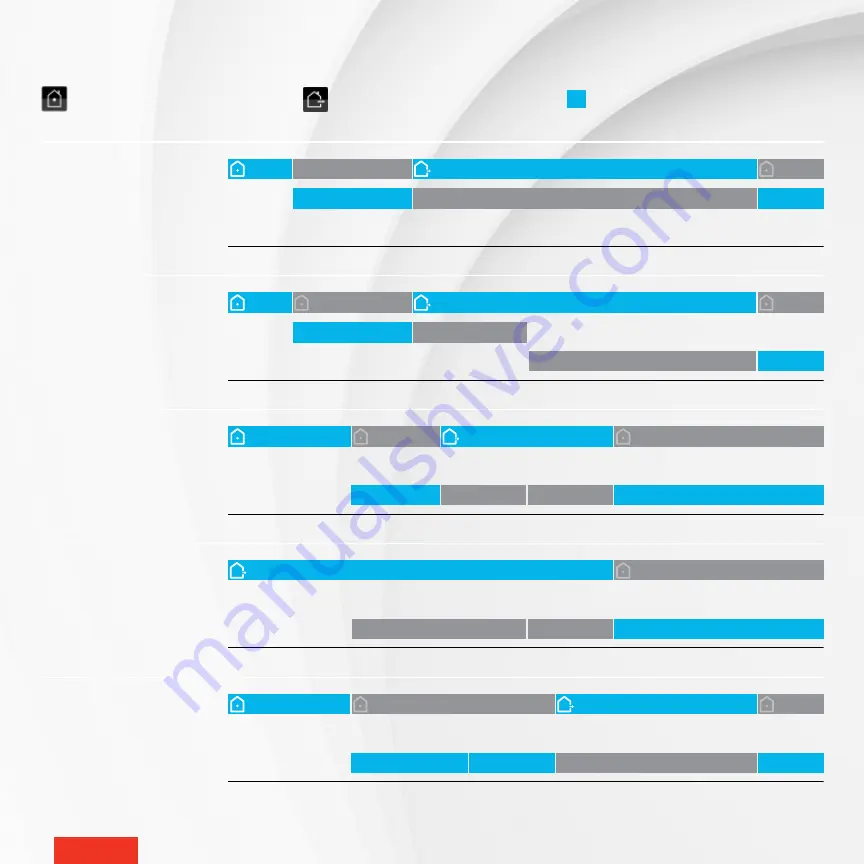
EXAMPLES OF STATUS AND ACTIVITY CHANGES

Example 1

7h  8h  9h  10h 11h 12h 13h 14h 15h 16h 17h

PROGRAMMED 

ACTIVITIES

MANUAL 

SETPOINTS

STATUS

17°C (63°F)

18°C (64°F) 

18°C (64°F)

18°C (64°F) 

21°C (70°F)

21°C (70°F)

21°C (70°F)

Example 2

7h  8h  9h  10h 11h 12h 13h 14h 15h 16h 17h

17°C (63°F)

18°C (64°F) 

18°C (64°F)

House cleaning 20°C (68°F)

20°C (68°F)

21°C (70°F)

21°C (70°F)

21°C (70°F)

PROGRAMMED 

ACTIVITIES

MANUAL 

SETPOINTS

STATUS

Example 3

7h  8h  9h  10h 11h 12h 13h 14h 15h 16h 17h

17°C (63°F)

20°C (68°F)

22°C (72°F)

Workout 20°C (68°F)

Relaxation 22°C (72°F)

21°C (70°F)

21°C (70°F)

21°C (70°F)

PROGRAMMED 

ACTIVITIES

MANUAL 

SETPOINTS

STATUS

Example 4

7h  8h  9h  10h 11h 12h 13h 14h 15h 16h 17h

17°C (63°F)

22°C (72°F)

Workout 20°C (68°F)

Relaxation 22°C (72°F)

21°C (70°F)

PROGRAMMED 

ACTIVITIES

MANUAL 

SETPOINTS

STATUS

Example 5

7h  8h  9h  10h 11h 12h 13h 14h 15h 16h 17h

17°C (63°F)

22°C (72°F)

Workout 20°C (68°F)

Relaxation 22°C (72°F)

21°C (70°F)

21°C (70°F)

21°C (70°F)

22°C (72°F)

PROGRAMMED 

ACTIVITIES

MANUAL 

SETPOINTS

STATUS

I am home

Setpoint programmed  
at 21 °C (70 °F)

I am away

Setpoint programmed  
at 17 °C (63 °F)

Setpoint active

Summary of Contents for Maestro SMC402AD

Page 1: ...USER GUIDE INS SMC402AD EN 0919 SMART CONTROLLER THERMOSTAT Model SMC402AD ...

Page 2: ...t 21 With the MAESTRO app 21 Without the MAESTRO app 22 Changing statuses or activities 23 Description of statuses 23 Examples of status and activity changes 24 Selecting a status for your home 25 Selecting an activity 25 Managing geofencing 26 Activating or deactivating geofencing 27 Deleting mobile devices 27 Defining the setpoint temperature of the controller thermostat 28 Temporarily modifying...

Page 3: ...adjust the temperature of your rooms at the right time ANTICIPATED START MAESTRO takes into account the outside temperature to reach the desired temperature at the perfect time GEOFENCING COMFORT FOLLOWS YOU WHEREVER YOU GO The MAESTRO app adjusts the temperature of your home according to your geographic location to ensure ideal com fort when you arrive and lowering it when you leave TRACK YOUR EN...

Page 4: ...ith Systems with inductive loads Central heating systems Systems with resistive loads that are o inferior to 150 W at 120 VAC 260 W at 208 VAC or 300 W at 240 VAC o superior to 2000 W at 120 VAC 3400 W at 208 VAC or 4000 W at 240 VAC Your controller thermostat is compatible with 802 11 b g n Wi Fi networks See page 45 for detailed technical specifications of the MAESTRO controller thermostat To in...

Page 5: ...pecified Protect the heating system with the appropriate circuit breaker or fuse You must regularly clean dirt accumulations on the controller thermostat Do NOT use fluid to clean controller thermostat air vents Do NOT install controller thermostat in a wet place or on an external wall However installing it in isolated walls is allowed To avoid any risk of overheating leave a clearance of at least...

Page 6: ...an function on its own but it offers more options when used with MAESTRO thermos tats and the MAESTRO app By using the complete MAESTRO system you ll benefit from maximum comfort flexibility and energy savings For more information on the MAESTRO system visit www stelpro com en CA maestro ...

Page 7: ...r could be positioned at the entrance to the living room 1 or dining room 2 The signal may have a hard time getting to the master bathroom as the washer dryer 3 and shower 4 could be barriers If a MAESTRO thermostat is placed in the master bedroom 5 it will help relay the signals between the controller and the master bathroom thermostat Since the controller thermostat also serves as a thermostat i...

Page 8: ...etely clear of any obstruction to ensure optimal functio nality For example do not install the controller thermostat behind curtains or furniture To avoid getting false temperature measurements do not install the controller thermostat in any of the following locations Near a window or close to a door leading outside In an area exposed directly to the light or heat of the sun a lamp a fireplace or ...

Page 9: ...ves as a thermostat for the room in which it is installed 2 INSTALL YOUR MAESTRO THERMOSTATS Now install your MAESTRO thermostats For instructions on how to do this read the thermostat s installation and user guide To maintain full control over the temperature of your home you must have a thermostat in each room NOTE A MAESTRO thermostat can control up to 4 000 watts READ THIS GUIDE AND WATCH THE ...

Page 10: ... controller thermostat screen to create a home 3 In the MAESTRO app the Connect a thermostat to my MAESTRO system feature will activate and set the controller thermostat in thermostat pairing mode see www stelpro com en CA support maestro for more details on how to use the MAESTRO app 4 Connect the thermostats to the controller thermostat one at a time see the Connecting a thermostat to the contro...

Page 11: ...cal panel Make sure the power is off by checking for example that the heating system remains off even if the setpoint temperature is higher than the ambient temperature mechanical thermostat INSTALLING THE MAESTRO CONTROLLER THERMOSTAT INSTALLATION OF THE CONTROLLER THERMOSTAT MUST BE DONE BY A QUALIFIED ELECTRICIAN IMPORTANT ...

Page 12: ... thermostat with a STELPRO mounting plate 1 Loosen the screw at the base of the thermostat without completely removing it to separate the thermostat from the mounting plate 2 Gently pull the thermostat to gain access to the wires 3 Disconnect the thermostat wires from those of the heating system and power supply 4 Remove the mounting plate ...

Page 13: ...r 2 Slide the mounting plate downward and then pull on it to separate it from the controller thermostat 3 Using the mounting screws supplied 2 secure the MAESTRO controller thermostat mounting plate to the electrical box Ensure the plate is perfectly straight so that the controller thermostat is also straight 4 Pass the power supply wires through the large opening at the centre of the mounting pla...

Page 14: ...nection diagram Tighten the caps onto the wires to ensure the connection is secure Then place all the wires inside the electrical box NOTE If the electrical wires are aluminum use CO ALR connectors instead not supplied NOTE Since controller thermostat wires have a polarity the way they are connected is important IMPROPER WIRING IS A FIRE HAZARD IMPORTANT LOAD White if 120 V 120 VAC 240 VAC ...

Page 15: ...hermostat are clean and clear of any obstruction 2 Align the slot on the top of the controller thermostat with the slot on the mounting plate 3 Then secure the controller thermostat to the mounting plate making sure that the wires do not get pinched between the unit and the mounting plate 4 Tighten the screw at the base of the controller thermostat to secure it in place ...

Page 16: ...thermostat should turn on If it doesn t read the Controller thermostat troubleshooting section on page 40 Once installed the controller thermostat will prompt you to choose a language temperature format time format heat mode and Lobby mode if the heating mode is Fan Forced heater If the temperature is below 0 C 32 F the home screen will display Cold If the temperature exceeds 50 C 122 F the screen...

Page 17: ...RT 5 SETTINGS TO BE SET Language Francais English Temperature format Celsius Fahrenheit Time format 12 hours 24 hours HEATING MODE Baseboard Fan forced heater LOBBY MODE Standard room Lobby NOTE Lobby mode only available if the heating mode is Fan forced heater ...

Page 18: ...ss all MAESTRO controller thermostat functionalities WI FI CONNECTED ACTIVE ALERTS LOCAL TIME HEATING POWER KEYBOARD LOCKED ACCESS SETTINGS ACCESS THERMOSTAT OUTDOOR RELATIVE HUMIDITY WEATHER CONDITIONS OUDOOR TEMPERATURE ACCESS STATUS ACTIVITIES ACCESS GROUPS ROOM TEMPERATURE 6 7 1 2 3 4 5 8 9 10 11 12 13 ENJOY THE FULL 360 COMFORT EXPERIENCE ...

Page 19: ... download the MAESTRO app and create your user account CONNECTING THE CONTROLLER THERMOSTAT TO YOUR WI FI NETWORK AND REGISTERING IT IN THE MAESTRO APP 1 Access SETTINGS WI FI SETUP 2 Tap SCAN NETWORKS The control ler thermostat will search for available Wi Fi networks and display them in the NETWORKS screen 3 In the NETWORKS screen select your home s Wi Fi network 4 In the PASSWORD screen enter t...

Page 20: ... Fi network you will need to follow these steps to obtain your registration code For example you may need to obtain the registration code when a MAESTRO system changes owners 1 Access SETTINGS WI FI SETUP REGISTER DEVICE A message will display on the controller thermostat REGISTRATION screen informing you that your request for a registration code is being processed When obtained the registration c...

Page 21: ...CT A THERMOSTAT TO MY MAESTRO SYSTEM The screen ADD A NEW THERMOSTAT on the controller thermostat will display the Zigbee channel being used 2 On the thermostat access menu 1 and select the auto connect option ON You can also use the channel displayed by the controller thermostat 3 On the thermostat tap the icon to confirm the selection The icon will blink rapidly while the thermostat searches for...

Page 22: ...elect the auto connect option ON You can also use the channel displayed by the controller thermostat 3 On the thermostat tap the button to confirm the selection The icon will blink rapidly while the thermostat searches for the channel The Zigbee channel will display them when the connection is established When the thermostat is connected to the controller thermostat s Zigbee network the icon will ...

Page 23: ...create up to 20 activities e g movie night to adjust the temperature of some groups of thermostats based on your lifestyle The activities can be programmed to start automatically at a given time or on demand Activities programmed to start at a given time only work with the I am home status However if you select an activity directly on the controller thermostat or with the MAESTRO app the activity ...

Page 24: ... 12h 13h 14h 15h 16h 17h 17 C 63 F 20 C 68 F 22 C 72 F Workout 20 C 68 F Relaxation 22 C 72 F 21 C 70 F 21 C 70 F 21 C 70 F PROGRAMMED ACTIVITIES MANUAL SETPOINTS STATUS Example 4 7h 8h 9h 10h 11h 12h 13h 14h 15h 16h 17h 17 C 63 F 22 C 72 F Workout 20 C 68 F Relaxation 22 C 72 F 21 C 70 F PROGRAMMED ACTIVITIES MANUAL SETPOINTS STATUS Example 5 7h 8h 9h 10h 11h 12h 13h 14h 15h 16h 17h 17 C 63 F 22 ...

Page 25: ...ture of all thermostat groups associated with the activity will adjust based on the chosen activity and the controller thermostat will return to the home screen NOTE The home status will automatically switch to I am home SELECTING A STATUS FOR YOUR HOME 1 Access STATUS on the home screen 2 Tap the desired status I am away I am home I am on vacation Standby The setpoint temperature for all thermost...

Page 26: ...ur thermostats see Changing statuses or activities on page 23 TIP Deactivate geofencing to maintain your home status at I am home even when your mobile devices are outside the boundary This will ensure that your mother in law and children don t get cold while you re out for a romantic dinner The following status changes can occur when using geofencing IF THE HOME STATUS IS AT AND THE HOME STATUS S...

Page 27: ...list associated with geofencing The MAESTRO system will then automatically re register all mobile devices that still have the option Use this mobile device activated 1 Access SETTINGS Geofencing 2 Tap Clear mobile device list 3 Tap CLEAR to confirm the deletion of the mobile devices recognized by the geofence ACTIVATING OR DEACTIVATING GEOFENCING You can activate and deactivate geofencing directly...

Page 28: ...ill display to confirm the selection If the controller thermostat needs to activate the heating system to reach the setpoint temperature the icon will indicate the intensity at which the heating system is operating NOTE Changing the setpoint temperature in the THERMOSTAT menu is considered as an exception to the group setpoint The change will therefore only be TEMPORARY To make a permanent change ...

Page 29: ...hanges or until an activity associated with this group begins The MAESTRO system will support a maximum of 8 groups 1 Access GROUPS 2 Tap the group you want to modify The group s screen will display the list of thermostats associated with it and the defined setpoint 3 Use and to adjust the setpoint The icon will display to confirm the selection You must use the MAESTRO app to perform any other ope...

Page 30: ...ure will be applied until the status of the home changes or until an activity associated with this group begins NOTE You can also modify the temperature directly on the thermostat if the keyboard is not locked 1 Access GROUPS 2 Tap the group containing your thermostat 3 In the group screen tap the thermostat you want to modify The thermostat screen will appear 4 Use and to adjust the setpoint temp...

Page 31: ...ve The group screen will display the group s list of thermostats and the defined setpoint temperature for each 3 Tap the thermostat you want to remove 4 In the thermostat screen tap the icon to access the thermostat s settings screen 5 Tap DELETE The thermostat will be removed from the home NOTE The thermostat screen also has a RECONFIGURE button This button must only be used for troubleshooting p...

Page 32: ...tionality is deac tivated simply tap the controller thermostat screen to turn it back on 1 Access SETTINGS OPTIONS PROXIMITY SENSOR 2 Tap Sensor Off or Sensor On The icon will appear to the right of the selected option 3 Tap APPLY to confirm the selection ACTIVATING OR DEACTIVATING OPEN WINDOW DETECTION 1 The MAESTRO controller thermostat can detect a drastic drop in tempe rature like an open wind...

Page 33: ...all thermostats connected to the control ler thermostat to prevent the setpoint temperature from being modified directly on these units 1 Access SETTINGS OPTIONS LOCK 2 Under THIS THERMOSTAT select Unlock or Lock The icon will appear to the right of the selected option 3 Under ALL THERMOSTATS select Unlock or Lock The icon will appear to the right of the selected option 4 Tap APPLY to confirm the ...

Page 34: ...controller thermostat displays different types of alerts Alerts generally serve to inform you of a system malfunction that needs to be resolved 1 On the home screen tap or access SETTINGS ALERTS The ALERTS screen will display all active alerts 2 Tap an alert for details Details for an alert include the name of the thermostat in question and advice for solving the problem ...

Page 35: ... ON THE CONTROLLER THERMOSTAT The STELPRO screen displays the following technical information on the controller thermostat NOTE You may need to provide the following information when contacting STELPRO technical support Thermostat Version Zigbee Version Wi Fi Version Produced on yyyy mm dd Control Checksum To access the STELPRO screen go to SETTINGS STELPRO ...

Page 36: ...n page 32 Activating or deactivating proximity sensor on page 32 and Locking and unlocking the controller thermostat screen on page 33 MODIFYING THE DISPLAY LANGUAGE 1 Access SETTINGS OPTIONS LANGUAGE 2 Tap English or Français The icon will appear to the right of the selected option 3 Tap APPLY to save the selection MODIFYING THE TEMPERATURE FORMAT DISPLAY 1 Access SETTINGS OPTIONS TEMPERATURE FOR...

Page 37: ... Tap APPLY to confirm the selection MODIFYING THE LOBBY MODE The Lobby mode is only available if yhe heating mode if Fan Forced Heater and if the open window detection is deactivated 1 Access SETTINGS OPTIONS HEAT MODE 2 If Fan Forced Heater is selected you will have the choice between Standard room or Lobby The icon will appear to the right of the selected option 3 Tap APPLY to confirm the select...

Page 38: ...G THE SCREEN SAVER OPTION The screen saver option allows you to choose the time of inactivity before the display goes off The times options are 1 5 10 and 30 minutes 1 Access SETTINGS OPTIONS SCREEN SAVER 2 Tap the desired time The icon will appear to the right of the selected option 3 Tap APPLY to save the selection SCREENSAVER APPLY 1Minute 5Minutes 10Minutes 30Minutes TIMEFORMAT APPLY 24Hours 1...

Page 39: ...t returns to the home screen ALL SETTINGS WILL BE RESET TO THEIR DEFAULT VALUES AND THE CONNECTION TO THE ZIGBEE AND WI FI NETWORKS WILL BE DELETED THIS ALSO MEANS THAT THE SETPOINT TEMPERATURES GROUPS AND STATUSES ARE RESET TO THEIR INITIAL VALUES AND THAT YOUR THERMOSTATS WILL NO LONGER BE CONNECTED TO YOUR CONTROLLER THERMOSTAT ALL ACTIVITIES CREATED WILL BE DELETED WHEN THE CONTROLLER THERMOST...

Page 40: ...n open window Close the window or deactivate open window detection Overheating equipment The heating system is overheating Inspect your heating system and replace it if malfunctioning This alert also displays if the thermostat is turned off repeatedly Wi Fi not connected The controller thermostat has lost its connection to the Wi Fi network See Connecting the controller thermostat to your Wi Fi ne...

Page 41: ... have entered the correct password The connection may also have failed due to an intermittent Wi Fi network problem Try reconnecting later The iCloud service may also be down In this case the controller thermostat will not be able to connect to the Stelpro cloud Heating is always on even when the setpoint temperature has been reached Make sure the wires of the controller thermostat are properly co...

Page 42: ...twork is deactivated all the thermostats connected to it will disconnect You will need to connect them to the controller thermostat s Zigbee network to control them from the controller thermostat and from the MAESTRO app Depending on their location in the home some thermostats may not disconnect automatically when the Zigbee network is deactivated In this case you must disconnect the thermostat fr...

Page 43: ...unlock keyboard Screen saver Proximity sensor Thermostat Version Zigbee Version Wi Fi Version Produced on yyyy mm dd Control Checksum Add a new thermostat Leave network Scan networks Register device Selected thermostat ACTIVITIES ALERTS GEOFENCING RESET TO DEFAULT OPTIONS STELPRO ZIGBEE SETUP WI FI SETUP GROUP THERMOSTATS Settings for selected thermostat ...

Page 44: ... 24 Hours Heat mode Baseboard Lobby Mode Standard room Open window detection Deactivated Locking Keyboard unlocked Screen saver 1 minute Proximity sensor Activated Geofencing Deactivated Group Only 1 group is defined Central setpoint temperature is 21 0 C 70 F Activities No activity defined Name of controller thermostat MAESTRO_CTRL CONTROLLER THERMOSTAT DEFAULT VALUES ...

Page 45: ... temperature 0 C to 50 C 32 F to 122 F Temperature display increments 0 5 C 1 F Temperature setpoint 5 C to 30 C 41 F to 86 F Temperature setpoint increments 0 5 C 1 F CONNECTIVITY Zigbee IEEE 802 15 4 protocol Wi Fi 802 11 b g n STORAGE AND OPERATING CONDITIONS Storage temperature 40 C to 50 C 40 F to 122 F Operating temperature 20 C to 50 C 4 F to 122 F The efficiency of the LCD screen may decre...

Page 46: ...hand In order for the warranty to be valid the unit must have been installed and used according to instructions If the installer or the user modifies the unit he she will be held responsible for any damage resulting from this modification The warranty is limited to the factory repair or the replacement of the unit and does not cover the cost of disconnection transport and installation Email contac...

Reviews: