

Coupler
Control Cable
to Generator
Adhesive Liner
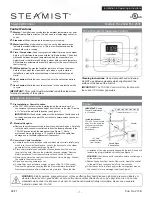
Modular Jacks:
All four modular jacks are
identical and work in
any combination.
Connect to any jack.
¾" Conduit
To Control
E
N
O
C
IL
I
S
R
A
E
L
C
.
Z
O
.
L
F
2 /
1
t
e
N
0
2
5
1
3
.
o
N
m
e t
I
.
A .
S .
U
N I
E
D
A
M
STOP
2
1
2
1
TIME
TEMP
IM
STOP
Steamhead Installation
Steamhead should be mounted
18" above the finished floor or
6" above the rim of the tub as
far from the bather as possible
TSX-220
Auxilary Outside
Control
TSC-250 or TSC, TSC-350
inside control required.
Locate
away from the direct line of
shower spray and do NOT
locate above steamhead.
All Instructions must be given to the homeowner for future use.
06/11
Pub. No. 271-B
- 2 -
IMPORTANT: The adhesive on the back of the TSC-250 control will NOT
seal this control. It is the responsibility of the installer to seal this control to
the wall with the supplied silicone. Water damage to the control is not
covered by the warranty.
Figure 4 - Installation Suggestions
Operating Instructions
Additional Features
Operation: Make sure the water and power are turned on. Simply
press USER 1 or USER 2 keypad to begin the cycle. Pressing the
Stop keypad will cancel the cycle. After a cycle is started it will take a
few minutes for the Steam Generator to heat up and begin producing
steam. This time will be less if the InstaMist has been ON. During
operation the display will show the ambient temperature or the
remaining time. This can be selected by toggling the TIME/TEMP
keypad.
Programming: : Adjustments can be made to the temperature only
while a cycle is started. When the temperature is displayed, the set
temperature can be viewed or changed by momentarily pressing the
up or down keypad. Temperature adjustments made when USER 1
cycle is started will be saved to USER 1 and likewise for USER 2. All
changes made to the temperature control are stored in memory until
changed again. The temperature range is 60°F to 125°F (16°C to
52°C). While a cycle is running the remaining time can be adjusted up
or down. This adjustment is only for the current steam bath cycle. The
default time is programmed when the cycle is off by momentarily
pressing the TIME/TEMP keypad. Any adjustments made at this time
are stored as the new default time for both users.
The InstaMist feature can be selected or deselected while the system
is in the off mode. Simply press the IM keypad and the blue waves will
light to indicate you are in InstaMist mode. InstaMist keeps the
generator warm for a faster heat up.
Memory: The temperature set points for USER 1, USER 2, the default
time, and the selection of InstaMist are retained even if there is a
power failure.
Service Modes: To enter the service mode, in the Off mode press and
hold the TIME/TEMP button. After 3 seconds you are in service mode
and can do one of the following three functions. The service mode will
be indicated by the display of either an F or C (Fahrenheit/Celsius)
indicating the current setting. You must continue to hold the
TIME/TEMP keypad to stay in the service mode.
Service mode 1: While continuing to press the
TIME/TEMP keypad press the up arrow to change to
Fahrenheit or Celsius. The display will show the
current setting “F” or “C”. Let go to save you setting.
Service mode 2: While continuing to hold the
TIME/TEMP button, press and hold the down arrow
for 5 seconds to reset factory defaults. All the display
characters will light for 2 seconds indicating it was
done successfully.
Service Mode 3: While continuing to hold the
TIME/TEMP button press the IM/STOP button and
the program version will be displayed.
Error Messages: This control is programmed with a
diagnostic feature to help isolate any potential
problems. Errors are displayed by flashing an “Er”
followed by a 2 digit number. The first digit is the
device number. Zero for the control and 1-4 for the
generators. The second digit is the error code for that
device. Error messages “Er 01”, “Er 02”, and “Er 04”
indicate a problem internal to the control. If this
occurs, the control should be replaced. Error
messages “Er 03” means the control could not communicate with a
steam generator and may be a cable connection problem. If this error
occurs, check both ends of the control cable for clean, dry and secure
connections. Dirty contacts can be cleaned with alcohol and a cotton
swab or a toothbrush. This can also happen if the control is not sealed
and the cable connections get wet. Also make sure the generator is
not in test mode. Try resetting the breaker. Generator error codes are
not covered in this document.
Figure 2
Figure 3 - Cable Installation on Steam Generator
Installation & Operating Instructions
East Coast Office: 25 E. Union Ave., East Rutherford, NJ 07073 • Tel: 800-577-6478 • Fax: 201-933-0746
West Coast Office: Tel: 800-355-6478 • Fax: 661-940-1617
®


