Pg 2 103-010
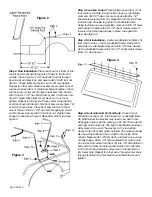
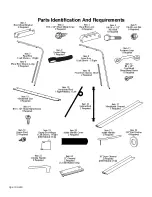
Step 5. Horizontal And Vertical Rods.
Place front of
horizontal rod (Item 15) into bracket on windshield frame.
On M38 models the bracket may need to be bent in at a
90 degree angle to be the same as a CJ-3A. There are left
and right horizontal rods. The right is identified by having a
white mark at one end. The washer on the rod will be
closest to the front bow when installed. The washer should
also be at the bottom of the rod and to the inside of the
vehicle. Measure 30 1/2" from dash and mark a line on top
of body flange. Drill a 1/2" hole centered from side to side.
Put one end of vertical rod (Item 16) into 1/2" hole drilled in
body and the other end into washer welded on horizontal
rod. Pull front bow forward and put rear of horizontal rod
into lower hole. Repeat for other side. Thread center strap
through footman loop mounted on windshield frame and
tighten.
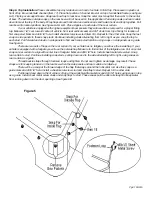
Step 2. Bow Installation.
Place rear bow lock (Item 3) into
rear of bow mount with three sets of holes to the front of
vehicle. Place 1/4-20 x 1 1/2" hex bolts (Itern 4) through
bow mount and bow lock, and secure with 1/4-20 lock nut
(Item 5). These items must pivot, so do not over tighten.
Repeat for other side. Place rear bow covers (Item 6) over
rear bow halves (Item 7). Slide bow halves together. Place
rear bow into center set of holes in rear bow lock. Fasten
with 1/4-20 x 1 1/2" hex bolts (Item 4) and 1/4-20 lock nuts
(Item 5). Again these Items must pivot, so do not over
tighten. Repeat for other side. Place center strap (Item 8)
over front bow half (Item 9). Slip front bow covers (Item 10)
over front bow halves. Place front bow into front of bow
mount. Place 1/4-20 x 1 1/2" hex bolt through bow mount
and front bow. Secure with 1/4-20 lock nut. Tighten only
enough to allow bow to pivot. Repeat for other side. See
figure 3.
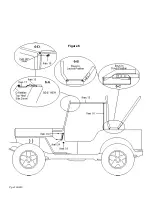
Step 3. Footman Loops.
Place footman loop (Item 11) at
rear corner of vehicle. Using footman loop as a template,
mark and drill 1/8" holes. Secure to body with #8 x 1/2"
sheet metal screws (Item 12). Repeat for other side. Place
footman loop at inside top center of windshield frame.
Using footman loop as a template, mark and drill 1/8" holes
and secure to frame with #8 x 1/2" sheet metal screws. If
there is a footman loop already in place, disregard this
step. See figure 5.
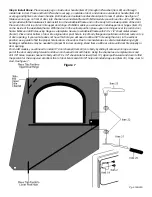
Step 4. Slot Installation.
Center windshield slot (Item 13)
from side to side on top of windshield frame. Using wind-
shield slot as a template mark and drill 1/8” holes. Secure
slot to windshield frame with #10 x 1/2” sheet metal screws
(Item 14). See figure 4.
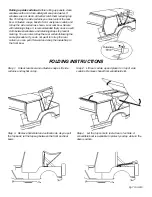
Figure 3
Figure 2
Figure 4
Summary of Contents for 103-01X
Page 4: ...Pg 4 103 010 Figure 6 ...
Page 6: ...Pg 6 103 010 ...


