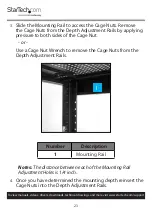
26
To view manuals, videos, drivers, downloads, technical drawings, and more visit www.startech.com/support
Note:
The adjoining rack may have a Baying Bracket screw
already installed in the Baying Screw Hole.
4.
Using a Phillips Head Screwdriver, Loosen the Baying Bracket
Screw holding the Baying Bracket in place.
5.
Turn the Baying bracket enough to align the Baying Bracket
with the Baying Hole.
6.
Insert an M6 Screw, through the Baying Bracket and into the
adjoining rack. Use a Phillips Head Screwdriver to tighten the
M6 Screw.
7.
Retighten the Baying Bracket Screw that was loosened in
step 4.


