background image

6

English

store it in the vertical position in a safe place.
Outside surface of the iron:

Once the iron is unplugged from the 

mains and has completely cooled down, 

wipe the outside surface of the iron with 

a damp cloth and a little mild soap if ne-

cessary. 

NEVER USE HARSH CLEANERS
Soleplate:

Starch and other residue can easily be eli-

minated from the iron soleplate by wiping 

it with a damp cloth.

To avoid scratching the surface, never 

use metal scouring pads to clean the so-

leplate and never place the iron on rough 

surfaces. Ironing synthetic fabrics at very 

high temperatures will generally ruin the 

fabric and also leave remains of melted 

synthetic stuck to the soleplate. The best 

way to remove synthetic residue from the 

soleplate is to heat up the iron and to iron 

an old cotton rag.
PRECAUTION:

Never use a steam iron cleaner to clean 

the iron. It may damage the iron’s opera-

ting parts.
Self-cleaning:

IMPORTANT: Your iron will provide better 

ironing results and last longer if you per-

form self-cleaning once a month or more 

often, depending on usage.

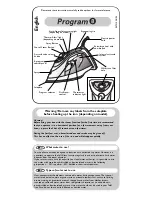
1. Fill the tank (G) halfway with water.

2. Place the iron in the vertical position.

3. Turn the temperature control dial (F) to 

the “MAX” position.

4. Plug in the iron.

5. Preheat the iron until the indicator light 

goes out.

6. Unplug the iron from the mains.

7. Hold the iron in the horizontal position 

over the kitchen sink.

8. Turn the steam control knob (A) to the 

“MAX” position and remove the steam 

needle (K). Boiling water and steam will 

come out of the holes in the soleplate (H).

9. While this is happening, shake the 

iron back and forth and let the water and 

steam come out until the tank (G) is al-

most completely empty.

10. Re-insert Steam Control Assembly 

(A) and Steam Needle (K).

11. Turn the steam control knob (A) back 

to the “0” position.

12. Plug in the iron.

13. Turn the temperature control dial (F) 

to the “MAX” position and let the iron heat 

up again. The water left in the tank (G) will 

now turn into steam and come out of the 

iron through the soleplate (H). We recom-

mend you iron a piece of old cloth during 

this process.
5. TECHNICAL SPECIFICATIONS

-  220-240 V - 50-60 Hz – 2000 - 2400 W

-  Ceramic-coated soleplate

-  Soleplate size: 23.2 x 11.8 cm

-  Steam production: 15~25 g/min

-  Anti-drip function

-  Water tank capacity: 320 ml

-  VDE plug with 1.8 m cable
6. QUALITY WARRANTY

This product is covered by a warranty 

against manufacturing defects subject to 

the time periods stipulated by the legisla-

tion in force in each country.

This warranty does not cover damage 

resulting from inadequate use, negligent 

commercial use, abnormal wear and tear, 

accidents or improper handling.
Australia & New Zealand only

This  product  has  the  benefit  of  certain 

Consumer Guarantees. These are pres-

cribed by the Australian Consumer Law & 

the New Zealand Consumer Guarantees 

Act 1993 both of which provide protec-

tion for consumers. There is no express 

warranty for this product in Australia or 

New Zealand. The above paragraph re-

fers to other countries.

CAUTION

DISPOSAL OF MATERIALS

A symbol of a crossed-out whee-

led  bin  means  you  should  find  out 

about and follow local regulations about 

disposing of this kind of product. Do not 

dispose of this device as you would other 

household waste. Dispose of this product 

in accordance with the corresponding lo-

cal regulations. Electrical and electronic 

appliances contain hazardous substan-

ces that can have harmful effects on the 

environment and/or human health and 

should be recycled properly.
Made in China

Summary of Contents for S0C3X0P4P2

Page 1: ...International patents pending All imitations will be prosecuted Starlyf Cordless Steam Iron is a registered EU CTM trade mark...

Page 2: ......

Page 3: ...the cable to come into contact with hot surfaces Wait for the iron to comple tely cool down before put ting it away Store in a dry place at room temperature preferably in a dry box or container The ir...

Page 4: ...mbol are liable to get hot during use This appliance can be used by children aged from 8 years and above and per sons with reduced physical sensory or mental capabi lities or lack of experience and kn...

Page 5: ...tra moisture It can be used for both dry ironing and steam iro ning Simply press the button C when you want to spray Steam ironing Fill the iron as indicated in the section Filling the steam iron with...

Page 6: ...ank G is al most completely empty 10 Re insert Steam Control Assembly A and Steam Needle K 11 Turn the steam control knob A back to the 0 position 12 Plug in the iron 13 Turn the temperature control d...

Page 7: ...Starlyf Cordless Steam Iron cerci rese de que est apagada No permita que el cable entre en contacto con superficies calientes Espe re a que la plancha se haya enfriado completamente antes de guardarla...

Page 8: ...e utilizar se solamente con la base suministrada La plancha debe utilizar se y apoyarse sobre una su perficie plana y estable No utilice la plancha si ha ca do al suelo si hay signos visibles de da os...

Page 9: ...plancha como agua perfumada porque los tejidos podr an quedar manchados y se podr a da ar la plancha No lle ne el dep sito por encima de la marca MAX Planchado en seco 1 Coloque la plancha en posici n...

Page 10: ...UNCA DETERGENTES AGRESIVOS Suela El almid n y otros residuos se pueden eliminar f cilmente de la suela de la plancha con un pa o h medo Para evitar rayar la superficie no utilice estropajos met licos...

Page 11: ...ierto por una garant a contra defectos de fabricaci n sujeta a los plazos de tiempo estipula dos por la legislaci n vigente en cada pa s Esta garant a no cubre los da os resul tantes de un uso inadecu...

Page 12: ...lisez pas le Starlyf Cordless Steam Iron assurez vous qu il est teint et veillez ce que le c ble n entre pas en contact avec des surfaces chaudes Attendez que le fer ait com pl tement refroidi avant d...

Page 13: ...ss Steam Iron d autres fins que celles sp cifi es dans cette notice Le fer doit uniquement tre utilis avec la base fournie Le fer doit tre utilis et pos sur une surface plane et stable Le fer ne doit...

Page 14: ...oir d eau apr s cha que utilisation Pour cela attendez que le fer ait refroidi ouvrez le couvercle J du r servoir d eau et videz le Remarque Dans la plupart des cas vous pouvez utiliser de l eau du ro...

Page 15: ...er que la semelle soit ray e oxyd e ou tach e 4 Une fois le fer compl tement froid rangez le en lieu s r en position verti cale Surface ext rieure du fer Une fois le fer d branch du secteur et parfait...

Page 16: ...cm D bit de vapeur 15 25 g min Fonction anti goutte Capacit du r servoir d eau 320 ml Fiche VDE avec c ble d une longueur de 1 8 m 6 GARANTIE Ce produit est couvert par une garantie contre les d fauts...

Page 17: ...orgesehenen Zweck Stellen Sie sicher dass das Starlyf Cordless Steam Iron ausgeschal tet ist wenn Sie es nicht benutzen Das Kabel darf keinesfalls mit hei en Oberfl chen in Ber hrung kommen Warten Sie...

Page 18: ...ampf direkt auf Ihren K rper Das B geleisen muss jederzeit auf einer stabilen Oberfl che abgestellt und benutzt werden Beim Abs tellen des B geleisens auf der Station darauf achten dass diese auf eine...

Page 19: ...uf die Position 0 stellen 2 Wasserbeh lterdeckel J ffnen und den Wasserbeh lter bis zur Markierung MAX am Wasserbeh lter G f llen 3 Der Wasserstand kann durch den transparenten Teil des Wasserbeh l te...

Page 20: ...rweise muss der Knopf mehrmals bet tigt werden um die Dampfsto funktion zu aktivieren Warten Sie einige Sekunden ab bis der Dampf in den Stoff eingedrungen ist bevor Sie den Dampfsto Knopf erneut bet...

Page 21: ...A und Dampfnadel K erneut einsetzen 11 Dampfregler A zur ck auf die Posi tion 0 stellen 12 B geleisen an das Stromnetz ans chlie en 13 Temperaturregler F auf die Posi tion MAX stellen und das B gelei...

Page 22: ...zzato assicurarsi che sia spento e non permettere che il cavo entri in contatto con superfici calde Atten dere che il ferro da stiro si raffreddi completamente prima di riporlo Conser vare in un luogo...

Page 23: ...icate nelle presenti istruzioni Il ferro da stiro pu esse re utilizzato solo con la base fornita in dotazione Il ferro da stiro deve es sere utilizzato e appoggiato su una superficie piana e stabile N...

Page 24: ...utilizzo Attendere che il ferro da stiro si raffreddi aprire il coperchio del serbatoio acqua J e versare l acqua Nota Con questo ferro da stiro possibile usa re la maggior parte di acqua di rubinetto...

Page 25: ...re il ferro da stiro con acqua nel serbatoio 3 Attendere che il ferro da stiro si sia ra ffreddato prima di riporlo e appoggiarlo sempre in posizione verticale sulla base per evitare che la piastra si...

Page 26: ...te questa operazione si consiglia di stirare un pezzo di stoffa vecchia 5 SPECIFICHE TECNICHE 220 240 V 50 60 Hz 2000 2400 W Piastra rivestita in ceramica Dimensioni della piastra 23 2 x 11 8 cm Produ...

Page 27: ...Quando n o estiver a utilizar o Starlyf Cordless Steam Iron certifique se de que est desligado e n o permita que o cabo el trico entre em contacto com su perf cies quentes Espere at que o ferro de eng...

Page 28: ...yf Cordless Steam Iron em aplica es n o especifica das nestas instru es O ferro de engomar s deve ser utilizado com a base proporcionada O ferro de engomar deve ser utilizado e apoiado numa superf cie...

Page 29: ...te no dep sito G quando o ferro de engomar estiver na posi o vertical Quando a gua atin gir um n vel baixo encha o dep sito de acordo com os passos indicados nos pontos de 1 a 3 4 Retire a gua do dep...

Page 30: ...e retire a ficha da tomada el trica 2 Esvazie o dep sito para gua depois de cada utiliza o N o guarde o ferro de engomar com gua no dep sito 3 Aguarde at que o ferro de engomar tenha arrefecido antes...

Page 31: ...sair do ferro de engomar atrav s da placa de base H Recomendamos que passe um te cido velho durante este processo 5 ESPECIFICA ES T CNICAS 220 240 V 50 60 Hz 2000 2400 W Placa de base com revestiment...

Page 32: ...on uit wanneer het niet in gebruik is en zorg ervoor dat de ka bel niet in contact komt met hete oppervlakken Wacht totdat het strijkijzer volledig is afgekoeld voordat u het opbergt Bewaar het op een...

Page 33: ...g alleen met de meegeleverde houder worden gebruikt Het strijkijzer moet wor den gebruikt op een vlak stabiel oppervlak Het strijkijzer mag niet worden gebruikt als het ge vallen is als er zichtbare t...

Page 34: ...toe aan het water en gebruik in het stoom strijkijzer geen speciaal water zoals lin nenwater of geparfumeerd water want dat kan vlekken veroorzaken op de kle ding en het strijkijzer beschadigen Vul h...

Page 35: ...volledig afkoelen Veeg de buitenkant van het strijkijzer af met een vochtige doek en indien nodig wat milde zeep GEBRUIK NOOITBIJTENDE SCHOON MAAKMIDDELEN Zool Stijfsel en andere resten zijn gemakkeli...

Page 36: ...oduct geldt een garantie tegen fabrieksfouten gedurende een periode die in de wetgeving van het betreffende land is vastgelegd Onder de garantie valt niet de schade die het gevolg is van verkeerd of n...

Page 37: ......

Page 38: ......

Page 39: ......

Page 40: ...40...

Reviews: