background image


3


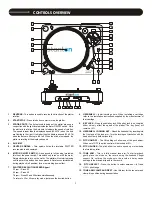
1. REVERSE 

This button is used to reverse the direction of the platter 

rotation. 

2. START/STOP 

Press this button to start or stop the platter. 

3. 

STROBE DOTS - 

The dots around the edge of the platter are used in 

conjunction with the light located inside the motor ON/OFF switch. While 
the platter is in rotation, the dots help to indicate the speed of rotation. 
The speed is lower than the displayed speed (33,45,78) when the dots 
are flowing to the right. It is higher than the displayed speed (33,45,78) 
when the dots are flowing to the left. When the strobe is stopped, the 
platter is rotating at the displayed speed. 

4. SLIP 

MAT 

5.  CENTER SPINDLE - 

This spindle holds the turntable PLATTER 

records stable and centered. 

6. 

MOTOR ON/OFF SWITCH - 

As opposed to fully analog turntables, 

this is not the power switch. This switch only turns on or off the motor. 
Rotate clockwise to turn on the motor. The platter will not start spinning 
until the start/ top button has been pressed. Rotate counterclockwise 
during playback (off position) for a slow winding down effect.


7. 

PLATTER REVOLUTION SPEEDS (rpm)   

33 rpm – Press 33 
45 rpm – Press 45 
78 rpm – Press 33 and 45 buttons simultaneously. 
To return to 33 or 45-rpm play mode, just press the desired button. 

8. HEADSHELL 

Install cartridge here. When installing a cartridge, 

refer to the installation instructions supplied by the manufacturer of 
that cartridge


9. 

KEY LOCK - 

Press to enable key lock. When key lock is on, the pitch 

slider will only affect the speed of the platter. The key (tone) will 
remain at 0%. 

10.  HEADSHELL LOCKING NUT


-

 Attach the headshell by inserting into 

the front end of the tone arm. Turn the locking nut clockwise with the 
head shell firmly held horizontally.


11.  PITCH ON/OFF - 

The ON setting will allow use of the pitch adjust. 

When set of OFF, the pitch control will be locked at 0%. 

12.  PITCH SLIDER - 

The pitch slider is used to speed up or slow down 

the turntable platter. 

13. TONE ARM - 

This is a fully manual tone arm. To start playback, 

gently place the stylus on the record using the headshell finger 
support. Do not drop the stylus onto the record as it may cause 
damage to the diamond tip and to the record. 

14. 


PITCH SELECT - 

Press the button to select b/-8% and 

+/-12% pitch range. 

15.  TONE ARM CLAMP AND REST - 

Use this rest for the tone arm and 

clamp it in position during transportation.


CONTROLS OVERVIEW                                                                       

21 22 23

25 26

T. 90  U S B

3

4

5

6

2

7

11

13

18

19

20

8

12

17

1

2

14

24

9

10

15

16

Summary of Contents for T.90 USB

Page 1: ...T 90 USB USER MANUAL DIRECT DRIVE TURNTABLE T 90 USB ...

Page 2: ......

Page 3: ... that described in the operating instructions All other servicing should be referred to qualified service personnel 17 Ventilation Slots and openings in the cabinet are provided for ventilation and to ensure reliable operation of the product and to protect it from overheating and these openings must not be blocked or covered The openings should never be blocked by placing the product on a bed sofa...

Page 4: ... the headshell tone arm when viewed from the front to the back The second adjustment is at the installation of the cartridge head shell assembly into the tone arm tube lock Holding the tone arm tube in one hand insert the cartridge headshell into the tube lock with the other hand Turn the lock ring clockwise when viewed from the rear until the headshell is locked tightly into the tone arm Remove t...

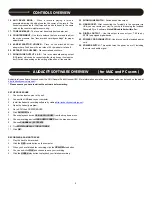
Page 5: ...s 45 78 rpm Press 33 and 45 buttons simultaneously To return to 33 or 45 rpm play mode just press the desired button 8 HEADSHELL Install cartridge here When installing a cartridge refer to the installation instructions supplied by the manufacturer of that cartridge 9 KEY LOCK Press to enable key lock When key lock is on the pitch slider will only affect the speed of the platter The key tone will r...

Page 6: ...ect your T 90 to any SPDIF in equipped digital device 25 POWER CORD CONNECTOR Used to connect the included power cord 26 POWER SWITCH This switch turns the power on or off including the motor and audio signal Audacity is free software licensed under the GNU General Public License GPL More information as well as open source code can be found on the web at http audacity sourceforge net Please ensure...

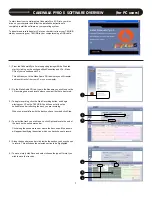
Page 7: ...On the Make Audio CD tab type in the filename you wish to save the LP recording under and locate where you want the file to be stored 3 To begin recording click the Start Recording button and begin playing your LP on the T 90 USB You will see activity on the sound waves bar reflecting the track you are recording When you are satisfied with the track you have recorded click Stop 4 To select the tra...

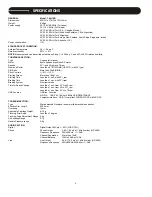
Page 8: ...tarting Time Less than 1 sec with 33 1 3 rpm Braking Time Less than 1 sec with 33 1 3 rpm Braking System Electronic brake Time for Speed Change Less than 1 sec from 33 1 3 to 45 rpm Less than 1 sec from 45 to 33 1 3 rpm Less than 1 sec from 33 1 3 to 78 rpm USB Function USB rec Function A D D A 16BIT 44 1KHz or 48KHz USB SELECTABLE Computer interface USB 1 1compliant WINDOWS XP or MAC OSX TONEARM ...

Page 9: ...7 NOTE ...

Page 10: ...y in which the merchandise was received Any returns to a non authorized dealer or to an authorized Stanton dealer not in the same country as the merchandise was intended to be sold or as set forth above will void this warranty To initiate a warranty repair you must contact the authorized Stanton dealer from whom you purchased the merchandise and follow such authorized Stanton dealer s return polic...

Page 11: ......

Page 12: ......
Reviews: