Stanley STGB3715 Manual Download Page 7

7

ENGLISH

(Original instructions)

7.   Electrical safety

Warning!

 If the power cord is damaged, it must 

be replaced by the manufacturer, authorized 

STANLEY Service Center or an equally qualified 

person in order to avoid damage or injury. If the power cord 

is replaced by an equally qualified person, but not 

authorized by STANLEY, the warranty will not be valid.

Bench Mounting

1.  The grinder should be unplugged.

2.  Position grinder on workbench. Check for the availability 

of power for the grinder. Mark location of holes for 

drilling.

3.  Drill appropriate sized holes.

4.  Insert 1/4” (6mm) Hex head bolts through washers and 

the holes. You may want to use washers on the 

underside of the bench as well.

5.  Tighten the nuts. Do not overtighten. Allow the rubber 

feet to absorb the vibration when the grinder is running.

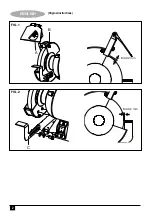
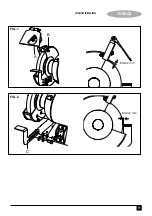
Installing eye shields and mounting of spark guard

(Fig. 1)

Turn off tool and disconnect from power supply.

 Adjust 

the eye shields so they are between the wheels and your 

eyes.

Note: Eye shields are not designed to replace safety 

glasses.

•  Mounting of spark guard

-  loosen screw B (do not remove it)

  ! regularly check the distance between spark guard A  

  and the grinding wheel (max. 2 mm) and re-adjust, if  

  necessary

-  replace the grinding wheel, if it is worn down to the point 

   where spark guard A can no longer be adjusted to the  

  maximum distance of 2 mm

Installing tool rests (Fig. 2)

Turn off power and disconnect from power supply.

 Use 

the bolts, washers, spacers and lock nuts from the plastic 

bag to secure the brackets and tool rests in place.

Caution:

 Use the washers and screws supplied. 

Longer screws may interfere with the movement 

of the grinding wheel.

! regularly check the distance between tool rest C and the 

grinding wheel (max. 2 mm) and re-adjust, if necessary

•  Mounting tool on working surface

Operation

Never use a bench grinder if it is not firmly fastened to a 

work bench or rigid frame.

 Before turning the grinder on, 

put on safety glasses. Turn on the grinder and allow it to 

reach full speed ( 2950 /min) . Hold the workpiece firmly and 

against the tool rest. Hold very small pieces with pliers or 

other suitable clamps. Feed the work smoothly and evenly 

into the grinding wheel. Move the work slowly and avoid 

jamming the work against the wheel. As the wheel tends to 

slow down you should occasionally release the pressure to 

let the wheel return to full speed.

Grind only on the face of the grinding wheel and never on 

the side. (Some wheels are designed for side grinding and 

will say so on their instruction sheets).

Caution:

 Prolonged grinding will cause most 

materials to become hot. Handle them with 

pliers.

Switch

The switch is located on the front of the grinder, on the base. 

To turn the tool on depress the side of the rocker switch on 

the right side, marked “1”. To turn off the grinder, depress the 

left side of the rocker switch, marked “ O ”.

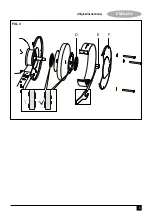
Changing Accessories

Turn off the tool and disconnect from power supply. Use only 

wheels that measure 152mm in diameter. This tool has 

13mm arbors on both sides. Follow the steps below to 

remove and replace an accessory. 

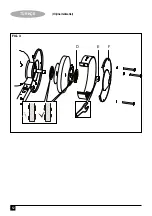
Replacing grinding wheels (FIG.3)

! disconnect the plug

! use only grinding wheels with an allowable speed

Summary of Contents for STGB3715

Page 1: ...STGB3715 English Page 3 Turkish Page 11 ...

Page 2: ...ENGLISH 2 Original instructions FIG 1 FIG 2 C MAX 2 mm MAX 2 mm B A ...

Page 3: ...3 ENGLISH Original instructions FIG 3 D E F ...

Page 4: ...hock d Do not abuse the cord Never use the cord for carrying pulling or unplugging the power tool Keep cord away from heat oil sharp edges or moving parts Damaged or entangled cords increase the risk of electric shock e When operating a power tool outdoors use an extension cord suitable for outdoor use Use of a cord suitable for outdoor use reduces the risk of electric shock f If operating a power...

Page 5: ...ed repair person using only identical replacement parts This will ensure that the safety of the power tool is mainta Additional Safety Rules For Bench Grinders Always use proper guard with grinding wheel A guard protects operator from broken wheel fragments Accessories must be rated for at least the speed recommended on the tool warning label Wheels and other accessories running over the rated spe...

Page 6: ...ssure on work piece grinding wheels will return running Lifting and transportation Stop and disconnect machine Use two hands to lift up machine from two sides of bottom of bearing housing The work piece should be suitable for opening size between wheels and plate The machine is designed and manufactured exclusively for grinding metals using properly authorized grinding wheels The grinding machine ...

Page 7: ...tic bag to secure the brackets and tool rests in place Caution Use the washers and screws supplied Longer screws may interfere with the movement of the grinding wheel regularly check the distance between tool rest C and the grinding wheel max 2 mm and re adjust if necessary Mounting tool on working surface Operation Never use a bench grinder if it is not firmly fastened to a work bench or rigid fra...

Page 8: ...ed cleaner Cleaning Blowing dust and grit out of the wheel guards using compressed air is a necessary regular maintenance procedure Dust and grit containing metal particles often accumulate on interior surfaces and could create an electrical shock hazard if not frequently cleaned out ALWAYS WEAR SAFETY GLASSES Caution Never use solvents or other harsh chemicals for cleaning the non metallic parts ...

Page 9: ...dispose of it with household waste Make this product available for separate collection Separate collection of used products and packaging allows materials to be recycled and used again Re use of recycled materials helps prevent environmental pollution and reduces the demand for raw materials Local regulations may provide for separate collection of electrical products from the household at municipa...

Page 10: ...h the instruction manual The product has been subject to fair wear and tear Repairs have not been attempted by unauthorised persons Proof of purchase is produced The STANLEY product is returned complete with all original components If you wish to make a claim contact your seller or check the location of your nearest authorised STANLEY repair agent in the STANLEY catalogue or contact your local STA...

Page 11: ...11 TÜRKÇE Orijinal talimatlar FIG 1 FIG 2 C MAX 2 mm MAX 2 mm B A ...

Page 12: ...12 TÜRKÇE Orijinal talimatlar FIG 3 D E F ...

Page 13: ...riskini arttıracaktır Elektrik kablosunu uygun olmayan amaçlarla kullanmayın Elektrikli aleti kesinlikle kablosundan tutarak taşımayın çekmeyin veya prizden çıkartmayın Kabloyu sıcaktan yağdan keskin kenarlardan veya hareketli parçalardan uzak tutun Hasarlı veya dolaşmış kablolar elektrik çarpması riskini arttırır Elektrikli bir aleti açık havada çalıştırıyorsanız açık havada kullanıma uygun bir u...

Page 14: ...tinizi sadece orijinal yedek parçaların kullanıldığı yetkili servise tamir ettirin Bu elektrikli aletin güvenliğinin muhafaza edilmesini sağlayacaktır Taş motorları için ek güvenlik talimatları Taşlama diski ile daima uygun koruyucu siperliği veya kalkanı kullanın Siperlik veya kalkan kullanıcının kırılan disk parçacıklarından korunmasına yardımcı olur Aksesuarlar aletin uyarı etiketinde tavsiye e...

Page 15: ...anan baskıyı azaltın ve taşlama diskleri yeniden dönmeye başlayacaktır Kaldırma ve taşıma Aleti durdurun ve yerinden sökün Aleti rulman gövdesini alttan iki taraftan ve iki elinizi de kullanarak kaldırın Iş parçası diskler ve taban arasındaki boyut açılması için uygun olmalıdır Alet usulüne uygun olarak üretilmiş taşlama disklerini kullanarak metal zımparalama için özel olarak tasarlanmış ve üreti...

Page 16: ...ı ve vidaları kullanın Daha uzun vidalar taşlama diskin dönmesine engel olabilir İş parçası desteği C ve taşlama diski arasındaki mesafeyi düzenli olarak kontrol edin maks 2mm gerekirse ayarlama yapın İş parçasını çalışma alanında yerleştirin Kullanım Sıkıca bir tezgah ya da sert çerçeveye sabitlenmiş değilse bir taş motorunu asla kullanmayın Taş motorunu çalıştırmadan önce koruyucu gözlük takın T...

Page 17: ...nın dışında kalarak aletin en az 5 dakika süre ile yüksüz çalışmasına izin verin Bakım Aletiniz minimum bakımla uzun bir süre çalışacak şekilde tasarlanmıştır Kesintisiz olarak memnuniyet verici bir şekilde çalışması gerekli özenin gösterilmesine ve düzenli temizliğe bağlıdır Uyarı Bakımdan önce aletin kapalı ve fişinin çekilmiş olduğundan emin olun Aletinizdeki havalandırma deliklerini yumuşak bir...

Page 18: ...ın Bu ürünü ayrı olarak toplanacak şekilde atın Kullanılmış ürünlerin ve ambalajların ayrı olarak toplanması bu maddelerin geri dönüşüme sokularak yeniden kullanılmasına olanak tanır Geri dönüşümlü maddelerin tekrar kullanılması çevre kirliliğinin önlenmesine yardımcı olur ve ham madde ihtiyacını azaltır Yerel yönetmelikler elektrikli ürünlerin evlerden toplanıp belediye atık tesislerine aktarılma...

Page 19: ...r Ürün yıpranmamış hırpalanmamış ve aşınmamıştır Yetkili olmayan kişilerce tamire çalışılmamıştır Satın alma belgesi fatura ibraz edilmiştir STANLEY ürünü tüm orijinal parçaları ile birlikte iade edilmiştir Garanti talebinde bulunmak için lütfen satıcıyla irtibata geçin veya STANLEY katalogunda belirtilen size en yakın STANLEY yetkili satıcı adresini kontrol edin veya ürünün kılavuzunda belirtilen...

Page 20: ... tebliğince kullanım ömrü 7 yıldır Türkiye Distribütörü STANLEY BLACK DECKER TURKEY ALET URETIM SAN TIC LTD STI Kozyatağı Mh Değirmen Sk Nida Kule No 18 Kat 6 34742 Kadıköy İstanbul Tel 0216 665 29 00 Faks 0216 665 29 01 E posta ...

Reviews: