


13
简体中文
组装
警告!
组装之前,请从工具上移除电池,并确保锯
片已停止。用过的锯片可能会发热。
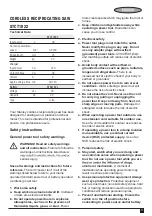
安装锯片(图
C
)
u
握住工具,使其与身体保持一定距离,然后按照
图
C
所示的方向旋转锯片夹具轴环
(5)
。
u
将锯片
(9)
柄完全插入锯片夹具轴环
(5)
。
u
松开锯片夹具轴环
(5)
以将锯片锁定到位。
注:
安装锯片时可将锯齿朝上以协助齐平切割。
拆除锯片(图
C
)
警告!
灼伤危险:使用工具后请勿马上去触摸锯
片。接触锯片可能导致人身伤害。
u
将锯片夹具轴环
(5)
旋转到释放位置。
u
拆除锯片
(9)
锁止按钮
本工具配有锁止开关以防止意外操作。
u
锁定:将锁止按钮
(2)
推到锁定位置。
u
解锁:将锁止按钮
(2)
推到解锁位置。
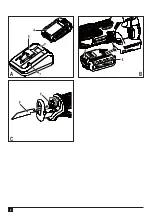
安装及取出电池(图
B
)
u
要安装电池
(4)
,请将它与工具上的插座对齐。
将电池滑入插座,然后推动直到电池卡入定位。
u
要取出电池,请按下释放按钮
(8)
,同时将电池
从插座中拉出。
使用
警告!
请让工具在自有速度下工作。切勿过载。
为电池充电(图
A
)
电池在首次使用之前,以及无法像从前一样对工作
轻松提供足够的电量时,都需要充电。电池在充电
时可能会变热;这是正常现象,而且并不表示出现
问题。
警告!
请勿在环境温度低于
10
°
C
或高于
40
°
C
的情
况下为电池充电。建议的充电温度大约
24
°
C
。
注:
如果电池温度低于
约
0
°
C
或高于
40
°
C
,则充电器不会为电池充电。
电池应留在充电器内,充电器会在电池温度升高或
降低到合适温度时自动开始充电。
u
要为电池
(4)
充电,请将电池插入充电器
(6)
。
电池只能以一种方式插入充电器。请勿用力过
猛。确保电池在充电器中完全到位。
u
插入充电器并打开电源。
充电指示灯
(7)
将闪烁绿色(缓慢)。充电指示灯
(7)
常亮绿色时表示充电完成。充电器可以和电池长
期连接,此时
LED
指示灯常亮。在充电器不时为电
池充电时,
LED
指示灯会变成闪烁绿色(充电中)
状态。只要设备连接插接电源的充电器,充电指示
灯
(7)
就会亮起。
u
当电池电力耗尽时,请在
1
周内进行充电。在电
力耗尽状态下保存会大大缩短电池寿命。
将电池留在充电器中
充电器可以和电池组长期连接,此时
LED
指示灯常
亮。充电器会减少电池损耗,保持电量充满。
充电器故障诊断
充电器检测到脆弱或损坏的电池时,充电指示灯
(7)
会快速闪烁红色。请按以下步骤操作:
u
重新插入电池
(4)
。如果充电指示灯仍然快速闪
烁红色,请使用其他电池确定充电过程是否正常
工作。
u
如果更换电池后可以正常充电,则原电池有缺
陷,应送返服务中心进行回收处理。
u
如果更换电池后,指示灯仍然和原电池一样,则
将充电器送至授权的服务中心进行测试。
注:
可能需要
60
分钟才能确定电池是否存在缺
陷。如果电池太热或太冷,则
LED
会闪烁红色,闪
烁频率为一快一慢相互交替。
开启和关闭
变速开关提供多种转速选择,可极大地提高各种材
料的切割速率。
Summary of Contents for STCT1822
Page 1: ...STCT1822 English 3 10...
Page 2: ...2 C B A...
Page 11: ...11 5 6 7 d 1 2 3 4 5 6 7 e 1 2 3 4 f 1 u u u u u u u u...
Page 12: ...12 u u u u u u u u u u 40 C u 10 C 40 C u u p u Stanley u u u u u u Stanley 1 2 3 4 5 A 6 7...
Page 14: ...14 u 1 u 1 u u u u 3 u u 3 u u u u u u u u 3 u 3 25 u u u u 3 u Stanley 30 Stanley u u u...
Page 15: ...15 u u u u Stanley Z Stanley Stanley Stanley Stanley u Stanley u u u Stanley...
Page 16: ...N529462 08 2018...


