background image

(Original instructions)

 ENGLISH

7

•   Never  force  battery  pack  into  charger.  Do  not  modify 

battery  pack  in  any  way  to  fit  into  a  non-compatible 

charger  as  battery  pack  may  rupture  causing  serious 

personal injury.

•   Charge the battery packs only in STANLEY chargers.
•   DO NOT splash or immerse in water or other liquids.
•   Do not store or use the tool and battery pack in locations 

where the temperature may reach or exceed 40 ˚C (105 

˚F) (such as outside sheds or metal buildings in summer).

WARNING: 

Never  attempt  to  open  the  battery 

pack  for  any  reason.  If  battery  pack  case  is 

cracked or damaged, do not insert into charger. Do 

not  crush,  drop  or  damage  battery  pack.  Do  not 

use a battery pack or charger that has received a sharp blow, 

been dropped, run over or damaged in any way (i.e., pierced 

with a nail, hit with a hammer, stepped on). Electric shock or 

electrocution  may  result.  Damaged  battery  packs  should  be 

returned to service centre for recycling. 

CAUTION:

 When not in use, place tool on its side 

on a stable surface where it will not cause a tripping 

or  falling  hazard.  Some  tools  with  large  battery 

packs will stand upright on the battery pack but may 

be easily knocked over.

Specific safety instructions for lithium ion (LI-Ion)

•   Do  not  incinerate  the  battery  pack  even  if  it  is  severely 

damaged or is completely worn out. The battery pack can 

explode  in  a  fire. Toxic  fumes  and  materials  are  created 

when lithium ion battery packs are burned.

•   If  battery  contents  come  into  contact  with  the  skin, 

immediately wash area with mild soap and water. If battery 

liquid gets into the eye, rinse water over the open eye for 

15 minutes or until irritation ceases. If medical attention is 

needed, the battery electrolyte is composed of a mixture of 

liquid organic carbonates and lithium salts.

•   Contents  of  opened  battery  cells  may  cause  respiratory 

irritation.  Provide  fresh  air.  If  symptoms  persists,  seek 

medical attention. 

WARNING:

  Burn  hazard.  Battery  liquid  may  be 

flammable if exposed to spark or flame.

Transportation

STANLEY  batteries  comply  with  all  applicable  shipping 

regulations  as  prescribed  by  industry  and  legal  standards 

which  include  UN  Recommendations  on  the  Transport  of 

Dangerous  Goods;  International  Air  Transport  Association 

(IATA) Dangerous Goods Regulations, International Maritime 

Dangerous Goods (IMDG) Regulations, and the European 

Agreement  Concerning  The  International  Carriage  of 

Dangerous  Goods  by  Road  (ADR).  Lithium-ion  cells  and 

batteries  have  been  tested  to  section  38.3  of  the  UN 

Recommendations  on  the  Transport  of  Dangerous  Goods 

Manual  of  Tests  and  Criteria.  In  most  instances,  shipping  a 

STANLEY battery pack will be excepted from being classified 

as a fully regulated Class 9 Hazardous material. In general, 

the two instances that require shipping Class 9 are:
1.   Air  shipping  more  than  two  STANLEY  lithium-ion  battery 

packs when the package contains only battery packs (no 

tools), and

2.   Any  shipment  containing  a  lithium-ion  battery  with  an 

energy  rating  greater  than  100  watt  hours  (Wh).  All 

lithiumion  batteries  have  the  watt  hour  rating  marked  on 

the pack. 

Regardless of whether a shipment is considered excepted or 

fully regulated, it is the shipper's responsibility to consult the 

latest  regulations  for  packaging,  labeling/marking  and 

documentation requirements.
Transporting  batteries  can  possibly  cause  fire  if  the  battery 

terminals  inadvertently  come  in  contact  with  conductive 

materials.  When  transporting  batteries,  make  sure  that  the 

battery  terminals  are  protected  and  well  insulated  from 

materials that could contact them and cause a short circuit. 
The  information  provided  in  this  section  of  the  manual  is 

provided in good faith and believed to be accurate at the time 

the document was created. However, no warranty, expressed 

or implied, is given. It is the buyer’s responsibility to ensure 

that its activities comply with the applicable regulations.

Battery pack

Battery type

The SCH12 operates on a 10.8V battery pack

Storage recommendations

1.   The best storage place is one that is cool and dry away 

from direct sunlight and excess heat or cold. For optimum 

battery performance and life, store battery packs at room 

temperature when not in use.

2.   For long storage, it is recommended to store a fully 

charged battery pack in a cool, dry place out of the 

charger for optimal results.

NOTE:

 Battery packs should not be stored completely 

depleted of charge. The battery pack will need to be 

recharged before use.

Summary of Contents for SCH12S2K

Page 1: ...English Page 04 French Page 13 Russian Page 22 Ukrainian Page 34 Turkish Page 46 Page 63 SCH12S2K...

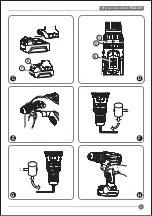
Page 2: ...ENGLISH Original instructions 2 5 8 2 1 6 7 11 3 9 4 7 10 A B...

Page 3: ...Original instructions ENGLISH 3 6 7 3 9 4 C D E F G H...

Page 4: ...rting Ensure the switch is in the off position before connecting to power source and or battery pack picking up or carrying the tool Carrying power tools with your nger on the switch or energising pow...

Page 5: ...g as it may be hot The intended use is described in this instruction manual The use of any accessory or attachment or performance of any operation with this tool other than those recommended in this i...

Page 6: ...n of charge will be indicated by the red light remaining ON continuously The pack is fully charged and may be used at this time or left in the charger NOTE To ensure maximum performance and life of Li...

Page 7: ...include UN Recommendations on the Transport of Dangerous Goods International Air Transport Association IATA Dangerous Goods Regulations International Maritime Dangerous Goods IMDG Regulations and the...

Page 8: ...idental start up can cause injury NOTE Make sure your battery pack 7 is fully charged To install the battery pack into the tool handle 1 Align the battery pack with the rails inside the handle 2 Slide...

Page 9: ...e WARNING Do not attempt to tighten drill bits or any other accessory by gripping the front part of the chuck and turning the tool on Damage to the chuck and personal injury may result Always lock off...

Page 10: ...proper position of the clutch collar Maximum recommended capacities MAINTENANCE Your STANLEY power tool has been designed to operate over a long period of time with a minimum of maintenance Continuou...

Page 11: ...hnical advice repair or genuine factory replacement parts contact the STANLEY location nearest you TECHNICAL DATA Technical data Voltage VDC 10 8 No load speed min 1 0 400 0 1500 Impact rate min 1 0 6...

Page 12: ...anship within 24 months from the date of purchase STANLEY guarantees to replace all defective parts free of charge or at our discretion replace the unit free of charge provided that The product has no...

Page 13: ...cialement pr vue cet effet L usage d une rallonge adapt e l utilisation en ext rieur r duit le risque de choc lectrique f Habillez vous correctement Ne portez pas de v tements amples ou de bijoux Gard...

Page 14: ...ie d Dans des conditions d utilisation excessive du liquide peut s couler de la batterie dans ce cas veuillez viter tout contact En cas de contact accidentel rincez la partie touch e avec de l eau Si...

Page 15: ...votre batterie uniquement des temp ratures ambiantes comprises entre 10 C et 40 C Chargez uniquement la batterie l aide du chargeur fourni avec l outil Lors de la mise au rebut des batteries respectez...

Page 16: ...s curit ci apr s Suivez ensuite les proc dures de charge d crites LISEZ TOUTES LES CONSIGNES Ne chargez pas ou n utilisez pas la batterie dans des atmosph res explosives par exemple en pr sence de li...

Page 17: ...qu e sur toutes les batteries au lithium ion Que le transport soit trait selon les r glementations ou en soit exempt il en va de la responsabilit de l exp diteur de consulter les r glementations les p...

Page 18: ...nt de proc der tout r glage ou de changer retirer des accessoires Position correcte des mains Fig A H AVERTISSEMENT A n de r duire le risque de blessure positionnez TOUJOURS vos mains tel qu indiqu su...

Page 19: ...engager la t te de la vis Retirez la vis en tournant dans le sens horaire extr mit gauche Placez la cl exagonale dans le mandrin et serrez tel qu illustr sur l image F Utilisez un marteau en bois ou...

Page 20: ...maximum recommand e ENTRETIEN Votre outil STANLEY a t con u pour fonctionner pendant longtemps avec un minimum d entretien Un fonctionnement continu satisfaisant d pend d un nettoyage r gulier et d un...

Page 21: ...outils lectriques Pour en savoir plus sur nos centres de r paration agr s et en cas de besoin de conseils techniques de r paration ou de pi ces rechange d origine contactez le concessionnaire STANLEY...

Page 22: ...22 STANLEY SCH12S2K 10 8 Li Ion 1 a b c 2 a b c d e f 3 a b c d e...

Page 23: ...23 f g h 4 a b c d e f g h 5 a b c d 6 a...

Page 24: ...24 STANLEY 40 10 40...

Page 25: ...25 STANLEY 2017 XX JN 1 1 2 2 1 1 1 N 1 2 3 4 5 6 7 8 9 B 1 10 2 7 3 Li Ion...

Page 26: ...26 Li Ion Li Ion T STANLEY 40 Li ION 15 STANLEY IATA IMDG ADR 38 3 STANLEY 9 9 1 STANLEY...

Page 27: ...27 2 100 SCH12 10 8 1 2 A A A 4 40 V STANLEY STANLEY STANLEY H STANLEY C 100 100 SC121...

Page 28: ...28 7 1 2 1 6 2 9 A 1 2 3 8 D 3 A D 2...

Page 29: ...29 4 4 E 1 2 3 19 2 F 1 6 35 1 4 F G 6 36 1 4...

Page 30: ...30 D 1 9 2 3 4 5 STANLEY 6 00 mm...

Page 31: ...NLEY STANLEY STANLEY STANLEY www 2helpU com STANLEY Li Ion NiCd NiMH STANLEY STANLEY STANLEY STANLEY STANLEY 10 8 0 400 0 1500 0 6000 0 22500 26 10 20 10 8 220 240 22 1 25 70 1 5Ah SC121 SCH12S SB12S...

Page 32: ...32 1 STANLEY 2 3 24 5 4 STANLEY www 2helpU com 5 6 7 7 1 7 2 7 3 7 4 7 5 8 8 1 8 2 8 3 8 4 65510 40...

Page 33: ...CH20 STCH1200B2 STCH12 STCH20 STDC18HBK STDC18LHB SCI12 STCI1081 STCI1200 STCI12 STCI1440 STDC041 SCS12 5 Z 0 9 01 05 09 13 17 22 26 31 35 39 44 48 02 06 10 14 18 23 27 32 36 40 45 49 03 07 11 15 19 2...

Page 34: ...34 STANLEY SCH12S2K 10 8 1 a b c 2 a b c d e f 3 a b c d e f...

Page 35: ...35 g h 4 a b c d e f g h 5 a b c d 6 a...

Page 36: ...36 STANLEY 40 C 10 C 40 C...

Page 37: ...37 STANLEY 2017 XX JN 1 1 2 2 1 1 1 N 1 2 3 4 5 6 7 8 9 B 1 10 2 7 3...

Page 38: ...38 40 105 F 15...

Page 39: ...39 IATA International Air Transport Association IMDG ADR 38 3 9 9 1 2 100 SCD12 10 8 1 2 4 C 40 C 100 100...

Page 40: ...40 7 1 2 1 6 2 9 A 1 2 8 3 SC121...

Page 41: ...41 D 3 A d 4 E 1 2 3 19 3 4 2 F 1 6 35 1 4 TORX 6 35 1 4 G 6 35 1 4...

Page 42: ...42 HHS D 1 9 2 3 4 5 STANLEY 6 00 mm...

Page 43: ...43 STANLEY STANLEY STANLEY STANLEY www 2helpU com STANLEY STANLEY SCH12S 10 8 1 0 400 0 1500 1 0 6000 0 22500 26 10 20 10 8...

Page 44: ...SC121 220 240 22 1 25 SB12S 10 8 1 5 Li Ion 44...

Page 45: ...45 1 STANLEY 2 3 24 5 4 STANLEY www 2helpU com 5 6 7 7 1 7 2 7 3 7 4 7 5 8 8 1 8 2 8 3 8 4 Stanley Black Decker Deutschland GmbH Black Decker Str 40 D 65510 Idstein...

Page 46: ...kkatsizlik ciddi ki isel yaralanmayla sonu lanabilir b Ki isel koruyucu ekipmanlar mutlaka kullan n Daima koruyucu g zl k tak n Ko ullara uygun toz maskesi kaymayan g venlik ayakkab lar baret veya kul...

Page 47: ...eden olabilir Ba lant par as n n gizli kablolara temas edebilece i yerlerde al ma yaparken elektrikli aleti yal t ml kavrama y zeylerinden tutun Ba lant par alar n n ak m ta yan bir kabloya temas etme...

Page 48: ...k S1 1 Kullan m k lavuzu NOT N modelleriyle birlikte ak ve arj cihaz verilmemekte dir Alette par alarda veya aksesuarlarda nakliye s ras nda meydana gelmi olabilecek hasar kontrol edin Aleti al t rmad...

Page 49: ...um yolunu tahri edebilir Ortama temiz hava girmesini sa lay n Belirtiler ge mezse t bbi yard m al n UYARI Yanma tehlikesi Ak s v s k v lc ma veya ate e maruz kal rsa yan c olabilir Nakliyat STANLEY ak...

Page 50: ...lan n UYARI Ciddi yaralanma riskini azaltmak i in ani tepki ihtimaline kar aleti DA MA s k ca tutun Do ru el pozisyonu bir elin ana kol 9 zerinde oldu u konumdur A ma kapama teti i ekil A Aleti a mak...

Page 51: ...i kadar a lana kadar saatin ters y n nde evirin 3 Ucu yakla k 19 mm mandren i ine sokun ve bir elinizle aleti tutarken di er elinizle mandreni saat y n nde evirerek s k n Aletiniz bir mil kilidi mekan...

Page 52: ...s mandal n kullan n stedi iniz sabitleyici aksesuar n herhangi bir matkap ucunu takt n z gibi mandrene tak n Tork ayarlama bilezi inin do ru konumunu belirlemek i in at k malzemelerin veya g r nmeyen...

Page 53: ...erinin sonunda ak leri evremize gerekli zeni g stererek at n Ak y bitene kadar aleti al t r n sonra aletten kart n NiCd NiMH ve Li Ion ak ler geri d n ml d r Ak leri yetkili servise veya yerel toplama...

Page 54: ...im emisyon de eri ah T TRE M Teknik veriler ve uygunluk beyanat i erisinde belirtilen titre im emisyon de erleri EN60745 taraf ndan belirlenen standart bir test y ntemine uygun olarak l lmektedir ve d...

Page 55: ...F dG dG H dG 55 24 www 2helpU com SB12S 10 8 1 5...

Page 56: ...www 2helpU com STANLEY STANLEY H dG F dG dG 56 SCH12S2 10 8 0 1500 0 400 1 0 22500 0 6000 1 26 10 20 10 8 SC121 220 240 22 1 25 1 5 70 SB12S 10 8 1 5...

Page 57: ...F dG dG H dG 57 HHS D 9 1 2 3 4 5 STANLEY 2 1 3 00 6 00 12 00 19 00 16 00 19 00 6 00...

Page 58: ...H dG F dG dG 58 LED 3 LED 8 D A 3 D A 4 E 1 2 3 4 19 3 2 F 1 1 4 6 35 F G 1 4 6 35...

Page 59: ...F dG dG H dG 59 40 4 C 7 1 2 6 1 2 H A 9 A 1 A 2...

Page 60: ...H dG F dG dG 60 Li Ion 105 40 Li Ion 15 MDG ATA ADR 38 3 9 9 1 2 100 10 8 SCH12S2 1 2...

Page 61: ...F dG dG H dG 61 STANLEY XX JN 2017 1 1 S1 1 S2 2 1 N 1 2 3 4 5 6 7 LED 8 9 10 1 7 2 3 Li Ion Li Ion...

Page 62: ...H dG F dG dG 62 5 a b c d 6 a MDF STANLEY 40 10 40...

Page 63: ...F dG dG H dG 63 STANLEY SCH12S2K 10 8V Li Ion dGh e dG G j cIAG b Y U MG I e a G UG Gh dG GP V dG S dGh 1 a b c 2 a b c d e f RCD 3 a b c d e f g h 4 a b c d e f g h...

Page 64: ...N450060 22 2018...
Reviews: