


8
ENGLISH
(Original instructions)
u
If the new battery gives the same indication as the original
battery, take the charger to be tested at an authorised
service centre.
Note: It may take as long as 60 minutes to determine that
the battery is defective. If the battery is too hot or too
cold, the LED will alternately blink red, fast and slow, one
flash at each speed and repeat.
Selecting the direction of rotation (fig. D)
For tightening, use forward (clockwise) rotation. For loosening,
use reverse (counterclockwise) rotation.
u
To select forward rotation, push the forward/reverse slider
(2) to the left.
u
To select reverse rotation, push the forward/reverse slider
to the right.
u
To lock the tool, set the forward/reverse slider into the
centre position.
Screwdriving / nut setting
u
Select the appropriate bit / socket for the screw or nut to
be driven.
u
Select forward or reverse rotation as described above.
u
Hold the tool in line with the fastener.
u
After tightening, check torque with a torque wrench.
LED work light
The LED work light (7) is activated automatically when the trig-
ger is depressed. The LED work light will illuminate when the
trigger is partially depressed, before the unit begins running.
State of charge indicator
The tool is fitted with a state of charge indicator. This can be
used to display the current level of charge in the battery during
use.
u
Press the state of charge indicator button (9).
Hints for optimum use
Screwdriving
u
Always use the correct type and size of screwdriver bit.
u
If screws are difficult to tighten, try applying a small
amount of washing liquid or soap as a lubricant.
u
Always hold the tool and screwdriver bit in a straight line
with the screw.
Maintenance
Your Stanley Fat Max tool has been designed to operate
over a long period of time with a minimum of maintenance.
Continuous satisfactory operation depends upon proper tool
care and regular cleaning.
Your charger does not require any maintenance apart from
regular cleaning.
Warning!
Before performing any maintenance on the tool,
remove the battery from the tool. Unplug the charger before
cleaning it.
u
Regularly clean the ventilation slots in your tool and
charger using a soft brush or dry cloth.
u
Regularly clean the motor housing using a damp cloth. Do
not use any abrasive or solvent-based cleaner.
u
Regularly open the chuck and tap it to remove any dust
from the interior.
Protecting the environment
Z
Separate collection. Products and batteries
marked with this symbol must not be disposed of
with normal household waste.
Products and batteries contain materials that can be recov-
ered or recycled reducing the demand for raw materials.
Please recycle electrical products and batteries according to
local provisions. Further information is available at
www.2helpU.com
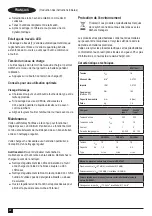
Technical data
KFMCF647
Voltage
V
DC
18
No-load speed
Min
-1
0-2700
Beats
BPM
0-3100
Max. torque
(PTI Method)
Nm
180
Chuck capacity
mm
6 (Hex)
Weight
kg
1.2
Charger
905998**
typ. 1
906086**
typ. 1
Input Voltage
V
AC
230
230
Output Voltage
V
DC
18
18
Current
A
1
2
Approx. charge time
min
90 - 240
45 - 120
Battery
FMC689L
FMC687L
FMC688L
Voltage
V
DC
18
18
18
Capacity
Ah
1.5
2.0
4.0
Type
Li-Ion
Li-Ion
Li-Ion
Level of sound pressure according to EN 62841:
Sound pressure (L
pA
) 97 dB(A), uncertainty (K) 3 dB(A)
Summary of Contents for Fatmax KFMCF647
Page 1: ...www stanley eu KFMCF647 8 4 9 3 1 2 7 10 5 6...
Page 3: ...3 5 11 12 A 5 13 14 3 4 C B 2 D...
Page 76: ...76 Stanley Fat Max KFMCF647 1 2 RCD RCD 3...
Page 77: ...77 4 5 130 C...
Page 78: ...78 6 u u u u u u u u u u u u 8 u...
Page 79: ...79 u u u u u MDF EN62841 2002 44 E f u u u 40 C u 10 C 40 C u u p u Stanley Fat Max u u u u u...
Page 81: ...81 u 1 LED 12 u 5 u u u 60 LED D u 2 u u u u u u LED LED 7 LED u 9 u u u Stanley Fat Max u u u...
Page 83: ......