


18
ENGLISH
(Original instructions)
the tool.
Stopper pin is for carrying and storage purposes only and not
for any cutting operations.
Maintenance
Caution!
Always be sure that the tool is switched off and
unplugged before attempting to perform inspection and
maintenance.
Warning!
Always be sure that the blade is sharp and clean for
the best and safest performance.
Note!
Never use gasoline, benzene, thinner, alcohol or similar
substances. Discolouration, deformation or cracks may result.
Adjusting the cutting angle (Fig.31, Fig.32, Fig.33)
This tool is carefully adjusted and aligned at the factory, but
rough handling may have affected the alignment. If your tool is
not aligned properly, perform the following.
Mitre angle (Fig.31)
u
Push the carriage toward the guide fence (9) and tighten
the locking screw to secure the carriage. Loosen the grip
(21) which secures the turn base. Turn the turn base
so that the pointer points to 0º. Then turn the turn base
slightly clockwise and counterclockwise to seat the turn
base in the 0º mitre notch
.
Fig.32
u
Lower the handle fully and lock it in to the lowered position
by pushing in the stopper pin.
u
Square the side of the blade with the face of the guide
fence (9) using a triangular rule (53), tri-square etc.
Fig.33
u
Make sure that the pointer (32) points to 0º on the mitre
scale (33). If the pointer (32) does not point to 0º, loosen
the screw (54) which secures the pointer (360 and adjust
the pointer (32) so that it will point to 0º.
Bevel angle (0° bevel angle Fig.34, Fig.35, Fig.36)
u
Push the carriage toward the guide fence and tighten the
locking screw to secure the carriage.
u
Lower the handle fully and lock it in the lowered position
by pushing in the stopper pin.
u
Loosen the lever (10) at the rear of the tool.
u
Carefully square the side of the blade (30) with the top
surface of the turn table (18) using a triangular rule (53),
tri-square, etc.
u
Turn the hex bolt (54) on the arm (36) slightly counter-
clockwise or clockwise to tilt the blade to the right position.
u
Then tighten the lever securely.
u
Make sure that the pointer (34) on the arm points to 0º on
the bevel scale (35) on the arm holder.
u
If they do not point to 0º, loosen the screw (55) which
secures the pointer (34) and adjust it so that it will point to
0º.
45° Bevel angle (Fig.37, Fig.38)
u
Adjust the 45º bevel angle only after performing 0º bevel
angle adjustment.
u
To adjust left bevel angle, loosen the lever (10) and tilt the
blade to the left fully.
u
Carefully measure the angle of the side of the blade (30)
with the top surface of the turn table (18) using the 45º
triangular rule (53).
u
Turn the left 45º bevel angle adjusting bolt (69) on the arm
(36) slightly counterclockwise to tilt the blade to the right
position.
u
Then tighten the lever securely.
u
Make sure that the pointer (34) an the arm points to 45º.
u
If the pointer does not point to 45º, adjust the pointer to
45º on the scale by loosening the screw (55), and then
tighten the screw.
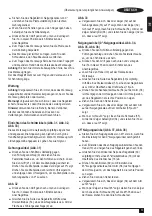
After use
u
After use, wipe off chips and dust adhering to the tool with
a cloth or the like.
u
keep the blade guard clean according to the directions in
the previously covered section "Retractable blade guard"
on Page. 14".
u
Lubricate the sliding portions with machine oil to prevent
rust.
u
When storing the tool, pull the carriage toward you fully.
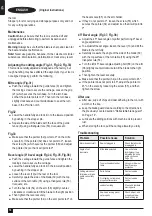
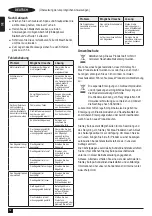
Troubleshooting
Problem
Possible Cause
Solution
Motor does not start
Saw not plugged in
Check that all cords
are plugged in
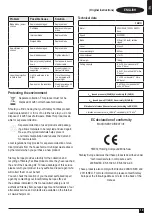
Angle of cut
inaccurate
Mitre table unlocked
Use mitre table
locking lever (see
Adjusting the mitre
angle section on
Page .15)
Too much sawdust under
table
Vacuum or blow out
dust. Wear eye
protection
Cutting arm cannot
fully raise, or blade
guard cannot fully
close
Parts Failure
Contact service
centre
Pivot spring not replaced
properly after service
Contact service
centre
sawdust build up
Clean and lubricate
moving parts
Saw head locking pin not
set properly
Check, adjust, and
properly set saw
head locking pin
Summary of Contents for FATMAX FME721-QS
Page 1: ...www stanley eu FME721 ...
Page 2: ...2 1 2 3 5 7 6 4 8 9 10 11 12 13 14 25 15 16 17 18 19 20 21 22 23 24 A www st anley eu FME721 ...
Page 3: ...3 7 26 27 15 15 28 29 23 18 9 30 1 2 3 4 5 6 ...
Page 4: ...4 23 31 32 21 22 33 10 10 36 34 35 6 37 7 8 9 10 11 12 ...
Page 5: ...5 25 39 29 40 41 30 42 38 43 30 44 14 5 45 13 14 15 16 17 46 18 18 ...
Page 6: ...6 9 49 49 50 17 48 9 51 12 19 13 6 19 21 22 23 24 25 20 A 24a ...
Page 7: ...7 1 6 17 52 32 33 21 10 52 17 26 27 28 29 30 ...
Page 8: ...8 9 21 9 53 54 33 32 10 54 36 53 30 18 35 34 55 31 32 33 34 35 36 ...
Page 9: ...9 36 55 34 56 58 57 37 38 39 40 30 18 53 ...
Page 155: ...155 ...


