10
ENGLISH
(Original instructions)
Assembly and adjustment
Warning!
To reduce the risk of serious personal injury, turn
tool off and disconnect tool from power source before making
any adjustments or removing/installing attachments or
accessories. Before reconnecting the tool, depress and
release the trigger switch to ensure that the tool is off. An
accidental start-up can cause injury.
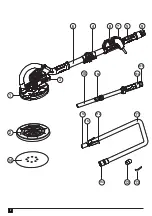
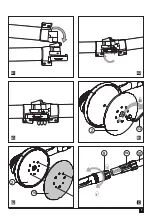
Assemble foldable shaft (Fig. A1, A2, A3)
u
Fully unfold the upper shaft and lower shaft (Fig. A1).
u
Push the folding lock (4) to the right position and keep
the tip adjacent to the handle (Fig. A2).
u
Press down the folding lock (4) to lock the shaft (Fig. A3).
u
Release the folding lock to fold the shaft.
Replace sanding pad (Fig. B1)
u
Insert the hex wrench (13) (size 5) into the hexagonal
screw bolt on the sanding block.
u
Hold the sanding pad firmly, and then turn the wrench
counter clockwise to dismount the pad.
u
Install new sanding pad by tightening the bolt.
Attaching and changing sanding disc (Fig. B2)
u
Place the sanding disc (14) in the center of the sanding
pad (2) and press on. The holes in the sanding disc must
be in alignment with the extraction holes in the sanding
pad.
u
For round sanding pad only: conduct a test run to
check that the sanding disc is clamped in the centre.
The LED light
u
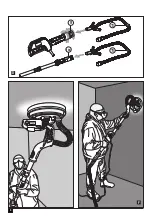
10W LED lights surrounding the pad lighten the
cupped and raised spots on the wall or ceiling, enable you
to work efficiently and deliver a better sanding result as
shown in figures E and F.
Extension shaft (optional) (Fig. C)
u
Use the extension shaft (10) according to the intended
operation for higher work surface.
u
Loosen the sleeve on the dust extraction outlet (9) of the
shaft. Do not remove the sleeve from the outlet.
u
Align the rear handle (10a) with the main handle (5)
and insert the sleeve (10c) on the extension shaft (10)
into the outlet (9) with a twist motion all the way to the
top.
u
Adjust the length of the extension shaft (10) if
necessary. Pay attention to the marking “max 1.8m”
on the extension shaft. Tighten the sleeve (9) after
assembling/adjusting the extension shaft.
Dust suction (Fig. D)
u
Loosen the sleeve on the dust extraction outlet (9)
or (10b) by turning it in the direction of the unlocking
symbol on the tool handle.
u
Insert vacuum hose (11) into the end of the tool handle
as illustrated.
u
Tighten locking knob for length adjustment (9) by
turning it in the direction of the locking symbol on the
tool handle.
u
Connect the vacuum hose with the Ø 47 mm adapter
(11d) or with the Ø35mm adapter (12) directly to an
industrial vacuum cleaner (remove vacuum cleaner
hose first).
u
You can also connect vacuum hose with one adapter
to an industrial Vacuum cleaner without removing the
vacuum cleaner hose.
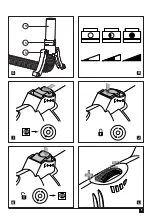
Support adaptor/airflow control (Fig. G, H)
u
Support adaptor (11a) protects the hose from damage
when putting the tool aside during work breaks (Fig. G).
u
Control the airflow by sliding suction power adjustment
ring (11c) over the airvent in tool connector (11b).
u
The vacuuming power is at its lowest level when the
air vent is fully visible (Fig. H).
Switching the machine on and off (Fig. I, J, K)
u
Turn the wall sander on/off using the switch (7).
Electronic speed control
u
Adjust the speed by turning the speed wheel (8), user
can choose different speed for different sanding
surface.
u
Keep the machine running at the same speed as
selected. Do not overload by excessive pressure.
Sanding operations
u
Once the machine and vacuum cleaner are set up
and all safety measures and equipment are in place,
begin by turning on the vacuum cleaner and then the
machine. (If you are using a vacuum cleaner with
integrated switching, then simply turn the machine on.)
Round sanding head
u
Begin sanding and carefully contact the work surface
as lightly as possible-just enough to keep the sanding
head flat against the surface.
u
The best technique is to use overlapping sweeps and
keep the head in constant motion with appropriate
lasting time. Never keep sanding too long in any one
place or there will be swirl marks.
u
Take the machine from the work surface before turning
off.
Warning!
Ensure that the sanding disc you are using is suited
to the task, Overly coarse grit paper may remove material too
quickly to control. While overly fine grit paper may not sand
the surface quickly.
Warning!
Take care to avoid sharp projections and nails, etc.
Summary of Contents for FAT MAX SFMEE500
Page 1: ...www stanley eu SFMEE500...
Page 2: ...2 1 3 2 14 13 12 11d 11a 10b 10a 10c 11c 11b 11 10 9 5 7 8 4 6...
Page 3: ...3 2 13 2 14 10 10c 9 A1 A2 A3 B1 B2 C...
Page 4: ...4 9 10b 11 11 D E F...
Page 5: ...5 11b 11c 11a G H I J K L...
Page 76: ...76 RCD 3 4...
Page 77: ...77 6 u u u u u u u u u u...
Page 78: ...78 u u u u u u u u u u u u u u...
Page 83: ...83...

