background image

GX1300

Page 16

6.4  ACCESSORY CABLE

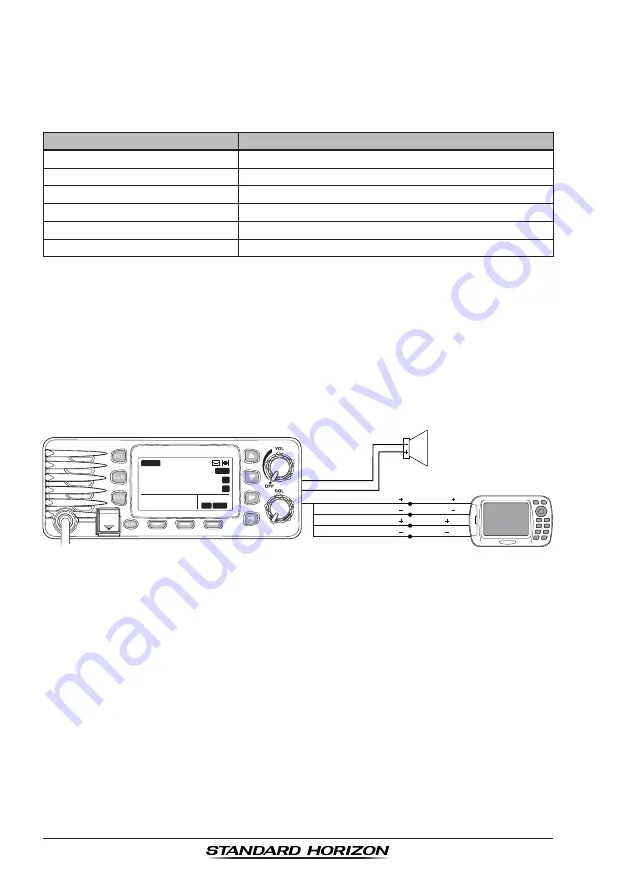
When  connecting  the  external  speaker  or  GPS  navigation  receiver,  strip 

off about 1" (2.5 cm) of the specified wire’s insulation, then splice the ends 

together using proper waterproofing techniques.

Wire Color/Description

Connection Examples

WHITE - External Speaker (

+

) Connect to external 4-ohm audio speaker

SHIELD - External Speaker (–) Connect to external 4-ohm audio speaker

YELLOW - NMEA GPS Input (

+

)

Connect to NMEA (

+

) output of GPS

GREEN - NMEA GPS Input (–)

Connect to NMEA (–) output or common ground of GPS

WHITE - NMEA DSC Output (

+

)

Connect to NMEA (

+

) input of GPS

BROWN - NMEA DSC Output (–)


Connect to NMEA (–) input of GPS

:  Some  GPS  chart  plotters  have  a  single  wire  for  NMEA  signal  ground. 

In  such  a  case  connect  the  NMEA  input  (–)  to  the  GPS  chart  plotter's 

single NMEA signal ground wire, and leave the NMEA output (–) open.


In  case  the  assignment  of  power  supply  and  ground  of  a  GPS  chart 

plotter to be used is different from that of the radio, connect the signal 

ground wire of the GPS chart plotter to the ground terminal (GND) on the 

rear panel of the radio.

•  The GPS must have the NMEA Output turned on and set to 4800 Baud 

in the SETUP menu. If there is a selection for parity select none.

•  For  further  information  on  interfacing  /setting  up  your  GPS.  Please 

contact the manufacturer of the GPS receiver.

• 

GX1300

 can read NMEA-0183 version 2.0 or higher.

•  The NMEA supported sentences are:

  Input:  GLL,  GGA,  RMC,  GNS,  GSA  and  GSV  (RMC  sentence  is 

recommended)

  Output:  DSC and DSE

GPS Receiver/Plotter

External Speaker

Shield
White

Green: NMEA GPS Input (  )

White: NMEA DSC Output (  )

NMEA OUT (  )
NMEA IN (  )

NMEA OUT (  )

NMEA IN (  )

Yellow: NMEA GPS Input (  )

Brown: NMEA DSC Output (  )

DISTRESS

PULL OPEN

BUSY

MEM

LOC

AM

A
C

USA

25W

123˚56.890W

 23˚56.890N

09:56

P

16

Summary of Contents for Eclipse GX1300

Page 1: ...zed Full dot matrix display 31 mm x 55 mm GPS position and time shown on a full dot matrix display DSC distress individual group all ships position request position report and DSC test call Programmable scan priority scan and Multi Watch Dual Watch or Triple Watch NMEA in and output connections to a compatible GPS chart plotter All USA International and Canadian marine channels Preset Key used to ...

Page 2: ...HANGING THE TIME LOCATION 19 6 8 CHANGING THE TIME FORMAT 20 7 CONTROLS AND INDICATORS 21 7 1 FRONT PANEL 21 7 2 REAR PANEL 23 7 3 MICROPHONE 24 8 BASIC OPERATION 25 8 1 RECEPTION 25 8 2 TRANSMISSION 25 8 3 TRANSMIT TIME OUT TIMER TOT 25 8 4 SIMPLEX DUPLEX CHANNEL USE 26 8 5 USA INTERNATIONAL AND CANADA MODE 26 8 6 NOAA WEATHER CHANNELS 27 8 6 1 NOAA Weather Alert 27 8 6 2 NOAA Weather Alert Testi...

Page 3: ...p Call 61 9 6 4 Setting up the Group Call Ringer 62 9 7 POSITION REQUEST 63 9 7 1 Transmitting a Position Request to Another Vessel 63 9 7 2 Receiving a Position Request 66 9 7 3 Setting up the Position Request Ringer 67 9 8 POSITION REPORT 68 9 8 1 Transmitting a DSC Position Report Call 68 9 8 2 Receiving a DSC Position Report Call 70 9 8 5 Setting up a Position Report Ringer 71 9 9 MANUAL INPUT...

Page 4: ...rectory 96 10 3 2 Individual Reply 96 10 3 3 Individual Acknowledgement 96 10 3 4 Individual Ringer 96 10 3 5 Group Directory 97 10 3 6 Auto Position Polling Call Type 97 10 3 7 Auto Position Polling Interval Time 97 10 3 8 Auto Channel Switching Time 98 10 3 9 DSC Beep 98 11 MAINTENANCE 99 11 1 REPLACEMENT PARTS 99 11 2 FACTORY SERVICE 99 11 3 TROUBLESHOOTING CHART 100 12 CHANNEL ASSIGNMENTS 101 ...

Page 5: ...he 16 S key on the radio to select Channel 16 Press and hold the 16 S key on the radio to select the sub channel Press again to revert to the last selected channel Press the H L key to toggle the transmit power between High 25W and Low 1W To transmit place your mouth about 1 away from the MIC hole of the microphone and speak in a normal voice level while pressing the PTT switch Press the MENU key ...

Page 6: ...Channel 70 receiver operation which allows continuous receiving of Digital Selective Calling functions on channel 70 even if the radio is receiving a call The GX1300 operates on all currently allocated marine channels which are switchable for use with either International USA or Canadian regulations It has an emergency channel 16 which can be immediately selected from any channel by pressing the r...

Page 7: ... 300 External Loudspeaker HC1100 Dust Cover 4 ONLINE WARRANTY REGISTRATION in USA or Canada only Please visit www standardhorizon com to register the GX1300 Marine VHF It should be noted that visiting the website from time to time may be beneficial to you as new products are released they will appear on the STANDARD HORIZON website PRODUCT SUPPORT INQUIRIES If you have any questions or comments re...

Page 8: ...be greater than 5 miles 8 km in line of sight 5 2 SELECTING AN ANTENNA Marine antennas are made to radiate signals equally in all horizontal direc tions but not straight up The objective of a marine antenna is to enhance the signal toward the horizon The degree to which this is accomplished is called the antenna s gain It is measured in decibels dB and is one of the major factors in choosing an an...

Page 9: ...r runs over 20 feet 6 m but less than 50 feet 15 m the larger RG 8X or RG 213 U should be used For cable runs over 50 feet 15 m RG 8X should be used For installation of the connector onto the coaxial cable refer to the figure below To get your coax cable through a fitting and into your boat s interior you may have to cut off the end plug and reattach it later You can do this if you follow the dire...

Page 10: ... other distinguishing marks The total transmission should not exceed 1 minute 9 End the message by saying OVER Release the microphone button and listen 10 If there is no answer repeat the above procedure If there is still no response try another channel NOTE 5 4 CALLING ANOTHER VESSEL CHANNEL 16 OR 9 Channel 16 may be used for initial contact hailing with another vessel However its most important ...

Page 11: ...l After a transmission say over and release the microphone s push to talk PTT switch When all communication with the other vessel is completed end the last transmission by stating your Call Sign and the word out Note that it is not necessary to state your Call Sign with each transmission only at the beginning and end of the contact Remember to return to Channel 16 when not using another channel So...

Page 12: ...e compass or that the radios performance is not affected by the antenna location temporarily connect the radio in the desired location and a Examine the compass to see if the radio causes any deviation b Connect the antenna and key the radio Check to ensure the radio is operating correctly by requesting a radio check 6 2 MOUNTING THE RADIO 6 2 1 Supplied Mounting Bracket The supplied mounting brac...

Page 13: ... at least 5 5 14 cm deep There should be at least 0 5 1 3 cm between the transceiver s heat sink and any wiring cables or structures 3 Cut out the rectangular hole and insert the transceiver 4 Fasten the brackets to the sides of the transceiver with the lock washer nut combination so that the mounting screw base faces the mounting surface 5 Turn the adjusting screw to adjust the tension so that th...

Page 14: ... VDC 20 power source Connect the black power wire to a negative ground 3 If an optional remote extension speaker is to be used refer to next section for connections 4 It is advisable to have a Certified Marine Technician check the power output and the standing wave ratio of the antenna after installation Figure 1 General Installation Reverse polarity connections will damage the radio GPSChart 150 ...

Page 15: ...h ends of the fuse holder and pull the fuse holder apart do not bend the fuse holder When you replace the fuse please confirm that the fuse is tightly fixed on the metal contact located inside the fuse Holder If the metal contact holding the fuse is loose the fuse holder may heat up ...

Page 16: ...single NMEA signal ground wire and leave the NMEA output open In case the assignment of power supply and ground of a GPS chart plotter to be used is different from that of the radio connect the signal ground wire of the GPS chart plotter to the ground terminal GND on the rear panel of the radio The GPS must have the NMEA Output turned on and set to 4800 Baud in the SETUP menu If there is a selecti...

Page 17: ...23 56 890N 09 56 01 12 13 15 21 22 25 28 31 32 AS NOTE 1 Turn the transceiver on BACK SELECT 2 Press the MENU key to display the menu 3 Select GPS with the key then press the SELECT soft key The GPS STATUS screen will appear 4 Press the CLR key to return to radio operation If there is a problem with the NMEA input from a GPS the satellite icon will blink continuously until the connection is correc...

Page 18: ...ION CONTRAST KEY BEEP LOCATION FORMT TIME OFFSET BACK ENTER TIME OFFSET 00 00 00 30 01 00 01 30 2 Select SETUP with the keys then press the SELECT soft key 3 Select CONFIGURATION with the keys then press the SELECT soft key 4 Select TIME OFFSET with the keys then press the SELECT soft key 5 Press the keys to select time offset from UTC See illustration below to find your offset time from UTC If 00...

Page 19: ...ASURE SOFT KEY BACK ENTER TIME AREA UTC LOCAL 2 Select SETUP with the keys then press the SELECT soft key 3 Select CONFIGURATION with the keys then press the SELECT soft key 4 Select TIME AREA with the keys then press the SELECT soft key 5 Press the to select UTC or LOCAL 6 Press the ENTER soft key to store the selected setting 7 Press the BACK soft key to exit the menu UTC mode BUSY MEM UTC A C U...

Page 20: ...CT CONFIGURATION TIME AREA TIME FORMAT UNIT OF MEASURE SOFT KEY BACK ENTER TIME FORMAT 24 HOURS 12 HOURS 2 Select SETUP with the keys then press the SELECT soft key 3 Select CONFIGURATION with the keys then press the SELECT soft key 4 Select TIME FORMAT with the keys then press the SELECT soft key 5 Press the to select 12 HOURS or 24 HOURS 6 Press the ENTER soft key to store the select ed setting ...

Page 21: ...ockwise until the pointer stops on the OFF indication on the panel Squelch Control Knob SQL Adjusting this control clockwise sets the point at which random noise on the channel does not activate the audio circuits but a received signal will This point is called the squelch threshold Further adjustment of the squelch control will degrade reception of wanted transmissions Keys The and keys are used ...

Page 22: ... to HI power until the PTT is released The H L key does not function on transmit inhibited and low power only channels CLR Key Immediately recalls the previous selected working channel during the DSC operation and other menu operations 16 S Key Immediately recalls channel 16 from any channel location and automati cally selects high power Pressing and holding this key recalls sub channel Pressing t...

Page 23: ...ty and optimum perfor mance Normally the GND connection to the heat sink is not needed However when the DC power cable connection to the radio has a long run the transmitter may become unstable and the receiving audio may be noisy In such a case connect a large diameter short cable between this termi nal on the heat sink and battery ground Install only the supplied screw or similar size M3x6 Stain...

Page 24: ...he transmitter when the transceiver is in radio mode MIC Microphone Hole Transmits the voice message with reduction of background noise using Clear Voice Noise Reduction Technology NOTE Be sure your mouth is about 1 1 3 cm from the MIC hole for best performance ...

Page 25: ... channel is being used 8 2 TRANSMISSION 1 Perform steps 1 through 6 of RECEPTION 2 Before transmitting monitor the channel to ensure it is clear THIS IS AN FCC REQUIREMENT 3 Press and hold the PTT push to talk switch of the microphone The TX indicator appears on the LCD 4 Speak slowly and clearly into the microphone 5 When the transmission is finished release the PTT switch 8 3 TRANSMIT TIME OUT T...

Page 26: ...s the SELECT soft key 3 Press the key to select CHANNEL SETUP then press the SELECT soft key 4 Press the key to select CHANNEL GROUP then press the SELECT soft key 5 Press the key to select desired channel group USA INTL or CAN 6 Press the ENTER soft key to store the select ed setting 7 Press the BACK soft key to exit the menu Refer to the VHF MARINE CHANNEL CHART page 104 for allocated channels i...

Page 27: ...Oceanic and Atmospheric Administration sends a weather alert accompanied by a 1050 Hz tone and subsequent weather report on one of the NOAA weather channels The GX1300 can receive weather alerts when on a weather channel and on the last selected weather channel during scanning modes or while on anoth er channel When an alert is received on a NOAA weather channel scanning will stop and the transcei...

Page 28: ...UP SCAN TYPE SCAN RESUME PRIORITY CH SUB CH BACK ENTER SCAN TYPE PRIORITY SCAN MEMORY SCAN 2 Select SETUP with the keys then press the SELECT soft key 3 Press the key to select CHANNEL SETUP then press the SELECT soft key 4 Select SCAN TYPE with the keys then press the SELECT soft key 5 Press the keys to select PRIORITY SCAN or MEMORY SCAN 6 Press the ENTER soft key to store the selected setting 7...

Page 29: ...step 5 for all the desired channels to be scanned 7 To delete a channel from the list select the channel then press the MEM soft key again The MEM disappears from the display 8 Press the BACK soft key to exit the menu NOTE 8 7 3 Memory Scanning M SCAN 1 Adjust the SQL knob until background noise disappears 2 Select MEMORY SCAN as scan type via the SETUP menu 3 Press one of the soft keys then press...

Page 30: ...t the priority channel 6 Press the ENTER soft key to store the selected setting 7 Press the BACK soft key to exit the menu NOTE 8 7 5 Priority Scanning P SCAN 1 Adjust the SQL knob until background noise disappears 2 Select PRIORITY SCAN as scan type via the SETUP menu 3 Press one of the soft keys then press the SCAN soft key it may be necessary to press the key to locate the SCAN soft key P SCN a...

Page 31: ...he radio stops and listens to the priority channel until communication ends and then starts dual or triple watch scan again 8 8 1 Setting up the Multi Watch Operation 1 Press the MENU key to display the menu BACK SELECT BACK SELECT SETUP DSC SETUP CHANNEL SETUP CONFIGURATION BACK SELECT CHANNEL SETUP WEATHER ALERT MULTI WATCH SCAN MEMORY SCAN TYPE BACK ENTER MULTI WATCH DUAL TRIPLE 2 Select SETUP ...

Page 32: ...ppears on the LCD The radio will scan between the priority channel and the channel that was selected in step 2 If a transmission is received on the channel selected in step 2 the GX1300 will dual watch to the priority channel BUSY MEM A C P SET USA 25W DW 16 A 88 4 To stop dual watch press one of the soft keys then press the DW soft key again When selecting TRIPLE in the SETUP menu TW will be disp...

Page 33: ...EM A C P SET USA 25W A 88 2 Press one of the soft keys then press and hold the PRESET soft key until the channel number blinks 3 Press the ADD soft key to program the channel into the preset channel The P SET icon appears on the LCD 4 Repeat steps 1 through 3 to program the desired channels into the preset channel bank NOTE 8 9 2 Operation 1 Press one of the soft keys then press the PRESET soft ke...

Page 34: ...SY MEM A C USA 25W A 88 2 Press the key to select the preset channel to be deleted 3 Press one of the soft keys then press and hold the PRESET soft key until the channel number blinks 4 Press the DELETE soft key to delete the channel from the preset channel bank The P SET icon disappears on the LCD 5 Repeat steps 2 through 4 to delete the desired channels from the preset channel bank ...

Page 35: ...g and Auto Position Polling This menu also provides convenient functions for DSC as below Sets the nature of Distress Call DIST ALERT MSG Browses information of received DSC calls DSC LOG Transmits a test call DSC TEST GPS You can check the signal strength of captured GPS satellites MMSI POS INFO Via this menu input your MMSI Maritime Mobile Service Identity before you use DSC SETUP This menu allo...

Page 36: ...receive Distress Urgency Safety Routine POSITION REQUEST POSITION SEND and Group calls to or from another vessel equipped with a DSC transceiver 9 2 MARITIME MOBILE SERVICE IDENTITY MMSI 9 2 1 What is an MMSI An MMSI is a nine digit number used on Marine radios capable of using Digital Selective Calling DSC This number is used like a telephone number to selectively call other vessels THIS NUMBER M...

Page 37: ...MSI number press the key until the wrong number is highlighted then press the key to correct the entry and press the SELECT soft key 7 When finished programming the MMSI number press the FINISH soft key The radio will ask you to input the MMSI number again Use steps 4 through 6 above 8 After the second number has been input press the FINISH soft key to store the MMSI 9 Press the OK soft key to ret...

Page 38: ...ount down 3sec 2sec 1sec and then the distress alert will be transmitted The backlight of the LCD and keypad flashes while the radios display is counting down QUIT DISTRESS UNDESIGNATED DISTRESS Hold for 3 sec DISTRESS UNDESIGNATED Transmitting DISTRESS UNDESIGNATED Waiting for ACK TX IN 02 25 PAUSE INFO CANCEL 2 The GX1300 watches for an acknowledgment call on channel 70 or a voice call on channe...

Page 39: ...alert is repeated at approximately 4 minute intervals until a DSC acknowledgment is received NOTE Transmitting a DSC Distress Alert with Nature of Distress The GX1300 is capable of transmitting a DSC distress alert with the following Nature of Distress categories Undesignated Fire Flooding Collision Grounding Capsizing Sinking Adrift Abandoning Piracy MOB 1 Press the MENU key to display the menu B...

Page 40: ...ALL INDIVIDUAL GROUP ALL SHIPS DIST ALERT MSG 2 Press the keys to select DSC then press the SELECT soft key 3 Press the keys to select DIST ALT MSG and then press the SELECT soft key To cancel press the BACK soft key 4 Press the POS TM soft key BACK POS TM DIST ALERT MSG UNDESIGNATED POS TIME UTC NATURE POS AND TIME 23 56 890N 123 56 890W POS TIME 12 56UTC BACK SELECT FINISH 5 Enter the latitude l...

Page 41: ...he time when the radio will re transmit the distress call DISTRESS UNDESIGNATED Waiting for ACK TX IN 02 25 PAUSE INFO CANCEL DISTRESS UNDESIGNATED Retransmission is now pausing TX IN 02 25 RESUME INFO CANCEL 2 To suspend re transmitting the distress call press the PAUSE soft key 3 To resume counting down to transmit the distress call press the RESUME soft key Canceling a DSC Distress Alert T h e ...

Page 42: ...d the acknowledgement Press the RESUME soft key to resume the acknowledgement 5 If you want the radio to stay on the channel you were on before receiv ing the distress call press the QUIT soft key 6 After accepting the distress call press the INFO soft key to show information of the vessel in distress RX DISTRESS YAESU UNDESIGNATED NOT ACKNOWLEDGED SINCE 00 05 INFO QUIT INFO DIST INFO DIST 3669012...

Page 43: ...f a navigation aid or an important meteorological message This call is the same as saying Securite Securite Securite 9 4 1 Transmitting an All Ships Call 1 Press the MENU key to display the menu BACK SELECT BACK SELECT DSC CALL INDIVIDUAL GROUP ALL SHIPS DIST ALERT MSG 2 Press the keys to select DSC then press the SELECT soft key 3 Press the keys to select ALL SHIPS and then press the SELECT soft ...

Page 44: ...annel press the ACCEPT soft key If a key is not pressed for thirty seconds by default refer to the section 10 3 8 Auto Channel Switching Time after an all ships call is received the GX1300 will automatically switch to the requested channel for you to monitor communications RX ALL SHIPS YAESU CATEG SAFETY CH 08 SINCE 00 05 ACCEPT QUIT PAUSE BUSY MEM A C USA 25W 08 ALL SHIPS PAUSE QUIT RESUME 4 Pres...

Page 45: ...e BACK soft key 4 Select DSC BEEP with the keys then press the SELECT soft key BACK SELECT DSC SETUP AUTO POS POLL AUTO POS TIME CH SWITCH TIMER DSC BEEP 5 Select ALL SHIPS with the keys then press the SELECT soft key BACK SELECT DSC BEEP INDIVIDUAL GROUP ALL SHIPS POS REQUEST ON ON ON OFF 6 Press the keys to select OFF then press the ENTER soft key BACK ENTER ALL SHIPS OFF ON 7 Press the 16 S key...

Page 46: ... The GX1300 can store up to 60 individual MMSI numbers with vessel s or person s names To transmit an Individual call you must program this directory with the infor mation of the persons you wish to call similar to a cellular phones directory 1 Press the MENU key to display the menu BACK SELECT BACK SELECT SETUP DSC SETUPGROUP CHANNEL SETUP CONFIGURATION 2 Press the keys to select SETUP then press...

Page 47: ...e previous screen ADD NAME YAESU MMSI BACK SELECT FINISH BACK SELECT FINISH ADD MMSI 3 11 Select MMSI with the keys then press the SELECT soft key 12 Press the keys to scroll through numbers 0 to 9 13 Press the SELECT soft key to store the number and step to the next digit to the right 14 Repeat steps 12 and 13 until the MMSI is complete If a mistake was made entering in the MMSI number press the ...

Page 48: ... key to display the menu BACK SELECT BACK SELECT SETUP DSC SETUPGROUP CHANNEL SETUP CONFIGURATION 2 Press the keys to select SETUP then press the SELECT soft key 3 Press the keys to select DSC SETUP then press the SELECT soft key To cancel press the BACK soft key 4 Press the keys to select INDIVIDUAL REPLY then press the SELECT soft key BACK SELECT DSC SETUP INDIVIDUAL DIR INDIVIDUAL REPLY INDIVID...

Page 49: ...RATION 2 Press the keys to select SETUP then press the SELECT soft key 3 Press the keys to select DSC SETUP then press the SELECT soft key To cancel press the BACK soft key 4 Press the keys to select INDIVIDUAL ACK then press the SELECT soft key BACK SELECT DSC SETUP INDIVIDUAL DIR INDIVIDUAL REPLY INDIVIDUAL ACK INDIVIDUAL RING 5 Press the keys to select ABLE or UNABLE then press the ENTER soft k...

Page 50: ...t HISTORY or MEMORY then press the SELECT soft key BACK SELECT INDIVIDUAL HISTORY MEMORY NEW ID 5 Press the keys to select an individual you want to contact then press the SELECT soft key BACK SELECT MEMORY YAESU USCG MEMORY SHIPS HORIZON 6 Press the keys to select the operat ing channel you want to communicate on and press the SELECT soft key BACK SELECT INTERSHIP CH CH 06 CH 08 CH 09 CH 10 7 Pre...

Page 51: ... Press the keys to select INDIVIDU AL and then press the SELECT soft key To cancel press the BACK soft key 4 Press the keys to select NEW ID then press the SELECT soft key BACK SELECT INDIVIDUAL HISTORY MEMORY NEW ID 5 Press the keys to scroll through numbers 0 to 9 BACK SELECT FINISH NEW ID MMSI 3 6 Press the SELECT soft key to store the number and step to the next digit to the right 7 Repeat ste...

Page 52: ...ust be sent back to the calling station The GX1300 in the default setting will automatically respond to the calling station and switch to the requested channel for voice communications Refer to the section 9 5 2 Setting up Individual Call Reply if you want to change the setting to see who is calling before replying to the call Automatic reply 1 When an individual call is received a ringing alarm s...

Page 53: ...DIVIDUAL YAESU CATEG ROUTINE CH 08 SINCE 00 08 ABLE QUIT UNABLE 6 Press the YES soft key to send an acknowl edgement Press the CHG CH soft key to change the channel for communication from the requested one RX INDIVIDUAL YAESU CH 08 ABLE TO COMPLY Transmit a Call YES NO CNG CH RX INDIVIDUAL YAESU CH 08 SINCE 00 05 Connected RESEND QUIT 7 After sending the acknowledgement the GX1300 switches to the ...

Page 54: ...ress the keys to select SETUP then press the SELECT soft key 3 Press the keys to select DSC SETUP then press the SELECT soft key To cancel press the BACK soft key 4 Select INDIVIDUAL RING with the keys then press the SELECT soft key BACK SELECT DSC SETUP INDIVIDUAL DIR INDIVIDUAL REPLY INDIVIDUAL ACK INDIVIDUAL RING 5 Press the keys to select ringing time of an individual call then press the ENTER...

Page 55: ...ct DSC BEEP with the keys then press the SELECT soft key BACK SELECT DSC SETUP AUTO POS POLL AUTO POS TIME CH SWITCH TIMER DSC BEEP 5 Select INDIVIDUAL with the keys then press the SELECT soft key BACK SELECT DSC BEEP INDIVIDUAL GROUP ALL SHIPS POS REQUEST ON ON ON OFF 6 Press the keys to select OFF then press the ENTER soft key BACK ENTER INDIVIDUAL OFF ON 7 Press the 16 S key or press the BACK s...

Page 56: ...e the country the ship registered for a MMSI The last 6 digits are specific to the ships ID Ship MMSI Example If your MMSI is 366123456 366 is MID which denote the country and 123456 is the ships ID for you Group MMSI Group MMSI numbers are not assigned by the FCC or other organiza tions licensed to assign ship MMSI numbers The first digit of a group MMSI is always set to 0 by the international ru...

Page 57: ...6 Select NAME with the keys then press the SELECT soft key BACK SELECT ADD NAME GROUP MMSI 0 7 Press the keys to scroll through the first letter of the group name you want to reference in the directory BACK SELECT FINISH ADD NAME Y 8 Press the SELECT soft key to store the first letter in the name and step to the next letter to the right 9 Repeat steps 7 and 8 until the name is complete Press the k...

Page 58: ... the FINISH soft key to return to the previous screen ADD NAME YAESU GP GROUP MMSI 036690155 BACK SELECT FINISH 16 Press the FINISH soft key to save the entered data 17 To enter another group entry repeat steps 5 through 16 18 Press the 16 S key or press the BACK soft key to return to radio opera tion mode 9 6 2 Transmitting a Group Call Group Call from Group Call Directory 1 Press the MENU key to...

Page 59: ...ay To change the display press the QUIT soft key GROUP YAESU GP CH 08 SINCE 00 05 Transmitted QUIT 9 Listen to the channel to make sure it is not busy then key the micro phone and call the other vessels you desire to communicate with Group Call Manual Group MMSI Entry You may enter an MMSI number manually to contact a vessel without storing the MMSI in the Group Call Directory 1 Press the MENU key...

Page 60: ...s been entered press the FINISH soft key 9 Press the keys to select the operat ing channel you want to communicate on and press the SELECT soft key BACK SELECT INTERSHIP CH CH 06 CH 08 CH 09 CH 10 10 Press the YES soft key to transmit the group call signal GROUP 036690155 CATEG ROUTINE CH 08 Transmit a Call YES NO 11 After the group call is transmitted the transceiver will switch to the channel se...

Page 61: ...UIT RESUME 5 If you want the radio to stay on the channel you were on before receiv ing the group call press the QUIT soft key 6 Press the keys to scroll the screen and see the MMSI or name of the calling vessel category of the call and requested operating channel RX GROUP YAESU CATEG ROUTINE CH 08 SINCE 00 08 ABLE QUIT UNABLE 7 Press the QUIT soft key to display the operat ing channel number of t...

Page 62: ...e BACK soft key 4 Select DSC BEEP with the keys then press the SELECT soft key BACK SELECT DSC SETUP AUTO POS POLL AUTO POS TIME CH SWITCH TIMER DSC BEEP 5 Select GROUP with the keys then press the SELECT soft key BACK SELECT DSC BEEP INDIVIDUAL GROUP ALL SHIPS POS REQUEST ON ON ON OFF 6 Press the keys to select OFF then press the ENTER soft key BACK ENTER GROUP OFF ON 7 Press the 16 S key or pres...

Page 63: ...l Position Request from Individual Position Call Directory 1 Press the MENU key to display the menu BACK SELECT BACK SELECT DSC CALL GROUP ALL SHIPS DIST ALERT MSG POS REQUEST 2 Press the keys to select DSC then press the SELECT soft key 3 Press the keys to select P O S REQUEST and then press the SELECT soft key To cancel press the BACK soft key 4 Press the keys to select HISTORY or MEMORY then pr...

Page 64: ...o a GPS chart plotter via NMEA 0183 DSC BEEP needs to be enabled to hear alarm Press any key to stop the alarm 9 Press the INFO soft key to show the position data transferred from the polled vessel on the display RX POS REPLY YAESU POS ACKNOWLEDGED SINCE 00 05 QUIT INFO 10 Press the keys to change the display to view the received data POS INFO POS 23 56 890N 123 56 890W TIME 12 56 UTC RX POS REPLY...

Page 65: ...ress the keys to scroll through numbers 0 to 9 BACK SELECT FINISH NEW ID MMSI 3 6 Press the SELECT soft key to store the number and step to the next digit to the right 7 Repeat steps 5 and 6 until the MMSI is complete If a mistake was made entering in the MMSI number press the keys repeatedly until the wrong number is highlighted then press the keys to correct the entry 8 After the ninth number ha...

Page 66: ...POS INFO POS 23 56 890N 123 56 890W TIME 12 56 UTC RX POS REPLY BACK QUIT BACK RX POS REPLY QUIT 123 56 890W TIME 12 56 UTC DST 29 8NM BRG 270 T 14 To exit from position request display press the QUIT soft key NOTE 9 7 2 Receiving a Position Request When a position request call is received from another vessel a ringing alarm will sound and POS REQUEST will be shown in the LCD 1 When a position req...

Page 67: ...e BACK soft key 4 Select DSC BEEP with the keys then press the SELECT soft key BACK SELECT DSC SETUP AUTO POS POLL AUTO POS TIME CH SWITCH TIMER DSC BEEP 5 Select POS REQUEST with the keys then press the SELECT soft key BACK SELECT DSC BEEP INDIVIDUAL GROUP ALL SHIPS POS REQUEST ON ON ON OFF 6 Press the keys to select OFF then press the ENTER soft key BACK ENTER POS REQUEST OFF ON 7 Press the 16 S...

Page 68: ... REQUEST POS REPORT 2 Press the keys to select DSC then press the SELECT soft key 3 Press the keys to select POS REPORT and then press the SELECT soft key To cancel press the BACK soft key 4 Press the keys to select HISTORY or MEMORY then press the SELECT soft key BACK SELECT POS REPORT HISTORY MEMORY NEW ID 5 Press the keys to select an individual you want to contact then press the SELECT soft ke...

Page 69: ...5 Press the keys to scroll through numbers 0 to 9 BACK SELECT FINISH NEW ID MMSI 3 6 Press the SELECT soft key to store the number and step to the next digit to the right 7 Repeat steps 5 and 6 until the MMSI is complete If a mistake was made entering in the MMSI number press the keys repeatedly until the wrong number is highlighted then press the keys to correct the entry 8 After the ninth number...

Page 70: ...tences DSC and DSE to a connect ed GPS chart plotter 2 Press any key on the radio to stop the alarm DSC BEEP needs to be enabled to hear alarm 3 Press the INFO soft key to show the position data transferred from the calling vessel RX POS REPORT YAESU POS 23 56 890N 123 56 890W SINCE 00 05 QUIT INFO 4 Press the keys to change the display to view the received data POS INFO POS 23 56 890N 123 56 890W...

Page 71: ...press the BACK soft key 4 Select DSC BEEP with the keys then press the SELECT soft key BACK SELECT DSC SETUP AUTO POS POLL AUTO POS TIME CH SWITCH TIMER DSC BEEP 5 Select POS REPORT with the keys then press the SELECT soft key BACK SELECT DSC BEEP GROUP ALL SHIPS POS REQUEST POS REPORT ON ON OFF OFF 6 Press the keys to select OFF then press the ENTER soft key BACK ENTER POS REPORT OFF ON 7 Press t...

Page 72: ...S INFO 3 Press the SELECT soft key To cancel press the BACK soft key 4 Press the POS TM soft key to display the position input screen 5 Press the key to select the first digit of your latitude then press the SELECT soft key to step to the next digit 6 Repeat step 5 to enter your latitude and longi tude 7 Enter UTC time in the 24 hour format with the same procedure in step 5 8 If a mistake was made...

Page 73: ... soft key 4 Select AUTO POS POLL with the keys then press the SELECT soft key BACK SELECT DSC SETUP AUTO POS POLL AUTO POS TIME CH SWITCH TIMER DSC BEEP 5 Press the keys to select POS REQUEST or POS REPORT then press the ENTER soft key BACK ENTER AUTO POS POLL POS REQUEST POS REPORT 6 Press the BACK soft key to return to DSC SETUP 9 10 2 Setting up the Polling Time Interval 1 Press the MENU key to...

Page 74: ...to display the menu BACK SELECT BACK SELECT DSC CALL DIST ALERT MSG POS REQUEST POS REPORT AUTO POS POLLING 2 Press the keys to select DSC then press the SELECT soft key 3 Press the keys to select AUTO POS POLLING and then press the SELECT soft key To cancel press the BACK soft key 4 Press the keys to select SELECT ID then press the SELECT soft key BACK SELECT AUTO POS POLLING ACTIVATION START SEL...

Page 75: ...t AUTO POS POLLING and then press the SELECT soft key To cancel press the BACK soft key 4 Press the keys to select ACTIVATION START then press the SELECT soft key BACK SELECT AUTO POS POLLING ACTIVATION START SELECT ID 5 Press the keys to select START then press the SELECT soft key BACK SELECT ACTIVATION START START STOP 6 Press the 16 S key or press the BACK soft key to return to radio opera tion...

Page 76: ...hen press the SELECT soft key BACK SELECT TEST CALL MEMORY NEW ID 5 Press the keys to select an individual you want to contact then press the SELECT soft key BACK SELECT MEMORY YAESU USCG MEMORY SHIPS HORIZON 6 Press the YES soft key to transmit the test signal TEST CALL YAESU CATEG SAFETY Transmit a Call YES NO 7 After the DSC test call is transmitted the GX1300 waits for a reply from the radio w...

Page 77: ...and 6 until the MMSI is complete If a mistake was made entering in the MMSI number press the keys repeatedly until the wrong number is highlighted then press the keys to correct the entry 8 After the ninth number has been entered press the FINISH soft key 9 Press the YES soft key to transmit the test signal TEST CALL 366901555 CATEG SAFETY Transmit a Call YES NO 10 After the DSC test call is trans...

Page 78: ... a DSC test call to the GX1300 the radio automatically reply an acknowledgement The display shows the MMSI or the name of the vessel transmitting the DSC test call RX TEST CALL YAESU DSC TEST REPLY SINCE 00 05 Transmitted QUIT Press the QUIT soft key to return to radio operation ...

Page 79: ...LECT POLLING CALL HISTORY MEMORY NEW ID 5 Press the keys to select an individual you want to contact then press the SELECT soft key BACK SELECT MEMORY YAESU USCG MEMORY SHIPS HORIZON 6 Press the YES soft key to transmit the polling signal POLLING CALL YAESU CATEG ROUTINE Transmit a Call YES NO 7 After the polling call is transmitted the GX1300 waits for a reply from the radio which was called and ...

Page 80: ...and 6 until the MMSI is complete If a mistake was made entering in the MMSI number press the keys repeatedly until the wrong number is highlighted then press the keys to correct the entry 8 After the ninth number has been entered press the FINISH soft key 9 Press the YES soft key to transmit the polling signal POLLING CALL 366901555 CATEG ROUTINE Transmit a Call YES NO 10 After the polling call is...

Page 81: ...a polling call to the GX1300 the radio automatically reply an acknowl edgement The display shows the MMSI or the name of the vessel transmitting the polling call RX POLLING CALL YAESU POLLING REPLY SINCE 00 05 Transmitted QUIT Press the QUIT soft key to return to radio operation ...

Page 82: ...ay the menu BACK SELECT BACK SELECT DSC CALL AUTO POS POLLING TEST CALL POLLING CALL DSC LOG 2 Press the keys to select DSC then press the SELECT soft key 3 Press the keys to select DSC LOG and then press the SELECT soft key To cancel press the BACK soft key 4 Press the key to select TRANSMITTED LOG then press the SELECT soft key BACK SELECT DSC LOG TRANSMITTED LOG DISTRESS LOG OTHER CALL LOG LOG ...

Page 83: ...SC LOG 2 Press the keys to select DSC then press the SELECT soft key 3 Press the keys to select DSC LOG and then press the SELECT soft key To cancel press the BACK soft key 4 Press the key to select DISTRESS LOG then press the SELECT soft key BACK SELECT DSC LOG TRANSMITTED LOG DISTRESS LOG OTHER CALL LOG LOG DELETE 5 Press the key to select the station name or MMSI number you want to review Note ...

Page 84: ...LLING TEST CALL POLLING CALL DSC LOG 2 Press the keys to select DSC then press the SELECT soft key 3 Press the keys to select DSC LOG and then press the SELECT soft key To cancel press the BACK soft key 4 Press the key to select OTHER CALL LOG then press the SELECT soft key BACK SELECT DSC LOG TRANSMITTED LOG DISTRESS LOG OTHER CALL LOG LOG DELETE 5 Press the key to select the station name or MMSI...

Page 85: ... DSC then press the SELECT soft key 3 Press the keys to select DSC LOG and then press the SELECT soft key To cancel press the BACK soft key 4 Press the key to select LOG DELETE then press the SELECT soft key BACK SELECT DSC LOG TRANSMITTED LOG DISTRESS LOG OTHER CALL LOG LOG DELETE 5 Press the key to select the category TRANSMITTED LOG DISTRESS LOG OTHER CALL LOG or ALL LOG to be deleted then pres...

Page 86: ... the catego ry list OK LOG DELETE TRANSMITTED LOG Complete NOTE The procedure above will delete logged calls of the selected category all at once To delete logged calls one by one review details of a call you want to delete then press the DELETE soft key ...

Page 87: ... DIMMER CONTRAST KEY BEEP LOCATION FORMT 5 Press the keys to select the desired level When OFF is selected the lamp is extinguished 5 BACK ENTER DIMMER 6 Press the ENTER soft key to store the selected level 7 To exit this menu and return to radio operation press the BACK soft key 10 1 2 LCD Contrast This selection sets up the display contract to optimize the viewing angle for the varying mounting ...

Page 88: ... the MENU key to display the menu BACK SELECT BACK SELECT SETUP DSC SETUP CHANNEL SETUP CONFIGURATION 2 Press the keys to select SETUP then press the SELECT soft key 3 Press the keys to select CONFIGURA TION then press the SELECT soft key 4 Select KEY BEEP with the keys then press the SELECT soft key BACK SELECT CONFIGURATION DIMMER CONTRAST KEY BEEP LOCATION FORMT 5 Press the keys to select the d...

Page 89: ...e keys to select the desired coordinate system BACK ENTER LOCATION FORMAT dd mm mmm dd mm mm dd mm SS 6 Press the ENTER soft key to store the selected level 7 To exit this menu and return to radio operation press the BACK soft key 10 1 5 Time Offset This selection sets the time offset from UTC time GPS sends to radio Refer to section 6 6 CHANGING THE GPS TIME for details 10 1 6 Time Display This s...

Page 90: ...en press the SELECT soft key 4 Select UNIT OF MEASURE with the keys then press the SELECT soft key BACK SELECT CONFIGURATION TIME AREA TIME FORMAT UNIT OF MEASURE SOFT KEY 5 Press the keys to select DISTANCE then press the SELECT soft key BACK ENTER UNIT OF MEASURE DISTANCE nm 6 Press the keys to select the unit BACK ENTER DISTANCE statute mile nautical mile kilometer 7 Press the ENTER soft key to...

Page 91: ...eys then press the SELECT soft key BACK SELECT CONFIGURATION TIME FORMAT UMIT OF MEASURE SOFT KEY RESET 5 Press the keys to select KEY ASSIGN MENT then press the SELECT soft key BACK SELECT SOFT KEY KEY ASSIGNMENT KEY TIMMER 6 Press the keys to select the desired soft key number then press the SELECT soft key BACK ENTER KEY ASSIGNMENT 1 SCAN 2 WX CH 3 SCAN MEMORY 4 DW TW 7 Press the keys to select...

Page 92: ...ys to select SETUP then press the SELECT soft key 3 Press the keys to select CONFIGURA TION then press the SELECT soft key 4 Select SOFT KEY with the keys then press the SELECT soft key BACK SELECT CONFIGURATION TIME FORMAT UMIT OF MEASURE SOFT KEY RESET 5 Press the keys to select KEY TIMER then press the SELECT soft key BACK SELECT SOFT KEY KEY ASSIGNMENT KEY TIMMER 6 Press the keys to select how...

Page 93: ...ANNEL SETUP then press the SELECT soft key 4 Press the key to select WEATHER ALERT then press the SELECT soft key BACK SELECT CHANNEL SETUP CHANNEL GROUP WEATHER ALERT MULTI WATCH SCAN MEMORY 5 Press the keys to select ON or OFF BACK ENTER WEATHER ALERT OFF ON 6 Press the ENTER soft key to store the selected setting 7 Press the BACK soft key to exit the menu and return to radio operation 10 2 3 Mu...

Page 94: ...ress the SELECT soft key 3 Press the key to select CHANNEL SETUP then press the SELECT soft key 4 Press the key to select SCAN RESUME then press the SELECT soft key BACK SELECT CHANNEL SETUP SCAN TYPE SCAN RESUME PRIORITY CH SUB CH 5 Press the keys to select the desired resume time BACK ENTER SCAN RESUME 1 sec 2 sec 3 sec 4 sec 6 Press the ENTER soft key to store the selected setting 7 Press the B...

Page 95: ...o select CHANNEL SETUP then press the SELECT soft key 4 Press the key to select SUB CH then press the SELECT soft key BACK SELECT CHANNEL SETUP SCAN TYPE SCAN RESUME PRIORITY CH SUB CH 5 Press the keys to select the sub channel BACK ENTER SUB CH CH 9 CH 10 CH 11 CH 12 S CH 6 Press the ENTER soft key to store the selected setting 7 Press the BACK soft key to exit the menu and return to radio operat...

Page 96: ...SC individual call requesting you to switch to a working channel for voice communications When the manual response is selected the MMSI of the calling vessel is shown allowing you to see who is calling This function is similar to caller id on a cellular phone Refer to section 9 5 2 Setting up Individual Call Reply for setting 10 3 3 Individual Acknowledgement The radio can be setup to transmit a r...

Page 97: ...pe The GX1300 has the capability to automatically track four vessels programmed into the individual directory This selection allows you to select the call type used in the auto position polling Refer to section 9 10 1 Setting up the Polling Call Type for setting 10 3 7 Auto Position Polling Interval Time The GX1300 has the capability to automatically track four vessels programmed into the individu...

Page 98: ...e BACK soft key 4 Select CH SWITCH TIMER with the keys then press the SELECT soft key BACK SELECT DSC SETUP AUTP POS POLL AUTO POS TIME CH SWITCH TIMER DSC BEEP 5 Press the keys to select the desired time then press the ENTER soft key The switching time can be set to OFF 10 sec 30 sec 1 min or 2 min BACK ENTER CH SWITCH TIMER OFF 10 sec 30 sec 1 min 6 Press the BACK soft key to exit the menu and r...

Page 99: ... contact your Dealer or our repair facility 11 1 REPLACEMENT PARTS Commonly requested parts and their part numbers are listed below Power Cord T9025406 VOL SQL Knob Black RA6018100 VOL SQL Knob White RA6018000 Mounting Bracket Black RA097840A Mounting Bracket White RA097830A Mounting Bracket Knob Black RA0978600 Mounting Bracket Knob White RA0978500 Microphone Hanger Black RA0458800 Microphone Han...

Page 100: ...he internal or external speaker Accessory cable Check the connections of the accessory cable Possible short circuit on the External speaker cable WHITE SHIELD Receiving station report low transmit p o w e r e v e n w i t h transceiver set to HI power Antenna Have the antenna checked or test the trans ceiver with another antenna If the problem persists contact your Dealer for servicing HI BATTERY o...

Page 101: ...an A adjacent to the alpha channels on the display on others alpha is not indicated but the proper channel is selected based on the U I C setting 3 Bridge to Bridge channels for example Channel 13 are for use by bridge operators on inter coastal waterways and rivers It is also used by marine vessels in the vicinity of these bridges for navigation and for communicating with the bridge operators Not...

Page 102: ...ation or the U S Coast Guard The use of these frequencies outside VTS and ship movement sector protected areas is permitted provided they cause no interference to VTS and ship movement communications in their respective designated sectors 10 Use of 156 875 MHz is limited to communications with pilots regard ing the movement and docking of ships Normal output power must not exceed 1 watt 5 156 375 ...

Page 103: ...tside Puget Sound area and its approaches and the Great Lakes 157 425 MHz is also available for communications between commercial fishing vessels and associated aircraft while engaged in commercial fishing activities 14 When the frequency 156 850 MHz is authorized it may be used addition ally for search and rescue training exercises conducted by state or local governments 15 The frequency 156 850 ...

Page 104: ...ship Navigation Safety Bridge to bridge 14 X X X S 156 700 Port operation VTS in selected areas 15 X S 156 750 Environmental Receive only 15 X X S 156 750 Commercial non commercial ship movement 1 W 16 X X X S 156 800 International Distress Safety and Calling 17 X X X S 156 850 State Controlled 1 W 18 X D 156 900 161 500 Port operation ship movement 18A X X S 156 900 Commercial 19 X D 156 950 161 ...

Page 105: ...ns 67 X X X S 156 375 US Commercial Used for Bridge to bridge communications in lower Mississippi River Inter ship only Canada Commercial fishing S R 68 X X X S 156 425 Non commercial Recreational 69 X X X S 156 475 US Non commercial Recreational Canada Commercial fishing only International Inter ship Port operations and Ship movement 70 X X X S 156 525 Digital selective calling voice communicatio...

Page 106: ...ce Marine Operator 83A X X S 157 175 U S Government Only Canadian Coast Guard Only 84 X X X D 157 225 161 825 Public Correspondence Marine Operator 85 X X X D 157 275 161 875 Public Correspondence Marine Operator 86 X X X D 157 325 161 925 Public Correspondence Marine Operator 87 X X S 157 375 Port operation ship movement 87A X S 157 375 Public Correspondence Marine Operator 88 X X S 157 425 Port ...

Page 107: ...chased after 01 01 91 Associated Chargers 1 year if purchased before 01 01 91 3 years if purchased after 01 01 91 Associated Batteries 1 year Note Batteries will be deemed deflective only if storage capacity drops below 80 of rated capacity or if leakage develops Associated Accessories 1 year Includes Microphones Handsets Exter nal Speakers Antennas Carrying Accessories Power Supplies and Signal i...

Page 108: ...imited warranty does not extend to any Product which has been subjected to misuse neglect accident incorrect wiring by anyone other than STANDARD HORIZON improper installation or subjected to use in violation of instructions furnished by STANDARD HORIZON nor does this warranty extend to Products on which the serial number has been removed defaced or changed STANDARD HORIZON cannot be responsible i...

Page 109: ...PT AS EXPRESSLY SET FORTH HEREIN Some states do not allow the exclusion or limitation of incidental or conse quential damages or limitation on how long an implied warranty lasts so the above limitations or exclusions may not apply This warranty gives specific legal rights and there may be other rights which may vary from state to state ONLY PRODUCTS SOLD ON OR AFTER JANUARY 1 1991 ARE COVERED UNDE...

Page 110: ...to the warranty STANDARD HORIZON includes a lifetime flat rate and customer loyalty programs to provide service after the warranty period has expired If you wish to obtain the flat rate price for out of warranty repair you must include the information on the Owner s Record with the unit when you return it to your Dealer or to STANDARD HORIZON Lifetime Flat Rate Service Program For the original Own...

Page 111: ...mory Transmitted 30 DSC Log Memory Distress 30 DSC Log Memory Received 50 Dimensions W x H x D 6 10 x 2 36 x 5 91 155 x 60 x 150 mm Flush Mount Dimensions W x H x D 5 15 x 2 00 x 5 51 131 x 51 x 140 mm Weight 1 91 lb 870 g 14 2 TRANSMITTER Frequency Range 156 025 to 157 425 MHz RF Output 25 W Hi 1 W Lo Conducted Spurious Emissions 80 dB Hi 66 dB Lo Audio Response within 1 3 of a 6 dB octave pre em...

Page 112: ...nce Bandwidth 7 5 kHz Selectivity Spurious and Image Rejection 75 dB Intermodulation and Rejection at 12 dB SINAD 70 dB Audio Output 4 5 W Audio Response within 1 3 of a 6 dB octave de emphasis characteristic at 300 to 3000 Hz Frequency Stability 4 F to 140 F 20 C to 60 C 0 0003 Channel Spacing 25 kHz DSC Format ITU R M 493 13 NMEA Input Output Output DSC DSE Input GLL GGA RMC GNS GSA GSV ...

Page 113: ...Page 113 GX1300 14 4 GX1300 DIMENSIONS 109 7 4 32 3 15 80 0 1 59 40 3 1 17 6 10 6 63 4 96 126 129 5 08 168 4 155 29 7 ...

Page 114: ...5 605 html To obtain a form from the FCC call 888 225 5322 15 2 RADIO CALL SIGN Currently the FCC does not require recreational boaters to have a Ship Radio Station License The USCG recommends the boats registration number and the state to be used when calling another vessel 15 3 CANADIAN SHIP STATION LICENSING You may need a license when traveling in Canada If you do need a license contact their ...

Page 115: ...gy and if not installed and used in accordance with the instructions may cause harmful interference to radio communications However there is no guarantee that interference will not occur in a particular installation If this equipment does cause harmful interference to radio or television reception which can be determined by turning the equipment off and on the user is encouraged to try to correct ...

Page 116: ...gulations CONSIGNES DE SECURITE Votre émetteur récepteur portatif sans fil contient un émetteur à faible puis sance Lorsque vous appuyez sur le bouton Push to Talk PTT l émetteur récepteur émet des signaux de radiofréquence RF En août 1996 la FCC Commission Fédérale des Communications a adopté des directives relatives à l exposition aux RF avec des niveaux de sécurité pour les appareils sans fils ...

Page 117: ...Page 117 GX1300 MEMO ...

Page 118: ...GX1300 Page 118 MEMO ...

Page 119: ...otropically radiated power e i r p is not more than that necessary for successful communication Conformément à la réglementation d Industrie Canada le présent émetteur radio peut fonctionner avec une antenne d un type et d un gain maximal ou inférieur approuvé pour l émetteur par Industrie Canada Dans le but de réduire les risques de brouillage radioélectrique à l intention des autres utilisateurs...

Page 120: ...20 Copyright 2014 YAESU MUSEN CO LTD All rights reserved No portion of this manual may be reproduced without the permission of YAESU MUSEN CO LTD Printed in China YAESU USA 6125 Phyllis Drive Cypress CA 90630 U S A ...

Reviews: