background image

HOW TO CONFIGURE THE CONSOLE  continued

22

HOW TO PAIR THE CONSOLE   continued

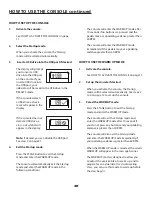
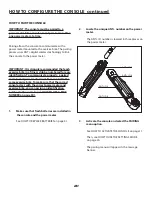
4.         View power sensor ANT+ ID number

When PAIRING is displayed on the message 

banner, press the 

STAGE button.  The 

ANT+ ID number 

associated with the 

console will appear at 

the bottom of the 

screen.

IMPORTANT:  This number must match the 

ANT+ ID number on the power meter.

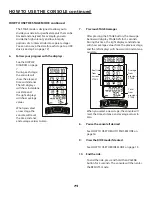
5.         Begin the Pairing Process

Press the STAGE button.

ENTER ANT will appear on

the message banner. 

Press the STAGE button.

5 numbers will appear on

the message banner.


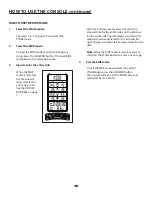
6.         Enter Ant+ ID Number located on the power

             meter.

Use the BACKLIGHT 

button to select 

the number.

The number will

increase from 0-9 and

return to 0.

Use the AVG/END button to move to the next 

digit. The highlight will move from left to right 

and return to the first digit.

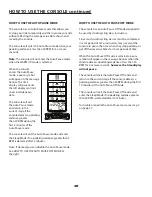
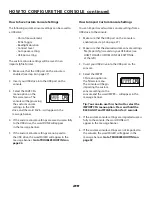
7.         Pair Console

When the number matches the ANT+ ID number 

on the power meter, Press the STAGE button to 

begin pairing.

Spin the power

meter on the bike.

This will wake the

power meter and 

allow the console 

to link to it.

The console will

search for the power

meter for 30-seconds.

Summary of Contents for SIC1

Page 1: ...this manual before using this equipment Keep this manual for future reference QUESTIONS If you have questions or if parts are damaged or missing please see HOW TO CONTACT CUSTOMER CARE on the back co...

Page 2: ...AGRAM 5 POWER METER DIAGRAM 6 DISPLAY DIAGRAM 7 DISPLAY DEFINITIONS 8 HOW TO USE THE CONSOLE 11 HOW TO LINK ANT COMPATIBLE DEVICES 18 HOW TO CONFIGURE THE CONSOLE 20 MAINTENANCE 31 TROUBLESHOOTING 31...

Page 3: ...s of the console are adequately informed of all precautions 6 Keep the console indoors away from moisture and dust Do not put the console in a garage or covered patio or near water 7 Inspect and prope...

Page 4: ...heart rate monitor signal in a range of approximately 2 to 3 meters Note A heart rate monitor is not included with the console USB DATA STORAGE The console has a USB port that can be used with commerc...

Page 5: ...n Button STAGE Enter Select Button USB Port LCD Message Banner AVG END Up Button Console Serial Number Batteries Battery Compartment USB Port Battery Cover Screw Rechargeable Battery Pack not included...

Page 6: ...POWER METER DIAGRAM Batteries Battery Door Serial Number Power Meter Pedal Mounting Threads Crank Arm Bolt Battery Door Gasket Crank Arm 6 Battery Door Screw Battery Compartment...

Page 7: ...f the user wears a compatible heart rate monitor not included displays the heart symbol heart rate instantaneous average and maximum Heart rate symbol flashes when connected to monitor 8 KCAL Displays...

Page 8: ...verage values in the right displays Ride data for each STAGE will also be saved in the console memory for the RESULTS mode If a user inserts a USB drive into the USB port before entering the STAGE mod...

Page 9: ...calories are also known as gram calories Small calories are very small units and are not used in nutri tional contexts The console will use the following formula to convert the kilojoules value to th...

Page 10: ...per hour to 20 miles per hour The speed value calculated by the console is based directly on the amount of power produced by the user This speed value is more realistic and consistent than the speed...

Page 11: ...to activate the console The displays will then light and the console will be ready for use HOW TO TURN OFF THE CONSOLE To conserve battery power the console will automati cally enter the Sleep Mode i...

Page 12: ...after 10 seconds if no buttons are pressed and the pedals move at a pedaling cadence greater than 20 RPM The console will enter the WARM UP mode immediately if the pedals move at a pedaling cadence g...

Page 13: ...1 Activate the console See HOW TO ACTIVATE THE CONSOLE on page 11 2 Set up the console if desired When you activate the console the Startup mode will be selected automatically See HOW TO SET UP THE C...

Page 14: ...When you select a new stage the console will reset the time distance and average values to zero 7 Previous STAGE Averages After pressing the STAGE button the message banner will display STAGE AVG for...

Page 15: ...for the entire ride so far See the DISPLAY DIAGRAM on page 7 The time and distance displays will show the elapsed time for the entire ride and the distance for the entire ride The left displays will s...

Page 16: ...than 5 RPM is detected after 3 minutes Note If desired you can disable the Auto Pause mode See HOW TO USE THE AUTO PAUSE OFF MODE at the right HOW TO USE THE AUTO PAUSE OFF MODE The console has an Au...

Page 17: ...there is a USB drive inserted into the USB port see step 3 on page 12 the data for the ride will also be saved to the USB drive See the DISPLAY DIAGRAM on page 7 The time and distance displays will sh...

Page 18: ...o the ANT module See HOW TO LINK A HEART RATE MONITOR at the right to link your ANT compatible heart rate monitor to the ANT module See HOW TO LINK A FITNESS WATCH OR MOBILE DEVICE on page 19 to link...

Page 19: ...on page 11 Then press the STAGE button to enter the WARM UP mode Note The console must be in the WARM UP mode to link to an ANT compatible fitness watch or mobile device The fitness watch or mobile de...

Page 20: ...s the STAGE button to select a menu option or enter a setting Press the BACKLIGHT button to move to the previous menu option Press the AVG END button to move to the next menu option The settings menu...

Page 21: ...console and power meter must be mounted to the same exercise bike To make sure that the correct console stays with the correct power meter and exercise bike you can assign an identification number to...

Page 22: ...sage banner Press the STAGE button 5 numbers will appear on the message banner 6 Enter Ant ID Number located on the power meter Use the BACKLIGHT button to select the number The number will increase f...

Page 23: ...ce the power meter next to the console so that they are side by side d Make sure that no other ANT devices in the area are active Pair only one console and one power meter at a time e See steps 3 to 6...

Page 24: ...least one revolution to ensure that it is awake and ready to communi cate Position the power meter vertically 6 o clock and ensure that there is no load on the pedals and the bike is stable Note If t...

Page 25: ...to enter the WARM UP mode e Press and hold the BACKLIGHT button for 3 seconds Note The zero reset process will begin immediately Ensure that steps a and b have been completed f Go to step 5 on page 24...

Page 26: ...n the OFF backlight duration is selected the backlight will not light When you select the BK LT TIME menu option you can select a backlight duration from the backlight time menu Note The default backl...

Page 27: ...on the console Note The default option is USB ON The currently selected USB option will be displayed with a dark background When the USB OFF option is selected the USB port cannot be used to save rid...

Page 28: ...this menu option to reset your custom console settings to the manufacturer s default settings See HOW TO RESTORE DEFAULT SETTINGS on page 30 How to Upgrade Firmware IMPORTANT Upgrading the firmware i...

Page 29: ...ar in the message banner Go to TROUBLESHOOTING on page 32 How to Import Custom Console Settings You can import saved custom console settings from a USB drive to the console 1 Make sure that the USB po...

Page 30: ...atches the identification number of the exercise bike If there is a communication problem between the console and the sensor you can view the bike number and make sure that the console is attached to...

Page 31: ...rovide good battery life when used The console and the power meter can also use C and AA NiMH nickel metal hydride rechargeable batteries These batteries have longer battery life for each charge compa...

Page 32: ...S INCLUDING WITHOUT LIMITATION WARRANTIES OF MERCHANTABILITY AND FITNESS FOR A PARTICULAR PURPOSE AND WARRANTIES AGAINST HIDDEN OR LATENT DEFECTS TO THE EXTENT PERMITTED BY LAW IN SO FAR AS SUCH WARRA...

Reviews: