Stadler Form BLENDER SIX SFB.555 Operation Instructions Manual Download Page 6

English

BLENDER SIX SFB.555

Congratulations on your purchase of a Blender Six!

Using this blender will easily solve a variety of cooking tasks, diversify your 
menu and accelerate the process of cooking. Convenience and ease of use 
will bring you an undoubted pleasure.

IMPORTANT SAFETY INSTRUCTIONS 

Read carefully and save all the instructions provided with an appliance.


• Do not handle appliance with wet hands.


• Avoid contact with moving parts.


• Do not touch the blade while it is operating, as it is very sharp. After 

the appliance has been switched off the blade will continue to rotate a 
moment longer.


• Do not use the appliance with hot oil, as there is a risk of burns due to 

splashing.


• Hold the stick blender firmly and up right while using it.


• Do not operate the appliance without a workload.


• When using extremely heavy loads, the appliance should not be operated 

for more than 4 seconds. 


• Never insert metal or other utensils, such as knives or forks, into the in-

side of the bowl while the appliance is operating.


• Always turn the power off at the power outlet before you insert or remove 

a plug. Remove by grasping the plug - do not pull on the cord.


• Turn the power off and remove the plug when the appliance is not in use 

and before cleaning.


• Do not use your appliance with an extension cord unless this cord has 

been checked and tested by a qualified technician or service person.


• Always use your appliance from a power outlet of the voltage marked on 

the appliance.


• This appliance is not intended for use by persons (including children) with 

reduced physical, sensory or mental capabilities, or lack of experience 
and knowledge, unless they have been given supervision or instruction 
concerning use of the appliance by a person responsible for their safety.


• Children should be supervised to ensure that they do not play with the 

appliance.


• The temperature of accessible surfaces may be high when the appliance 

is operating.


• Never leave an appliance unattended while in use.


• Do not use an appliance for any purpose other than its intended use.


• Do not place an appliance on or near a hot gas flame, electric element or 

on a heated oven.


• Do not place on top of any other appliance.


• Do not let the power cord of an appliance hang over the edge of a table or 

bench top or touch any hot surface.


• Do not operate any electrical appliance with a damaged cord or after the 

appliance has been damaged in any manner. If damage is suspected, re-

turn the appliance to the nearest Appointed Service Centre for examina-
tion, repair or adjustment.


• Do not immerse the appliance in water or any other liquid unless recom-

mended.


• Appliances are not intended to be operated by means of an external timer 

or separate remote control system.


• This appliance is intended to be used in household and similar applica-

tions such as: staff kitchen areas in shops, offices and other working en-
vironments; farm houses; by clients in hotels, motels and other residential 
type environments; bed and breakfast type environments. 
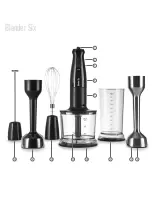
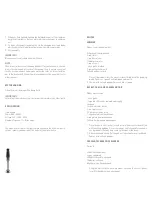
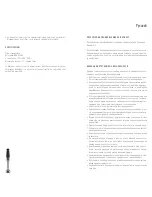
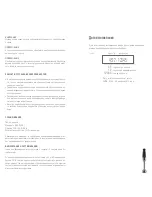
DESCRIPTION 

1.  Variable speed control Allows the optimum speed to be used for various 

food processing tasks.

2.  Power button. Pressing the ( • ) button will operate the stick blender at 

the speed selected on the variable speed control dial.

3.  Turbo speed button. Pressing the ( •• ) button will provide an extra 

boost of power.

4.  900 Watt motor housing. High powered 900 Watt motor for the most 

demanding blending tasks.

5.  Detachable stainless steel shaft
6.  Detachable plastic shaft 
7.  Shaft cup
8.  Ice crushing blades. Unique blade design with vertical teeth for optimal 

blending. Crushes ice in seconds.

9.  1 L beaker with non-slip mat
10. Chopper with non-slip mat. 750ml bowl conveniently attaches to the 

stick blender motor housing to chop a variety of food including meats, 
vegetables, nuts and herbs.

11. Chopping blade.
12. Milk frother attachment. Frothes warm or cold milk in an instant and is 

ideal for baby chinos, hot chocolates or froth for other beverages.

13. Whisk attachment. Ideal for beating egg whites and mixing light batters.
14. Wall mount. Holds motor housing with attachment when not in use.

Operation with metal shaft, plastic shaft, whisk, milk frother

IMPORTANT

Ensure that the stick blender is unplugged from the power outlet before 
assembling or removing attachments.

1.  Insert the motor housing into the hole on the top of the attachment; rota-

te it in a clockwise direction until it locks into position.

2.  Plug the power cord into a 220-240 volt power outlet.
3.  Select the optimal speed for the processing task, by turning the speed 

control dial. The small dot on the speed control dial is the slowest and 
big dot is the fastest. Then lower the stick blender into food and depress 
the power button ( • ).

Summary of Contents for BLENDER SIX SFB.555

Page 1: ...Blender Six Gebrauchsanweisung Operating instructions Mode d emploi Инструкция по эксплуатации ...

Page 2: ...Blender Six 1 2 3 4 7 5 8 9 10 11 13 6 12 ...

Page 3: ...b eines Geräts der Premiumklasse des Blenders Six Die Nutzung des Blenders wird es erlauben mit Leichtigkeit verschiedene kulinarische Aufgaben zu lösen Ihr Menü abwechslungsreicher zu gestal ten und den Prozess der Zubereitung zu beschleunigen und die bequeme und einfache Handhabung wird Ihnen zweifellos Genuss bringen WICHTIGE SICHERHEITSHINWEISE Vor der Nutzung lesen Sie bitte aufmerksam die Be...

Page 4: ...chale mit einem Elektromotor an der An triebseinheit zusammen und drehen fest um den Deckel fest zu verrie geln 5 Setzen Sie den Deckel auf der Zerkleinerungsschale an 6 Stecken Sie den Stecker des Netzkabels in die Steckdose 220 240 V 7 Wählen Sie die optimale Geschwindigkeit mit dem Zifferblatt der tiefste Punkt des Schiebers entspricht der minimalen Geschwindigkeit maxi mal Höchstgeschwindigkei...

Page 5: ...omotor abwaschen kann 2 Aufsatzarbeitsbereich könnte man unter fließendem Wasser und einem milden Reinigungsmittel gereinigt werden Die Aufsatzfixierzone mit ei nem sauberen feuchtes Tuch zu reinigen Nach der Reinigung wischen Sie alle Teile des Aufsatzes gründlich mit einem weichen Tuch VORSICHT Die Klingen sind sehr scharf Vorsicht beachten beim Umgang mit ihnen HINWEIS Wenn die Messer stumpf si...

Page 6: ... a table or bench top or touch any hot surface Do not operate any electrical appliance with a damaged cord or after the appliance has been damaged in any manner If damage is suspected re turn the appliance to the nearest Appointed Service Centre for examina tion repair or adjustment Do not immerse the appliance in water or any other liquid unless recom mended Appliances are not intended to be oper...

Page 7: ...f power during operation the turbo speed button may be depressed NOTE The power button should be released when selecting the turbo speed button 9 To stop the stick blender take your finger off the power button or turbo speed button 10 To detach the chopping bowl attachment rotate it counterclockwise un til the two pieces separate Attached Processing task Food Sug gestion setting Suggestion Process...

Page 8: ...otice RECIPES HUMMUS Makes 2 cups approximately 420g can chickpeas drained cup tahini cup lemon juice 1 tablespoon water cup olive oil 1 clove garlic crushed teaspoon ground cumin Salt and pepper to taste 1 Place all ingredients into the processor bowl fitted with the chopping blade Process on speed 9 until combined and smooth 2 Season with salt and pepper Serve as a dip or spread ROCKET CHILLI AN...

Page 9: ...d 5 Using your fist punch down dough fold sides to centre and turn dough over Place dough onto a floured surface and lightly knead until smooth For a thin pizza crust Halve dough Roll dough out to about a 4 5mm thickness and place onto 2 oiled pizza trays For a thick pizza crust Press dough onto an oiled pizza tray and allow to rest in a warm place until dough has risen again 6 Spread with pizza s...

Page 10: ...ith the chopping blade process bread until crumbs are formed Transfer to a bowl 2 Add garlic onions parsley mint and lemon rind to the processor bowl Process on speed 6 until finely chopped 3 Add mince 1 tablespoon lemon juice egg and breadcrumbs Season with salt and pepper Pulse until combined and mixture comes together 4 Remove mixture from bowl divide into 12 patties Place on a plate 5 Heat a f...

Page 11: ...d pepper Transfer to a flat plate 3 Using the whisk attachment whisk egg and milk together in a bowl Place flour in a separate shallow bowl 4 Coat veal lightly in flour shaking off excess Dip in egg mixture Lightly press in breadcrumb mixture 5 Heat oil in a large frypan over medium high heat Cook veal in batches for 2 3 minutes each side or until golden and cooked through Drain on absorbent paper...

Page 12: ...e électrique ne pende pas de la table et ne touche pas de surfaces capables de l endommager qu il ne s emmêle pas et ne se torde pas Ne touchez pas le cordon électrique ou sa fiche avec des mains mouillées Ne tirez pas sur le cordon électrique lors du débranchement du mixeur du réseau électrique Placez le mixeur sur une surface horizontale égale Ne placez pas et n utilisez pas le mixeur près de so...

Page 13: ...our éteindre le mixeur DESCRIPTION DE L APPAREIL L appareil est composé des éléments principaux suivants 1 Le réglage électronique de la vitesse assure la vitesse optimale pour réaliser différentes tâches culinaires 2 Bouton marche En appuyant sur le bouton le mixeur s allume avec la vitesse donnée qui est réglable avec le commutateur en forme de disque 3 Bouton du régime TURBO En appuyant sur le ...

Page 14: ...ppareil électrique Il est interdit d utiliser un appareil électrique en mauvais état ainsi que s il y a des dommages mécaniques ou autres sur l appareil électrique lui même son cordon électrique ou sa fiche 10 Débranchez le mixeur du réseau électrique à la fin du travail ensuite retirez le couvercle tournez et détachez le du bloc avec le moteur élec trique Embout Fonction Plat Vitesse recom mandée...

Page 15: ... жизни и здоровья пользователя Этот электроприбор не предназначен для использования детьми или недееспособными взрослыми без надлежащего контроля а также ли цами не имеющими достаточных навыков по использованию электро приборов и не знакомыми с инструкцией по эксплуатации Не допускайте чтобы дети играли электроприбором Перед подключением блендера к электросети удостоверьтесь в том что напряжение э...

Page 16: ...лез вия ножей очень острые Обратите внимание что сразу после выклю чения блендера лезвия продолжают вращаться в течение нескольких секунд Не промывайте насадку не отсоединив ее от блока с электродвига телем Не используйте блендер вне помещений Во избежание травм и повреждения имущества используйте только оригинальные аксессуары блендера которые входят в комплект при бора Для хранения упакуйте блен...

Page 17: ...пления насадки к блоку с электродвига телем 2 Рабочую зону насадок можно мыть проточной водой с мягким мою щим средством Для чистки фиксирующей зоны насадок используйте чистую влажную салфетку После чистки вытрите все части насадки насухо мягкой салфеткой Насадка Назна чение Блюда Ско рость Дополнительные рекомендации насадка блендер Аэрация насы щение кислоро дом Молочные коктей ли смузи фрук тов...

Page 18: ...на неисправности обусловленные не квалифицированным ремонтом а также неправильной эксплуатацией электроприбора Запрещается использование неисправного электроприбора а также при механических или иных повреждениях самого электроприбора сетевого шнура или его вилки Никогда не разбирайте электроприбор самостоятельно не вставляй те никакие посторонние предметы в отверстия в корпусе электропри бора СПЕЦ...

Page 19: ...шкой и оставьте в теплом месте на 5 минут Добавьте масло 2 Установите лезвия для измельчения в чашу Поместите в чашу муку добавьте соль и дрожжевую смесь и вымешивайте на скорости 1 до получения однородной консистенции примерно 10 15 секунд РЕЦЕПТЫ ХУМУС выход продукта примерно 2 чашки 420г гороха нут предварительно замоченного без жидкости чашки тахини чашки лимонного сока 1 столовая ложка воды ч...

Page 20: ...ную примерно 8 10 минут пока тесто не станет эластичным Готовое тесто скатайте в шар и вы ложите в присыпанную мукой миску накройте пленкой и оставьте в теплом месте на 20 30 минут чтобы тесто подошло 4 Выложите тесто на присыпанную мукой доску Для приготовления тонкой пиццы разделите тесто на две равные части Придайте те сту форму пиццы вручную нажимая на шар теста сверху Выложите основу для пицц...

Page 21: ...Ь В ПРЯНОЙ ПАНИРОВКЕ 4 штуки 4 ломтика подсушенного хлеба из муки грубого помола нарезанного кубиками 1 чашки зелени петрушки 1 столовая ложка мелко нарезанного зеленого лука 1 литр куриного бульона 1 чашки сметаны или сливок по желанию Соль и перец по вкусу 1 Положите тыкву и лук в суповую кастрюлю налейте бульон Доведи те до кипения уменьшите огонь и варите до мягкости тыквы Слегка остудите 2 Пю...

Page 22: ...тита 1 столовая ложка листьев тимьяна 2 зубчика чеснока разрезанного на половинки чашки мелко натертого сыра пармезан Соль и перец по вкусу 1 стакана муки 2 яйца слегка взбитых 2 столовые ложки молока 4 тонких шницеля из телятины Растительное масло для жарки 1 Установите лезвия для измельчения в чашу Поместите в чашу хлеб ные кубики и измельчите в мелкую крошку Выложите в большую миску 2 Положите ...

Page 23: ...why we came up with the idea to develop attractive and appealing household products Martin Stadler Наша общая цель наслаждаться процессом делая жизнь яркой Она также подразумевает внедрение ди зайнерских вещей в повседневную жизнь человека это наш основной принцип Множество бытовых приборов являются важными и полезными обитателями нашего дома вместе с тем они часто гадкие утята в семье Именно поэт...

Reviews: