background image

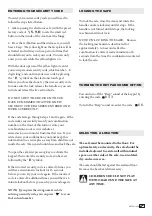
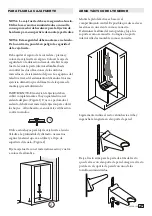
Assemble the tactical gun rests in the center 
compartment.  You may want to elevate the guns on 
a shelf as shown.  Determine the height of the gun 
rest and assemble to the brackets as shown.  
Position the adjustable stock rest to support your 
tactical guns as shown.

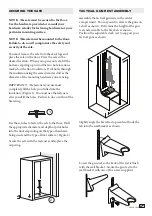
TACTICAL GUN REST ASSEMBLY

Lower the gun rest so the back of the rest is flush 
with the wall bracket.  Secure the gun rest to the  
wall bracket with one of the screws supplied.

Slightly angle the barrel rest upward and hook the 
tab into the wall bracket as shown.

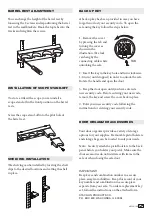
SECURING THE SAFE

1

Secure the safe with the fasteners and replace the 
carpeting.

Use these holes to fasten the safe to the floor.  Drill 
the appropriate diameter and depth of pilot holes 
into the floor depending on the type of hardware 
being used and the type of floor surface. (Figure 2)

You must remove the safe from the skid/legs and 
place the safe on the floor.  Place the safe in the 
desired location.  When you open your safe, lift the 
bottom carpeting up to find the two hole locations 
marked on the floor insulation.  Drill holes through 
the insulation using the same diameter drill as the  
diameter of the mounting hardware you are using.  

IMPORTANT:  The fasteners you use must 
completely fill the hole you drilled into the 
insulation. (Figure 1)  You must use the fasteners 
after you drill the holes.  Failure to do so will void the 
fire rating.

2

NOTE:  The safe must be secured to the floor.   
Use the hardware provided or consult your 
hardware retailer for fastening hardware for your 
particular mounting surface.

NOTE:  This safe must be mounted to the floor.  
Failure to do so will compromise the safety and 
security of the safe.

40356-1409

4

21

Summary of Contents for TS-20-MB-E-S

Page 1: ...s TS 20 MB E S WARNING Tip Over Hazard A child or adult can tip the safe and be killed or seriously injured Failure to secure the safe as shown in these instructions can result in death or serious inj...

Page 2: ...the front foam packaging NOTE Do not use this handle to move the safe HANDLE ASSEMBLY You must first install the battery which is located in the front protective styrofoam After installing the battery...

Page 3: ...e electronic touch pad Before you close the door try the new security code to make sure the lock releases the handle so you can turn it and retract the live action bolts DO NOT SHUT THE DOOR UNTIL YOU...

Page 4: ...nding on the type of hardware being used and the type of floor surface Figure 2 You must remove the safe from the skid legs and place the safe on the floor Place the safe in the desired location When...

Page 5: ...ing the cover as shown in the illustration The lock can hang by the connecting cable while unlocking the safe BACK UP KEY The shelving can be installed by locating the shelf clips to the desired locat...

Page 6: ...urchased___ ___ ____ Owner s Address ___________________________ Unit or Apt Number _________________ City ___________________________ State _______________ Zip Code________________ Telephone Number _...

Page 7: ...HICH HAS BEEN SUBJECT TO EXCESSIVE USE ACCIDENT NEGLIGENCE INCORRECT MAINTENANCE ALTERATION OR REPAIR BY ANYONE OTHER THAN STACK ON ABUSE OR MISUSE THIS WARRANTY IS EXCLUSIVE AND EXPRESSLY IN LIEU OF...

Page 8: ...e blessure grave Le fait de ne pas fixer le coffre tel qu illustr dans les pr sentes instructions peut causer la mort ou des blessures graves aux enfants et aux adultes Les enfants ne doivent pas joue...

Page 9: ...do para activarla Le clavier reste allum pendant 10 secondes INSTALLATION DES PILES Vous devez d abord installer la pile situ e dans le panneau isolant de polystyr ne du devant LANGUETTE Pour ouvrir l...

Page 10: ...personnelle qui peut tre compos de trois huit chiffres et confirmez ensuite votre nouveau code en appuyant sur le symbole sur le clavier lectronique Avant de fermer la porte essayez votre nouveau code...

Page 11: ...devez retirer le coffre fort de la palette jambes et placer la s curit au sol Placez le coffre fort l endroit d sir Lorsque vous ouvrez votre coffre soulevez le bas de la moquette trouver les deux em...

Page 12: ...me il est indiqu dans l illustration Le c ble de connexion peut supporter le poids de la serrure pendant le d verrouillage du coffre OUVERTURE AVEC LA CL ACCESSOIRES RANGE TOUT DE PORTE L tag re peut...

Page 13: ...__ No d appartement _____________ Ville ___________________________ Province _______________ Code postal___________ T l phone ____ _____________________ T l copieur ____ ________________________ Courr...

Page 14: ...IDENTEL N GLIGENT ABUSIF D UNE MAUVAISE UTILISATION D UN ENTRETIEN INCORRECT D ALT RATIONS OU DE R PARATIONS PAR QUICONQUE AUTRE QU UN REPR SENTANT DE STACK ON CETTE GARANTIE EST EXCLUSIVE ET REJETTE...

Page 15: ...tr nicos discos para computadora medios audio visuales o negativos de fotograf as en la caja fuerte Estos materiales no sobrevivir n la temperatura interna clasificada para la caja fuerte Estos materi...

Page 16: ...arla El teclado permanecer iluminada durante 10 segundos INSTALACI N DE LAS PILAS Primero debe instalar la pila que se encuentra en el hule espuma protector al frente de la unidad Para abrir una cerra...

Page 17: ...sonal de seguridad mismo que puede ser de 3 8 d gitos y confirme el c digo oprimiendo la tecla del teclado Antes de cerrar la puerta pruebe su c digo nuevo para asegurarse de que se abra el seguro de...

Page 18: ...suelo Figura 2 Debe quitar el seguro de la corredera piernas y colocar la caja fuerte en el piso Colocar la caja de seguridad en la ubicaci n deseada Al abrir la caja fuerte levante la parte inferior...

Page 19: ...djunto INSTALACI N DE LAS PARRILLAS INSTALACI N DEL SEPARADOR PARA ESCOPETAS Enrosque el separador de escopetas en el agujero piloto del descanso del ca n AJUSTE DEL DESCANSO DEL CA N Usted podr cambi...

Page 20: ..._____________________________ No Interior _________________ Ciudad ________________________ Estado _______________ C P ________________ No Tel fono ____ ___________________ No Fax ____ ______________...

Page 21: ...O QUE HA ESTADO EXPUESTO A USO EXCESIVO ACCIDENTE NEGLIGENCIA MANTENIMIENTO INCORRECTO ALTERACI N O REPARACI N POR CUALQUIER OTRO QUE NO SEA STACK ON ABUSO O MAL USO ESTA GARANT A ES EXCLUSIVA Y EXPRE...

Reviews: