background image

AMP


RIGHT REAR

RIGHT FRONT

WHITE-BLACK LF 

GREEN-BLACK LR

WHITE LF+

LEFT REAR

GREEN LR+

LEFT FRONT

GREY RF+

VIOLET RR+

VIOLET-BLACK RR

GREY-BLACK RF

RED

FUSE 

YELLOW

BLACK

L

-C

H

R

-C

H

L

-C

H

WHITE

R

-C

H

RED

WHITE

RED

BLUE

20-PIN

AUDIO/POWER

HARNESS

ANTENNA

JACK

ANTENNA

EXTENDER

CABLE

(Not supplied)

GREY

FRONT

CHANNEL

10 

11  12  13  14  15 

16  17  18  19  20

Figure 1

Pin View

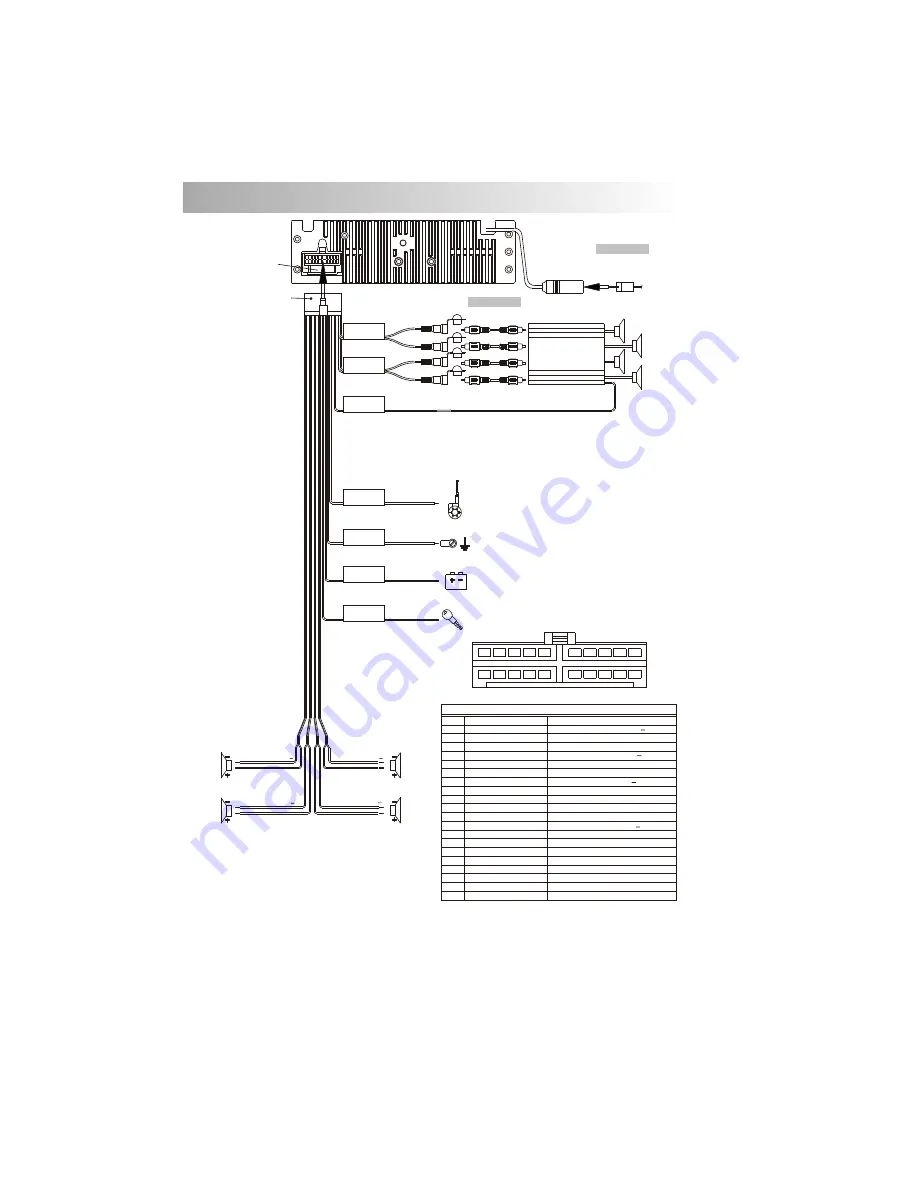
20 PIN HARNESS PIN CHART

PIN 

WIRE COLOR

FUNCTION / LABEL

1

2
3
4
5
6
7
8
9

10

11

12
13
14
15
16
17
18
19
20

GREY / BLACK
GREY
VIOLET
VIOLET/BLACK

GREEN
GREEN / BLACK
RED
BLACK
RED
WHITE
WHITE / BLACK
BLUE/WHITE 
BLUE
YELLOW
BLACK
WHITE 
RED
BLACK
WHITE

RIGHT FRONT SPEAKER (   )

LEFT REAR SPEAKER (+)

LEFT FRONT SPEAKER (+)

POWER AMPLIFIER REMOTE (+)

CHASSIS GROUND
LEFT FRONT PRE-AMPLIFIER LINE OUT

LEFT REAR PRE-AMPLIFIER LINE OUT

LEFT FRONT SPEAKER (   )

POWER ANTENNA
BATTERY (+)

RIGHT FRONT PRE-AMPLIFIER LINE OUT
FRONT PRE-AMPLIFIER LINE OUT COMMON

RIGHT FRONT SPEAKER (+)
RIGHT REAR SPEAKER (+)
RIGHT REAR SPEAKER (    )

LEFT REAR SPEAKER (   )
IGNITION (ACC)
REAR PRE-AMPLIFIER LINE OUT COMMON
RIGHT REAR PRE-AMPLIFIER LINE OUT 

(See Figure 1 )

POWER

AMPLIFIER

REMOTE

REAR

CHANNEL

BLACK

BLUE/WHITE 

STRIPE

Connect to power amplifier, If not used, 
Tape bare end of wire.

Power Antenna
Connect to power antenna or amplifier,
If not used, Tape bare end of wire.

Ground
Connect to ground terminal or clean
unpainted metal part of chassis.

Memory / Battery
Connect to battery or 12 volt power source 
that is always live.  The radio will not work if 
this wire is not connected.

Accessory / Ignition
Connect to existing radio wire or radio fuse.

RCA-TO-RCA

CABLES

(Not supplied)

20 PIN AUDIO / POWER HARNESS

POWER ANTENNA/

AMPLIFIER REMOTE

GROUND

+12 VOLTS
CONSTANT

+12 VOLTS
SWITCHED

 7. WIRING DIAGRAM - POWER / SPEAKERS (20 PIN)

9

EMPTY

N/A

Summary of Contents for S6000V

Page 1: ......

Page 2: ...L 8 WIRING DIAGRAM AUDIO VIDEO CONNECTIONS 9 WIRING DIAGRAM POWER SPEAKERS 10 CONTROL PANEL FUNCTION 11 REMOTE FUNCTION 13 BASIC OPERATIONS 15 AUDIO OPERATION 15 TUNER OPERATION 16 CD OPERATION 19 MP3...

Page 3: ...CAUSE HAZARDOUS RADIATION IF EXPOSED DIRECTLY BE SURE TO OPERATE THE MOBILE DVD PLAYER CORRECTLY AS INSTRUCTED USE OF CONTROLS OR ADJUSTMENTS OR PERFORMANCE OR PROCEDURES OTHER THAN THOSE SPECIFIED HE...

Page 4: ...numbers ALL A DISCS CAN PLAY WITH THIS UNIT C DISCS WHICH CAN NOT BE PLAYED D NOTE ON REGION CODE E DISC MAINTENANCE 3 B FORMAT CAN PLAY WITH THIS UNIT Digital Versatile Discs DVDs Video CDs VCDs Supe...

Page 5: ...store where you purchased the player full detachable DVD head unit Remote control Lithium Battery Extended remote control sensor jack cable 3V CR2025 Audio Video cable Half Sheeve Insert Key 1 Dashbo...

Page 6: ...air from heater or where it would be subject to dust dirt or excessive vibration Be sure to remove the front panel before installing the unit DIN FRONT REAR MOUNT This unit can be property installed e...

Page 7: ...and half sleeve are not used for method B installation 5 2 4 3 2 5 a Frame b Insert fingers into the groove in the front of frame and pull out to remove the frame When re attaching the frame point th...

Page 8: ...case and be careful not to drop it or subject it to strong shocks When the release button is pressed and the D C P is unlocked the car s vibrations may cause it to fall To prevent damage to the D C P...

Page 9: ...d AUDIO OUT DIGITAL OUTPUT EXTERNAL REMOTE JACK ORANGE PINK REMOTE VIDEO IN 1 VIDEO 1 INPUT YELLOW AUDIO IN 1 R AUDIO 1 INPUT RIGHT AUDIO IN 1 L AUDIO 1 INPUT LEFT VIDEO OUT 1 VIDEO 1 OUTPUT VIDEO OUT...

Page 10: ...POWER ANTENNA BATTERY RIGHT FRONT PRE AMPLIFIER LINE OUT FRONT PRE AMPLIFIER LINE OUT COMMON RIGHT FRONT SPEAKER RIGHT REAR SPEAKER RIGHT REAR SPEAKER LEFT REAR SPEAKER IGNITION ACC REAR PRE AMPLIFIER...

Page 11: ...r Volume AS Memor y 1 Pause Play Short press M4 Menu Tune Up Seek Down Tune Down File Track Down Power Audio Menu OSD Band Set up Set up Ok Repeat Track Repeat Disc Repeat Off Repeat Chapter Repeat Ti...

Page 12: ...Back Ok Ok Track NO Access Track NO Access Track NO Access Track NO Access File NO Access Numeric 1 File NO Access File NO Access File NO Access Numeric 2 Numeric 3 Numeric 4 Left Right Up Down Stop S...

Page 13: ...File NO Access Numeric 9 Numeric 0 iX Bass Band M6 Track NO Access Track NO Access 24 25 26 Track NO Access File NO Access File NO Access File NO Access Numeric 6 Numeric 7 Numeric 8 Sub W 12 M5 23 Tr...

Page 14: ...Spectrum Analyzer mode 1 True Spectrum Analyzer mode 2 True Spectrum Analyzer mode 3 The selected DISPLAY will appear in the display when the unit is turned on 9 DIMMER BUTTON DIM Press the DIMMER bu...

Page 15: ...tion by using the Volume Up or Down button within 5 seconds The following menu items can be adjusted as described above Menu operations Time Set The time on the clock is set to 12 00 by default User c...

Page 16: ...tton to adjust the Fader between the front and rear speakers from R12 full rear to F12 full front C00 represents an equal balance between the front and rear speakers 12 TUNER OPERATION 19 BAND BUTTON...

Page 17: ...Y to resume playback from the location where playback is stopped DVD VCD 1 1 VCD 2 0 SVCD CVD and audio CD 3 Pressing STOP twice is resume playback from the beginning of the disc 18 STOP To operates C...

Page 18: ...like in the Goto function etc 2 Use when playback DVD which need numeric Selection or Input like in the Goto function etc 32 REPEAT 10 13 UP DOWN LEFT RIGHT BUTTON Use to move cursor up down left rig...

Page 19: ...1 Press STOP to stop playback and show the logo screen The player memorizes the location where playback is stopped 2 Press PLAY to resume playback from the location where playback is stopped DVD VCD 1...

Page 20: ...uttons 32 Repeat 10 13 Up Down Left Right button 16 OK button 7 RANDOM To operates CD function through the following keys on the remote control Selecting a Track to Play 1 Use the UP DOWN LEFT RIGHT d...

Page 21: ...an 3 seconds to repeat play the current file And keep on repeat Playing the current file until the repeat play is disabled To disable current file repeat play press REPEAT button less than 3 seconds 1...

Page 22: ...20 or TRACK DOWN 21 button for less than one second to advance to the next FILE on the disc The selected file number will appear on the display Press and Hold TRACK UP 20 or TRACK DOWN 21 button for...

Page 23: ...pictures is five seconds PAUSE NEXT BACK and NUMERIC selection and navigation keys work the same as in other operations 22 1 Press the TITLE key to get a thumbnail view Nine pictures 3x3 will be displ...

Page 24: ...PAUSE to single step forward to the next picture in the video DVD and VCD SVCD CVD only 3 Press PLAY to resume normal playback 18 STOP 1 Press STOP to stop playback and show the logo screen The player...

Page 25: ...ress DVD MENU for the main menu 34 OSD BUTTON 1 Press OSD button once to display the amount of time played and time remaining to be played on the disc For example the OSD may display 24 2 Press OSD bu...

Page 26: ...with the number pad as follows 1 Press ZOOM during normal slow or still playback 33 ZOOM BUTTON 2 Pressing the ZOOM button repeatedly increases the magnification level Three magnification levels are...

Page 27: ...ayback to change the audio language when playback a DVD disc The OSD indicates the current setting by giving the audio track number language audio type and number of channels For example 1 The first p...

Page 28: ...revious chapter 1 Long press FAST FORWARD to fast forward through the disc Each time the button is pressed a new speed 2X 4X 8X or 20X is selected 2 Press PLAY to resume normal playback 3 Long press F...

Page 29: ...bring up the System Setup Menu Please refer to the related description in system Set Up for details operation of Set Up After pressing the Set Up button the LCD will display Set Up and keep on blinkin...

Page 30: ...category 1 Use the UP DOWN direction buttons to select the setting to be changed 2 Press OK to cycle through each possible option or display a list of the options When a list of options appears press...

Page 31: ...es Off Disable display of OSD status messages Divx Subtitle setting is used for choosing the language domain only for Divx After select one language domain alphabet when playback a divx with Divx subt...

Page 32: ...t is PAL If the content is NTSC the Output is NTSC Video Settings 1 2 3 4 5 TV Aspect Ratio TV Output NTSC or PAL View mode The user may select one of the following options Priority content Picture CD...

Page 33: ...ettings 2 Press the LEFT RIGHT direction buttons to select the Audio button Digital Output Setting Selecting the Digital Output setting allows the user to adjust the audio output on S PDIF ports to wo...

Page 34: ...mory If the wrong password was entered no change will occur and the user may attempt to enter the password again 1 A password is always four digits 2 If the password is forgotten the back door passwor...

Page 35: ...iliary Input Section Frequency response Input Maximum Voltage Input Impedance 20Hz to 20KHz 3dB 1200 mV 4 7k ohm Radio Section FM Frequency Range Usable Sensitivity Stereo Separation S N Ratio AM or M...

Page 36: ...el Wiring is not properly connected Check wiring connection The operation keys do not work No sound The built in microcomputer is not operating properly due to noise Press the RESET button Front panel...

Page 37: ......

Reviews: